Stories posted under Pinkbike Community blogs are not edited, vetted, or approved by the Pinkbike editorial team. These are stories from Pinkbike users.
If a blog post is offensive or violates the Terms of Services, please report the blog to Community moderators.
So... Can joe average build a bike frame?
After writing this, I realise this is a fairly long post, so bare with me and I hope you make it to the end.
A brief intro..
So earlier this year I read a blog post about someone making a bamboo bike. It all looked relatively simple, and needed absolutely nothing special tool wise. I kept looking around and saw a few other posts\videos where people had tried, with reasonable amounts of success. I also watched a fair few of the instructional videos on how to make the DIY kits that are sold by a number of companies out there, none of which seemed outside what I thought I could do myself.
Calfee, Bamboo Bicycle club to name a few.
Now I don't know about everybody else, but riding bikes is my obsession\hobby\escape. I've got a family a decent job, and if I'm honest I don't get out as much as I'd like to doing it. Most of the time when I do it's dark, wet and (thanks to another bike obsessed lunatic) generally at such an unsociable hour that we rarely see anyone out on the trails with us. Finance wise everything goes on the family, so there isn't much left for extravagant toys that I drool over on Pinkbike every day, and I normally get by trading on second hands from the classifieds.
Back to the point....
I'd been looking at the newer long/low/slack hardtails that are coming out, and I wanted to try one but didn't really have many options to buy one. I don't know why, probably just my masochistic streak, but something in my head went "just make one with bamboo"!
Now before anyone assumes I've done anything like this before.. I have not.
I've barely done much home DIY, never worked with bamboo, I'd call myself beginner level 100%.
Yes, I do all my own bike maintenance, and service my suspension and shocks, but DIY I'm full on novice.
BUT I do have an OCD streak, love solving problems, so I recon it's worth a punt!
Here is the story of how it went, and a few of the major mistakes I made along the way.
Let the daydreaming begin...
The original geometry plan was to take inspiration from the On-One hello Dave frame and change it for 27.5, 160mm forks and tune it back slightly for all round riding. I also had a vision in my head of a dual top-tube\seat-stays straight line through from headtube to dropouts. I don't know why, I just think it makes it look nice, and brings back memories of my old 2000's Scaracen X-Tort. (the one with a massive box section)
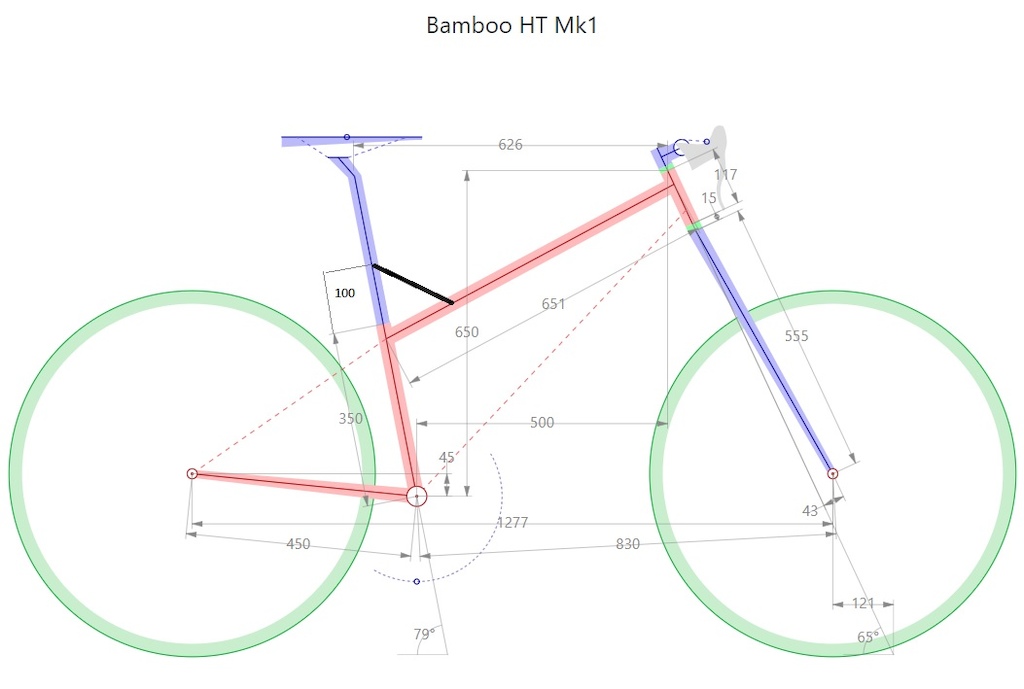
Bamboo Mk1 Geometry
From this I roughly knew what bamboo I needed:
Downtube pole (~45mm dia) ~1.5m
Chainstays (~25mm dia) ~1m
Seattube (~50mm dia) ~0.5mm
Toptube/Seatstays (~30mm dia) 2x1.5m
I ordered some low viscosity UV resistant epoxy and tonnes of hemp twine off of Ebay.
Ordered some new junior hacksaw blades, and big hacksaw blades.
And after much searching, managed to find a perfect donor broken frame with a 44mm headtube, 31.6mm seat-tube, and 73mm BB (Scott aspect).
The frame arrived super quick... and I got to work with my less than skilful hacksaw use!

Donor frame dissection!
I was on a roll, I felt the plan coming together and was in high spirits. I spent ages trying to find somewhere with the bamboo I was after for not silly money, which was actually quite hard. So I dropped my first investment and bought them from brycus.co.uk..... 1x2.4m 45-55mm pole, 6x 30-40mm poles. Hoping it would give me plenty to pick from, as the shipping was the expensive bit.
Then lockdown came along....
Mistake number 1...
ALWAYS check supplier reputation before placing an order.
Turns out Brycus have such a bad reputation and reviews even before lockdown, I started doubting if it would ever turn up or even get my money back.
So I had about 2months of waiting with absolutely no communication or response about my bamboo order, even after contacting them loads of times.
IF you ever try this yourself.... invest in a well known local bamboo supplier that can give you exactly what you need.
During this time I did do a few useful things:
I decided I didn't want a QR rear end, and found some spare 26in 142mm dropouts from my Carver ICB in my toolbox I could use.
I tried to make dropout mounts from 10mm alloy plate.... and almost killed my drill, and was pretty quick to see it was way out of my skill set!
Gave up and made them out of 10mm marine ply, which I then messed up the drive-side dropout.
So ordered more and made another....
The angles for the dropouts mount arms were done very roughly with rulers, and tape measures.

Attempt #1

Final dropouts

Out of nowhere....Special delivery!
It was like Christmas... I was so excited....Until I opened it....
Firstly I found half the poles had major splits in, all of the poles had been burnt\blackened and they had some hideous varnish coating on them. Secondly all of the poles were on the large size, so it meant that there were no poles small enough for the chain-stays or seat-stays.
I was gutted!
Reflecting on it I had ordered poles that were too big diameter for the rear end anyway, and due to them being from an odd supplier I suppose they were only meant as ornamental not really structural.
It felt like being a kid at Christmas, hearing sleigh bells....
And then watching Santa turning up in a clapped out old ford fiesta when you looked out the window!
The one thing I did get very lucky with was my 1 big bamboo pole! The single big pole was in very good condition, had decent 5mm wall thickness, even after sanding off the outer coating.
This meant that if I judged the cutting right I could use it for the downtube and the seat-tube! The only annoying bit was the fact is bamboo is not completely round, it has flattening bits where the nodes sprout as it grows, so I measured up, crossed my fingers and chopped it.
Unfortunately my first inside diameter judgement was a little off, so ended up trimming it down another ~30cm loosing all of my "just in-case" room for error space on the pole!
I had still allowed myself ~30mm either end for wastage during mitring the joints, so it was still just working out. The fact I was able to use some of it after all was a big relief.
I'd invested time and effort and I still had the dream in my head, so I stumped up and went on the hunt for some 20-25mm diameter bamboo (from a decent UK supplier). I settle with 10x2.4m poles 20-25mm diameter (the min order) from BS-bamboo.co.uk. These turned up super quick, but were a bit green, so I left them sat in my conservatory whilst I got on with the other jobs.

Layed out rough poles on the floor
My 7yr old was getting well into sawing stuff up with my spare hacksaw, and my offcuts were going to good use. But he was getting bored a lot, as he couldn't really help with the stuff I was trying to do. At this point my "project" had started to annoy everyone, so I had to start on mission: "keep the family happy". As I'd now taken over half the conservatory, started getting sawdust everywhere and was trying to do it at weekends in the garden when the kids were there too. So... I had to dedicate some time to actually making things with the kids too. (completely understandably)
Firstly we used some of the plywood offcuts and a chunk of bamboo....
Voila it's a space shuttle!
Out comes some random cable ties and drill....
Voila more offcuts turn into a marble run....
My next mission was getting the seat-tube to fit into the bamboo. This was a massive mission, and where I'd chosen to cut the bamboo there was a node about 20cm in from the top. This was super awkward to sand, and took forever to get it so the seat-tube would get in. Remember the non-round comment I made above, this was the problem, I had to sand out the inside of the bamboo node where it wasn't round to try and make it round. I also was acutely aware that if I sanded too much it would be loose and likely not bond in well enough for a long dropper post.
Mistake number 2....
Don't wedge stuff down the middle of bamboo!
I was getting impatient and trying to coax the seat-tube in further with a bit too much force.... Crack!
It opened up a split from the node up to the top.... BUMMER!

cracked tube
After reflecting, I was left with:
1: User the cracked seat-tube and hope that the seat post bonding, and wrapping would support it enough.
2: Loose my nice sized downtube and use that for the seat-tube as it was just the right size also. (meaning having to buy another downtube from somewhere.)
After starting work to make the other end of the downtube work for the seat-tube, I had a re-think and confirmed I didn't really want a smaller downtube. So I chose to go with option1. As I could drill out the end of the crack to stop it propagating, and there was going to be a decent amount of support around that area from the top-tube joint wrapping that I could take further down the seat-tube if I was really worried about it.
As the smaller bamboo started to dry out nicely after a couple of weeks I had started to pick out the best poles for wall thickness and diameter for the bike.
So with some of it that was left over, and more cable ties along came "keep the family happy" time....
We turned it into panpipes! (Although I'm not sure this one did much to keep the wife happy!)
By now I'd managed to get a decent shaping and fit on the downtube\headtube, and the seat-tube. This was done by using some of the offcut pieces of bamboo that were similar diameters to the BB and headtube, and wrapping the sandpaper round them and giving it a bit of elbow grease.

Roughly aligned front triangle joints
Only to realise that I'd need a stance like John Wayne and a 100mm BB to get it for my knees to clear the width the seat-stays were going to take up! Quick review of my other bamboo supplies and I realised I could just get a long enough crack free pole out of the original big order to give myself a regular straight top-tube. Win! So I chopped that up and shaped it, and it all started to look like it might even work.
At this point I realised I couldn't go much further without actually having a Jig...
Yeah, you heard me.... So far I'd built half a bike frame just using tape measures, sandpaper, files and some basic trigonometry.
I'm sure it was just me avoiding it because it would be a difficult job if I'm honest.
Mistake number3....
Build the jig 1st, not half way through.
Most normal jigs work from securing the specific alignment points, BB axle, Rear Axle, Headtube.
I have to concede I 100% built my jig backwards, working around the parts that I knew I needed to fit on the bike (cranks, fork, and rear hub) and the geo I wanted.
Mine was a very crude setup made from of a 2.4m chunk of 2x4, and shed tonne of screws, and a shed tonne more measuring.
Oh and the most important tool so far..... the "Bubble level" android phone app!
I first secured the BB shell, and left the BB and Cranks in it, so I could use those as points of alignment, checking the gaps between the crank and the base 2x4 when rotating them over. Next I found the centre line, and marked it all the way along the base to either end. Worked out the height of woodblock needed to support the rear hub to get my intended BB drop from the axle working it out to account for the hub shell diameter, and added a tonne more screws to hold the hub on the woodblock. Then worked out the height of woodblock for the fork axle, and distance from the BB. At this point I had to get creative with more random blocks of wood and screws as I'd cut my base ~40mm too short! Next I needed to add a support for my seat-tube to allow me to get it straight, and the right angle. This took as silly amount of time for me to get happy with it, as I always had to put it away after working on it. Each time I'd get it out, but never be on a flat surface, and have to try and work out how much offset horizontally and laterally to adjust my angles by.
I then had a Eureka moment whilst out night riding and complaining to my riding buddy about setting up the jig. I was complaining that I wished I had some adjustable feet to put on it and level it off.
Durr.... I just need to put a screw in each corner, and screw each one in or out to level it perfectly where I was working!
So now I had a jig!
I put all my nicely mitred poles in it.... to find they were all a bit off. Damn! Yeah, who'd have thought... lining things up by eye and roughly hanging together with cable ties wasn't accurate. A chunk of re-sanding all the mitre's and the main downtube and seat-tube were good. My headtube gusset block was also a bit out, but it was close enough for me not to be worried about it. I did realise that I'd got the seat-tube angle set as 80deg on the jig, but thought this wasn't a bad design change so kept it. I also found the top tube I'd already mitred was way too long, so proceeded to cut it shorter by 20mm.
Welcome to Mistake number 4...
Double and triple check your measurements always!
Yeah, this was a kicker, I'd cut off double what I needed to!
I should've only cut 10mm, and left room for the mitring... Oops.
Still this wasn't a complete failure, all it meant is that I now would have a straight top-tube right to the top of the seat-tube and adjust the headtube mitre to fit that instead. Rather than have it in-line with the seat-stays as I had in my original vision. I toyed with the idea of trying to find another top-tube worthy chunk out from the dodgy cracked bamboo, but realised the one I had was the best pole already. The only annoying thing about this mistake, was I also now had a very awkward angle mitre to do for the top-tube\seat-stay joint.
Next I went on to the difficult job.... how to do the chain-stay\BB yoke.
At this point I went low-tech!
Graph paper, rulers, and got creative

Chain-stay yoke planning
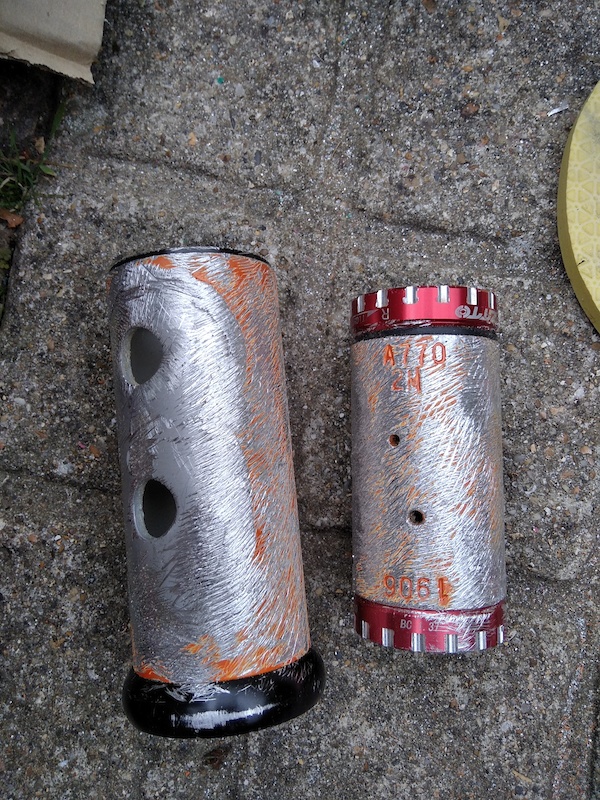
I suddenly realised I'd ignored a job that I really needed done.... I had to trim and knurl my donor BB and headtube! This increases the surface area that the bonding can adhere to, and gives a much better joint. This is where things got tricky, it was a one time job, and I didn't want to mess it up and have to find another donor frame. I'm not exactly skilled with a hacksaw, and won't ever claim to be, but was pretty chuffed when I managed to take off 1mm thick long strip off each side of the headtube in a single cut!
0% Loaded
1/3
Once I'd sorted out prepping the headtube, and BB I sorted out the disc side chain-stay.
As far as jobs go this was a super simple one.
I also realised that I needed to get rid of the shiny waxy coating on the lighter bamboo I had, as I read it wouldn't take the epoxy coating I'd be finishing the frame with well.
So went to town with the sandpaper again...
Chain-stay yoke jigging
Then came the job I'd been dreading... sorting out the seat-stays.
Notching them out to fit onto the dropout mounts was nice and easy, but the mitring the other end with a long off axis mitre was an absolute pain.
On top of that this was triggering my OCD, which meant I really wanted both of them to line up in the same position on the top-tube.
Thumb like a shish kebab!
This is where I met real pain for the first time during the build!
Sure I'd scuffed my knuckles, and caught my fingers on the hacksaw blades a few times up till this point, but this was something else.
I was doing long sanding strokes with a piece of offcut bamboo, and getting the off axis angle perfect for the top-tube joint. So perfect it created a perfect twisted spear point at the tip of the bamboo, and there were a few small shards of bamboo starting to stick up slightly. On a sanding backstroke, one of these "shards" caught on the side of my thumb at the 1st knuckle, and proceeded the skewer through the entire length of the tip of my thumb and stick out from the front next to the nail! This stopped my hand in its tracks with an unsurprising shooting pain, and a natural recoil reaction that snapped off the shard leaving my thumb like a shish kebab. With my thumb throbbing I decided to take it out quickly from the direction it entered, as it looked like one end was fatter.
I quickly wrapped my thumb in electrical tape from my build box to put pressure on it, and finished off the seat stay job I was doing. Taking care to sand off the tip of any more shards as they appeared!
Thankfully the tape did its job and I didn't actually bleed everywhere when I took it off, and you could just see the red line inside the side of my thumb where it had done it's damage.
...that friggin hurt!
Over the next few evenings I finished off knurling all the ends of the bamboo tubes, to allow everything to bond better. Then I was tiding up sanding bits here and there, and looking for things to do to it. This is when I realised something... I was looking for things to do because I was scared to start gluing it together! I mean, so much work and effort had gone into it so far, all it would take was a twist here, and miscalculation there and voila all wasted time.
Avoiding the inevitable!
At this point, I just had to man up... get on with it and take it on the chin if I messed it up.
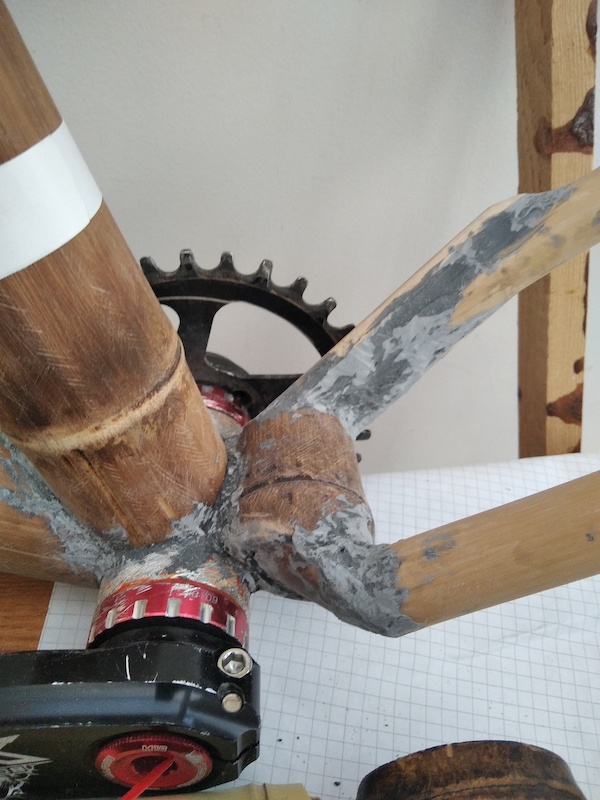
So I opened up the first packet of JBWeld epoxy metal, got out the cornflour and mixed it up till I got the thick gloop that you need so it doesn't run out from the joints. Cornflour is an non-reactive superfine powder you can use as a thickening agent for epoxy, there are better ones but none that I already had to hand. The first round I just did the front triangle, headtube gusset, yoke plank, main yoke block, and the seat tube, checked it lined up from the front, and left it for the night to set. Checking it in the morning it was a massive relief to find it did all line up still! I had nightmares of it shifting a bit before it had set and it all going wonky.
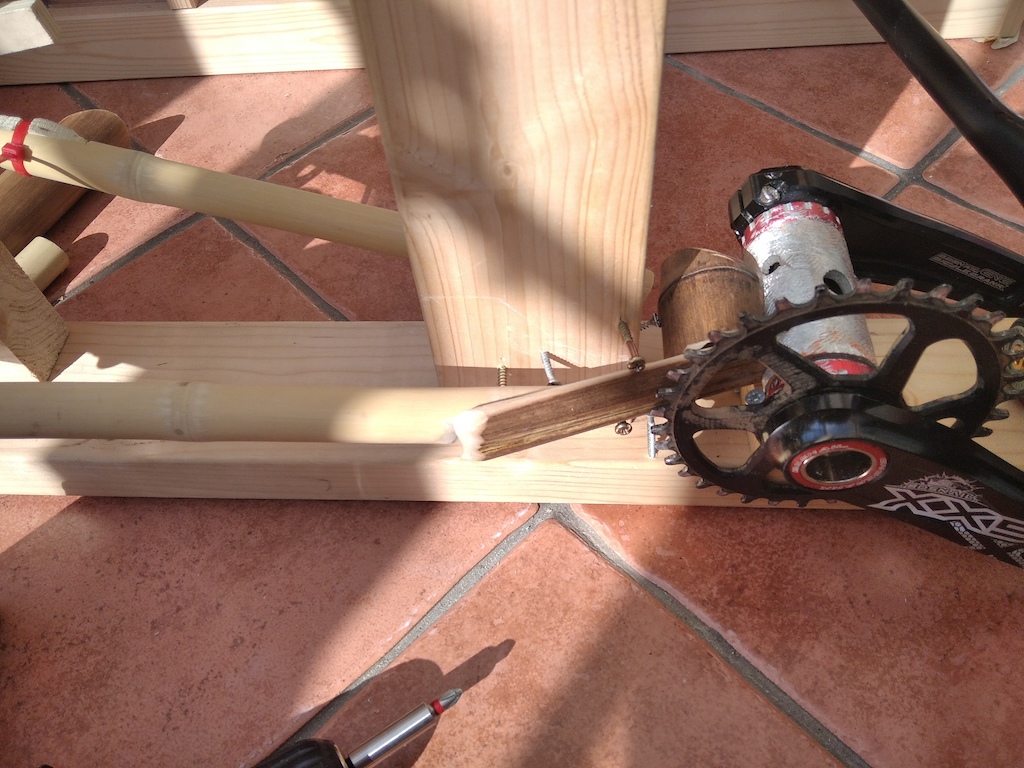
This increased my confidence no-end, and I felt happy to get on with bonding the chain-stays on. Up to this point I'd never been 100% on the alignment on the rear hub in the jig. It was close enough that I could fit the poles and everything, but I didn't trust it to be 100% straight for a wheel. So I was sneaky, how do you make sure it all lines up for the rear wheel.... Bond it together with the rear wheel in it! So this time only a half pack of JBWeld, and I bonded the chain-stays to the yoke, and the dropouts. Checked it all lined up, and the wheel was straight vertically and laterally and went to bed.

Chainstay bonding drive side

Chainstay bonding disc side
Another overnight and it all looked like it was good.
Tire clearance was ok, not massive on the disk side, but good enough that I still had some wrapping space.

BB yoke tyre clearance
I strapped the seat-stays on it with cable ties, and put some wheels on it to check alignments.
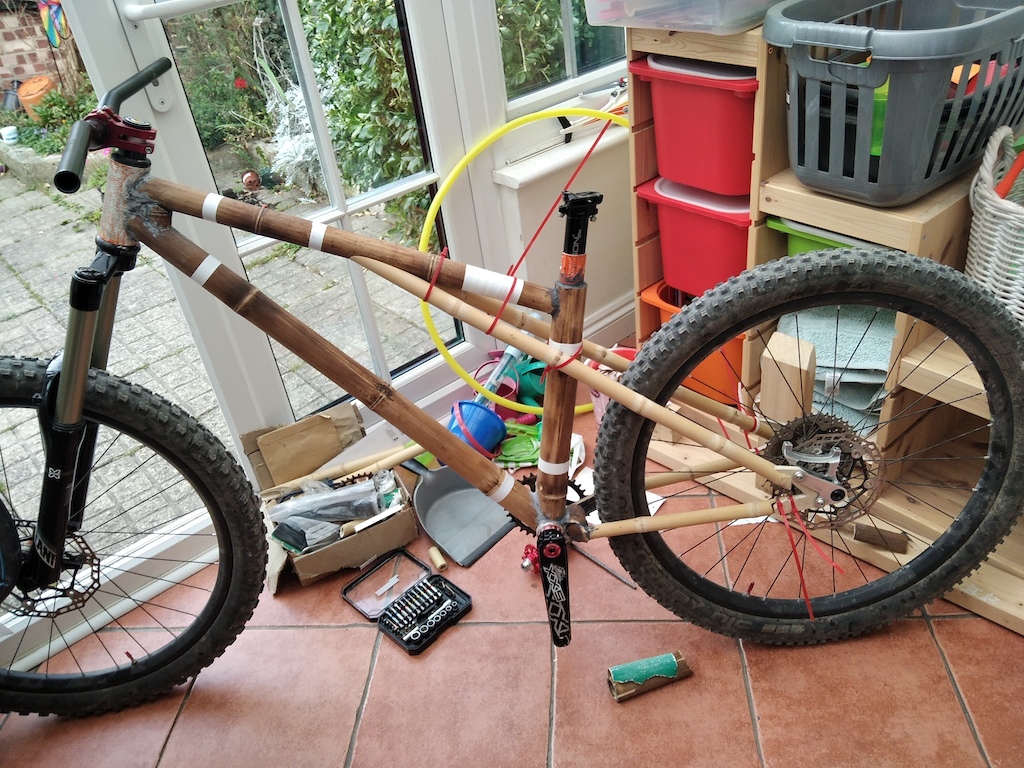
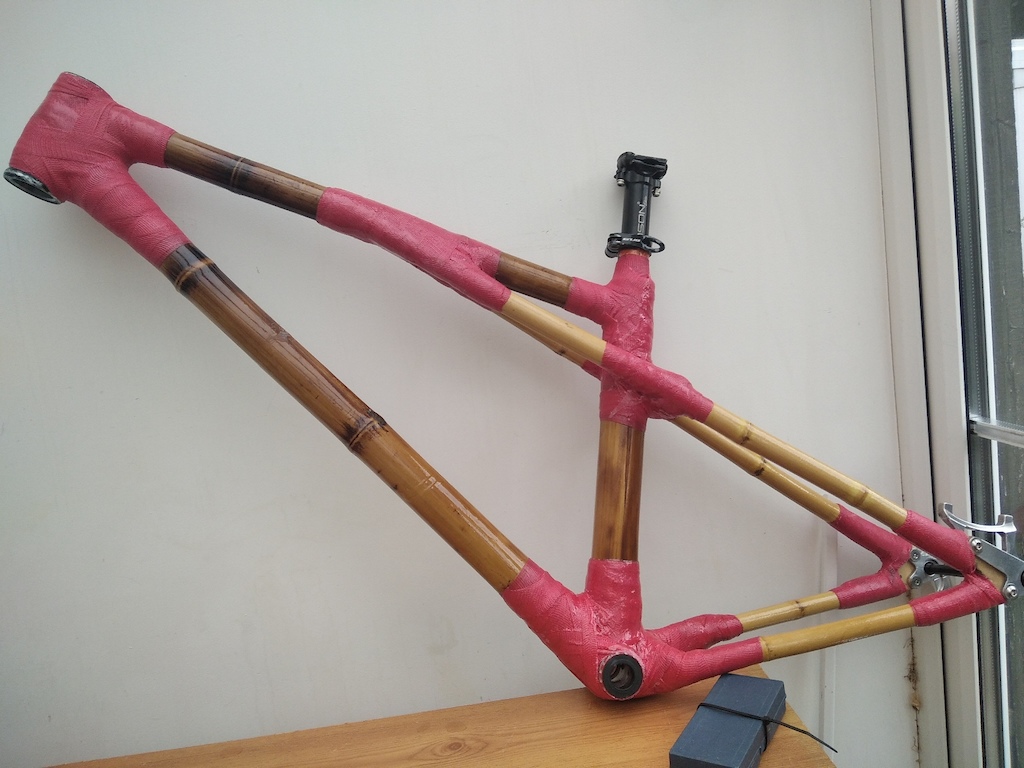
It finally looked like a bike!
I was on a roll!
From it being nothing like a bike, to actually looking like it would be usable within 2days I was chuffed to bits.
I had a look and really wanted to add a seat-stay\seat-tube bridge, as I'm not a light guy and had visions of it all being a bit too flexy with the long seatstays.
So I found a reasonable big tube offcut, and out came the sandpaper again....
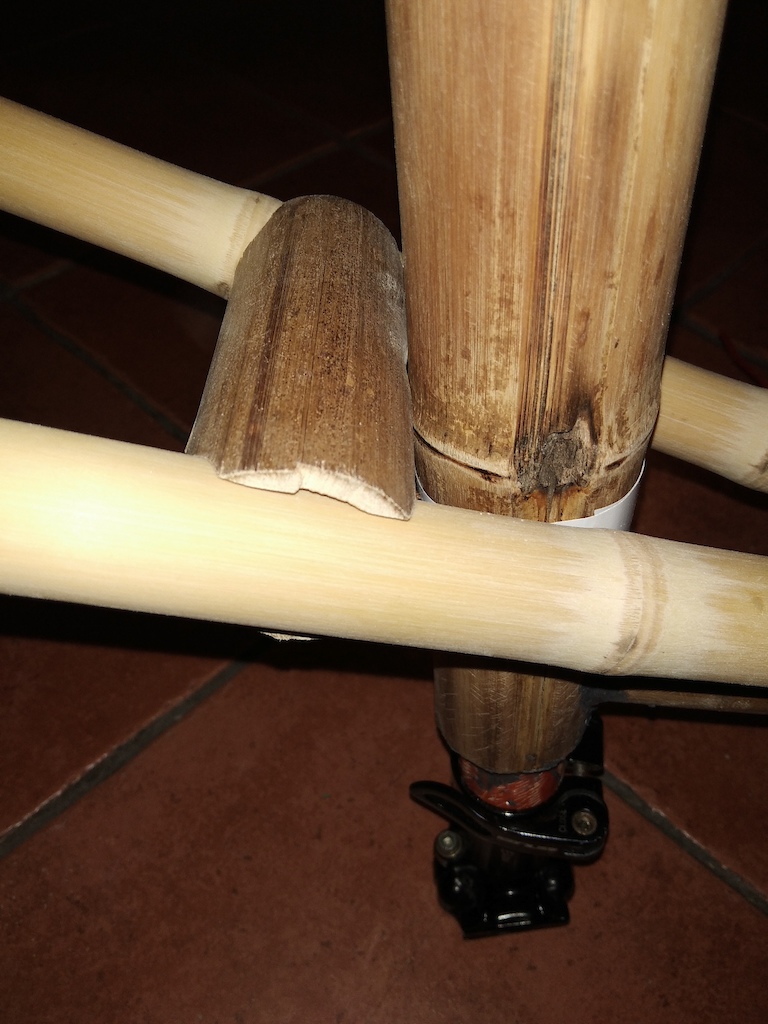
Seattube bridge
Welcome to mistake number 5...
Don't drop a half glued frame!
Yeah, I was lining up bits for the seat-stay bridge, and I managed to knock the frame over.
And the disc-side chain-stay popped off the BB yoke.

Broken chainstay joint
This still allowed plenty of crank clearance, so I re-prepped the all the surfaces.
On to bonding session number 3.
Time to bond on the seat-stays to the top-tube, seat-stay yoke, and rear dropouts.
Again I did this with the rear wheel in the frame, as it gave me a visual points of reference to make sure it was going to be good alignment.
Thankfully it all bonded together nicely, and there were no dramas after it was left overnight.

Seatstay bridge

Seat-stay top-tube joint
So had a final round of bonding tidying it all up and making sure everything could be smoothed out nicely.
So out came the sandpaper again to smooth out all the bonded joints....
0% Loaded
1/5
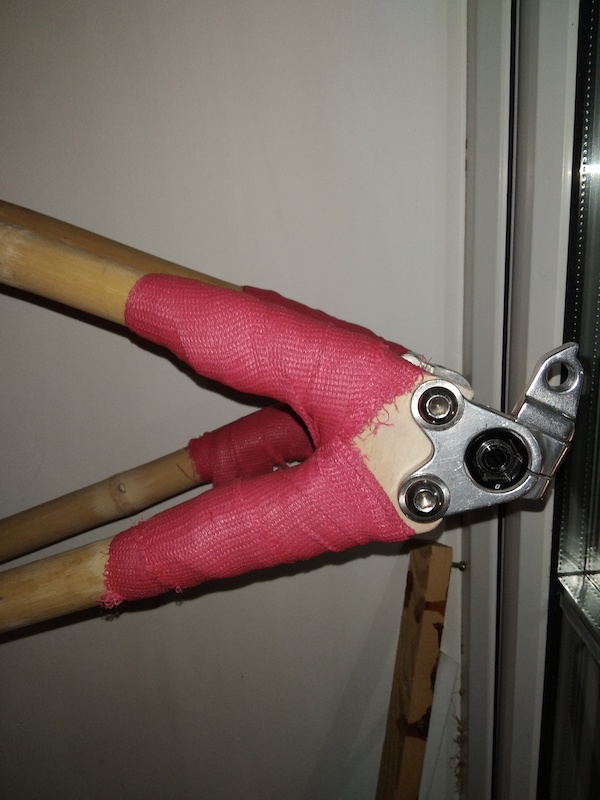
My original plan was to use the epoxy and twine to wrap the frame joints. But after watching some videos and specifically the Calfee DIY kit build tutorials I came across casting tape! This was said to give a strong joint with less bulk than an epoxy\twine joint, and be easier to work with. So I went with it, and stumped up for a 10roll pack of Red 3in x 3.4m Casting tape. The idea is that you cut the tape in half by cutting through the pack to open it, seal 1 in a ziplock bag, and then you have a nice workable 1.5in strip to work with to wrap the joints. After making sure the tubes were suitably scored to increase surface adhesion, it was another man up moment!
Ready... Get set... GO!
I've never worked with this stuff before, and my god it sets fast!
From the time you open the packed till the time it hardens is less than 5mins.
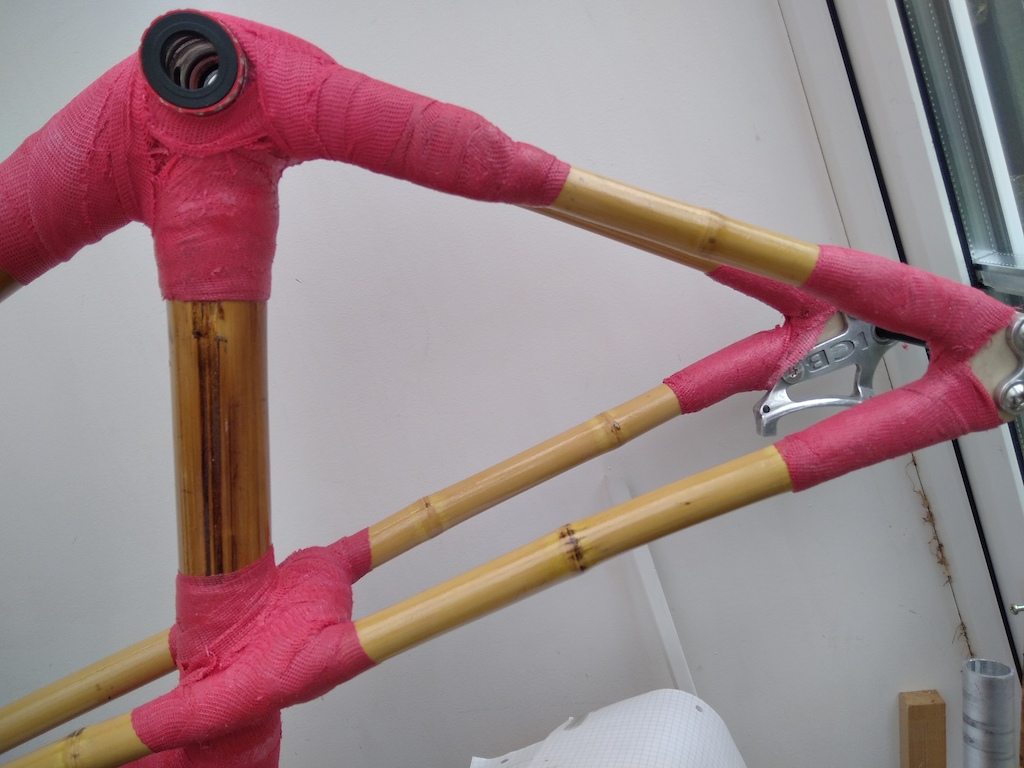
I started by wrapping the headtube, as that looked like the simplest joint to learn on, just dunk the rolling in some water, squeeze it out and go for it!
A good few wraps round to anchor the tape to start, and then working diagonally around the headtube trying to tightly wrap and form a continuous bind round the tubes, without overlapping too much on one specific area, and trying to make sure all of the wraps smooth down nicely. I eventually got the hang of it, and it was massively stressful trying to do it quickly, tightly, and evenly.
I was fairly happy with the results, and it was only when getting to the end of some rolls I realised it had already started to harden\set too much.This was what happened with both of the top-tube joints, so I ended up unwrapping some of those till I got to the well bonded sections chopping off the bad bit.
4 Rolls of Casting tape down, and 3 pairs of heavy duty gloves trashed.... One productive evening bike session!
0% Loaded
1/4
Unfortunately I only learnt a good trick after doing the first set of wrapping, which was NOT to dip the tape in water. This delays the hardening reaction as it then it is only being triggered by the moisture in the air, so you get slightly longer to work with it.
This trick was a god send for the tighter and more complex joints like the top-tube seat-stay joint, and the seat-tube bridge. Where I had to force the roll through tight spaces while wrapping it, as this added too much time delay when the roll had already been wetted at the start.
My impatience was starting to kick in now and I was consciously aware that summer had gone, and winter weather was kicking in, so I start doing late nights to try and get this thing done.
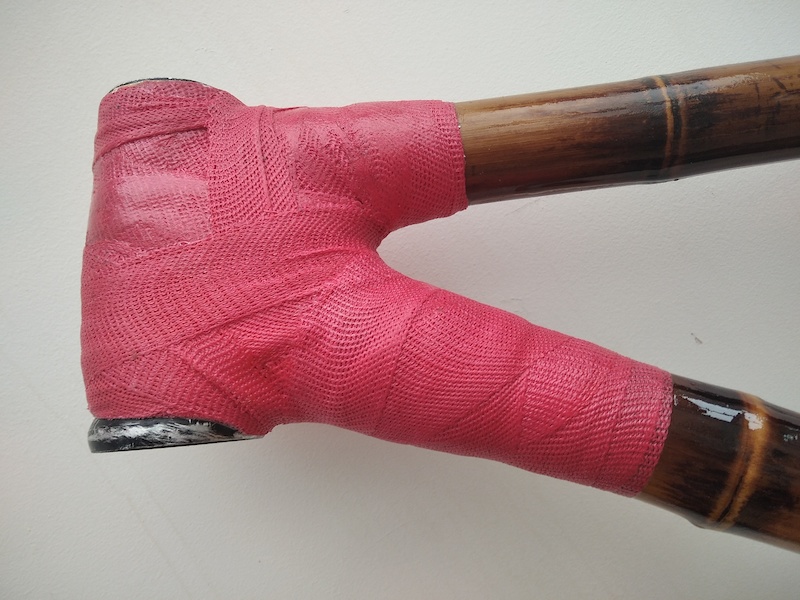
I started to sand back all of the joints to smooth them out, and I'm starting to realise this "red" tape is looking way more pink than red!

Sanding the joints back
Mistake Number 6..
Treat fibreglass like a biohazard!
I truly regretted a late night 3hr garden sanding session the next day, no word of a lie I could feel tiny stabbing shards of fibreglass on my fingers, knees, and forearms for days but you can't even see it! AND to top it all off, the stuff sticks to clothes and gets everywhere.
If I were to ever do this bit again, I'd be dressed in full overalls, with rubber gloves on, shoe covers and do it over a large sheet of plastic so I could strip off after in the middle of the sheet, and put the whole thing in the bin!
Then came real trouble!
I thought I'd been careful and kept all the sanding mess outside. Oh how wrong I was! So I think it was stuck to my shoes, clothes, body etc, and managed to get transferred into the house.
I know this as I had a FUMING wife come storming in after taking the kids to school, screaming "What the hell is this!?!" holding a red'ish shard up to my face. Knowing full well it was something from me and the "project", in a way only a wife can manage!
Apparently it was in her sock and had been stabbing her ankle all the way to school and back....OOPS!
After a thorough grovel session, I then went round finding loads of little red shards everywhere in the house!
The lounge rug....yup loads.
The stairs carpet... yup some.
Bedroom floors... luckily not many.
The conservatory floor....a fair few bits still between the tiles.
Time for more grovelling, and a deep clean of the entire house and conservatory!
And from now on I'm not sanding it back unless I absolutely have to.
So.... It was finally ready for some stiffness testing, and pretty optimistic!
I fitted wheels, forks, cranks, bars, leant it over at 45degrees and gave the cranks a good push to side load it. It was flexier than the Octane One Prone I had to compare, not too bad, but definitely not as stiff as I had hoped which was a bummer!
At this point I also decided to go and put it on the scales. All in with a BB, headset, seat-tube and axle it was 2.9Kg which I was very happy with! Even with a chunk of epoxy for the final coatings it wouldn't be crazy heavy. Final weight was even considered during the build, so this was a nice surprise.
Disappointed, but still in the game!
So the plan to help fix this was to:
1: Wick some low visco epoxy into the existing joints to firm them up.
2: Re-wrap the downtube at either end going further down the tube, as this is where it looked like the flex was coming from.
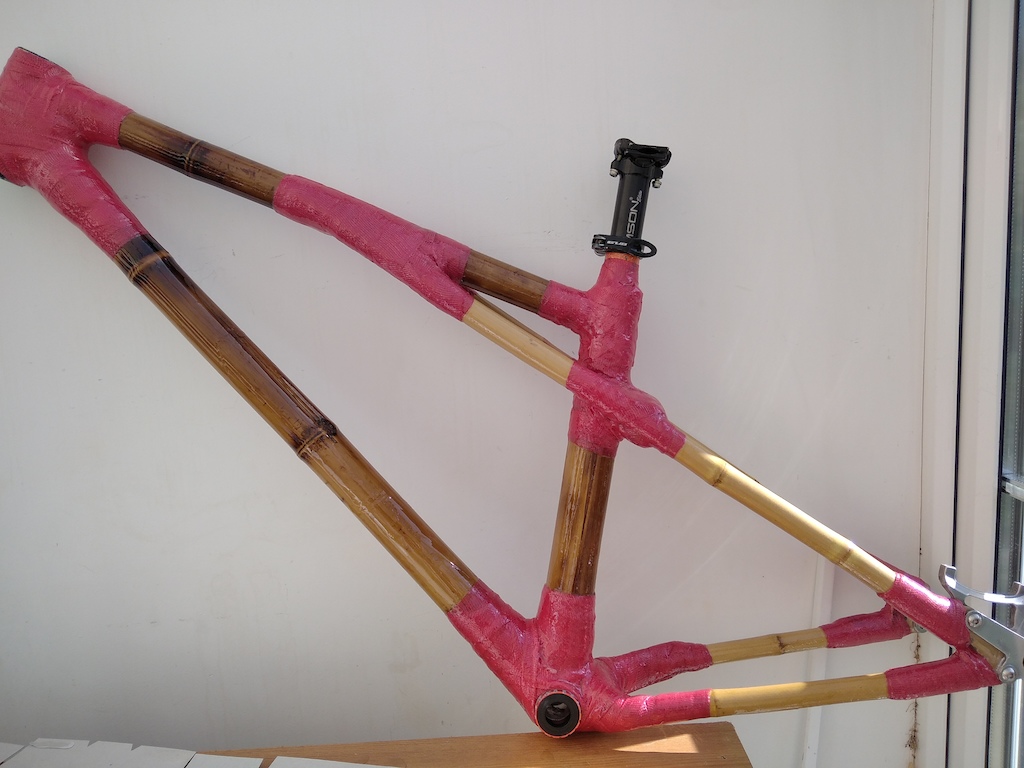
Luckily I still had all the epoxy I'd bought for the original joint wrapping plan. It was super low viscosity, almost like water, so was actually perfect for soaking in to the joints. After going round all the joints twice to wick in as much as I could, I then had to leave it 48hrs to harden. The best about getting the epoxy on, was that the sanded bamboo that was really dull suddenly came up really really nice. After 48hrs I then re-wrapped the down-tube/head-tube and the down-tube/bb joints. I was starting to feel way happier that it was working out alright again.
Now its starting to look nice!
After my previous sanding nightmare, I wasn't giving sanding a second thought. I just wanted to get this next layer of joints fully epoxy coated, so they were fully bonded, and reasonably smooth to cope better with the muddy UK winter weather. The water-like epoxy now was less than ideal, so I mixed it, and left it for 24hours to let it thicken up, and I was back in business! The bad thing about thick epoxy is it still flows and drips, just super slowly. So after leaving what I thought was a well coated frame I ended up with a few drip marks from the more uneven joints when I came back in the morning. Nothing a run round with a craft knife couldn't clean up, but it was still annoying.
0% Loaded
1/9
At this point I've decided I'm not too fussed bout making it a pristine shop worthy finish, I just want it strong enough and weather proof so I can use it!
I could still see some bits that weren't coated well enough, so after 72hours, on went another full coat of thickened epoxy.
If I was wanting to paint the joints, then it would have made more sense to use an automotive filler to finish the shaping work, but I was wanting to keep them showing the raw wrapping so tried to use the clear epoxy to cover gaps where I could resulting in yet more annoying drips. By now I've come to not mind the darker pink that it is when it's coated. But I have to admit trying to rush the epoxy coatings is the reason for some of the lumpy bits, and the less than pristine finish.
Welcome to Mistake number 7...
Don't try and rush the finishing!
If I really like it and want to tidy it up I can always sand back any uneven coating, and re-shape the joints at a later date.
But I don't want to my get hazmat suit on, and I'm just itching to get using it now!
So.... I bet you want to know..
Has it worked?!
Hell yes it's worked!
So watch this space.....
Final Summary
Wow... you're still reading this...
Ok, so I'd better finish off this monster post.
So did I achieve what I set out to...
All in I'd say I've definitely managed to make an aggressive modern geometry frame that is usable.
Total cost is probably just over £230 give or take, a bolt through rear end added a chunk, and mistakes added more.
If I'd got all the right bamboo at the start, it would've saved ~£50, and if I'd gone with QR instead of 142mm dropouts it would've saved another ~£80.
Time wise I hadn't set any goals, but it has taken a bit longer than expected.
This has probably taken me somewhere in the region of 120-150hours of total time, but about 6 months having to fit it round job, family, and life.
Would it have been cheaper to buy a frame with similar geo maybe, but that's not the point.
It's to prove you can try, and learn from failing along the way.
Are my family sick of bamboo, fibreglass, epoxy and the bike (and probably me!)... Completely.
The wife has even asked why I can't just do computer games for a hobby like any other normal man.... Hahaha, Not a chance!
As one of my work colleagues put it:
That is equal parts awesome and completely nuts!
Here's hoping my sharing this can help inspire others...
IF YOU NEVER TRY YOU CAN'T EVER SUCCEED.
JUST DON'T BE AFRAID OF FAILURES ON THE WAY!
I'll be updating my Bamboo build album as I get using it if anyone is interested.
Thanks for reading!
Author Info:
 Member since Sep 4, 2001
Must Read This Week
Sign Up for the Pinkbike Newsletter - All the Biggest, Most Interesting Stories in your Inbox
PB Newsletter Signup
Is it still in one piece?
Done over 100miles offroad and 10k+ft climbing on it now, and no creaks or anything.
I've put an offset dropout in the rear to straighten the wheel alignment a bit better (it was ~2mm to the disc side by the BB), before I could buzz the rear tyre on the disc chainstay when cornering hard.
Now it's quiet as a mouse even hitting the hardest corners.
Really happy with it!
Annoyingly I can't ride it for a while now with lockdown n living too far from decent offroad trails.