Stories posted under Pinkbike Community blogs are not edited, vetted, or approved by the Pinkbike editorial team. These are stories from Pinkbike users.
If a blog post is offensive or violates the Terms of Services, please report the blog to Community moderators.
Lee McCormack's Guide to Dialing in Your Bike for Your Riding Style
In my last Pinkbike post we talked about Rider Area Distance (RAD) — the distance between your bottom bracket and your handlebars.
When you create your ideal mountain bike setup, RAD is the first and most important measurement. When your bike's RAD fits your body, your bike feels good.
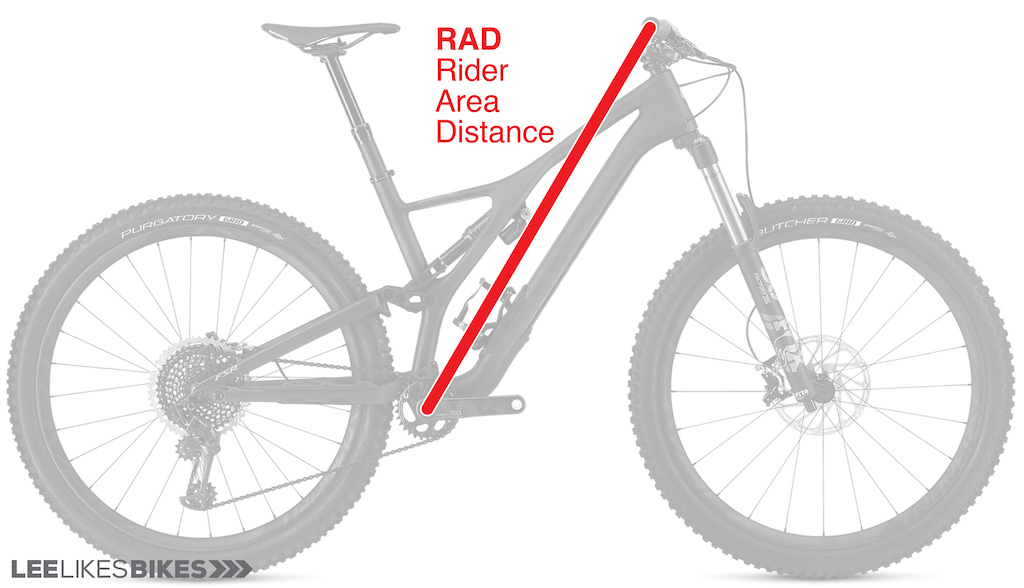
To take your setup to the next level, we can look at Rider Area Angle in Degrees (RAAD).
RAAD is the angle of your RAD compared with level:

If your bike has a low RAAD, the handlebars are far away and low.
If your bike has a hi RAAD, the bars are close and high.
We live in a universe of randomness and exceptions, but, in general:
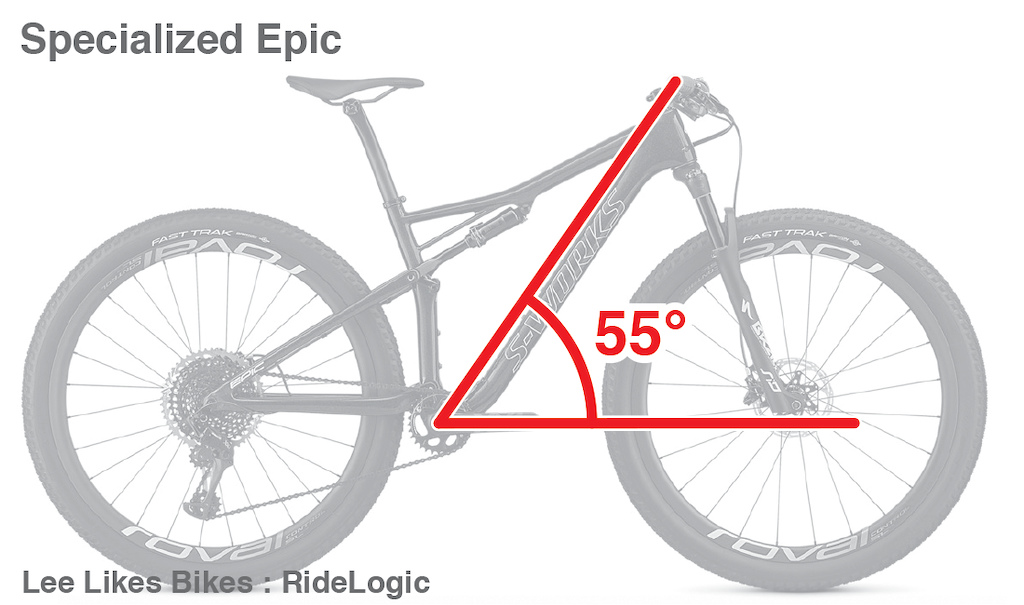
Cross country bikes have low RAADS.
55-56°
Downhill bikes have high RAADS.
62-63°

Trail bikes have medium RAADS.
58-60°

Some thoughts:
The perfect RAD makes your bike fit your body. The perfect RAAD makes your bike fit your riding style.
The higher your bike’s RAAD, the more range of motion you have for braking, cornering, pumping and going down things, and the better your bike feels on descents. Everyone who’s installed a shorter stem knows this.
The lower your bike’s RAAD, the more your bike feels optimized for climbs or for a very aggressive, long/low riding position. This works well for pro XC and enduro racers, but it increases sketchiness for people with lower skills (I’m talking to most of you).
If your frame has a long reach, it will pull you into a low RAAD. Don't be afraid to try a smaller frame. Today's medium is yesterday's large.
58-60° is a sweet spot for most riders on most bikes in most places. We want bikes that handle well everywhere, and that help us in the most dangerous moments. Losing a few seconds on a climb is no biggie compared with being flung off a ledge. I recommend setting up your bike up for confidence and safety, then learning to pedal it.

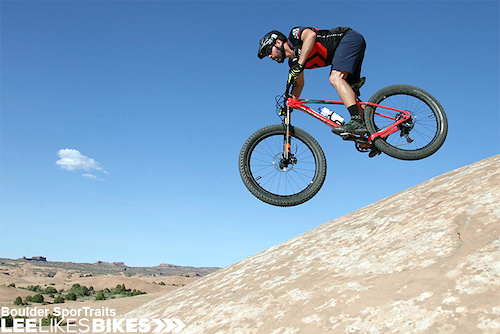
Steep, tight, rocky, off camber. The bottom of Porcupine Rim Trail in Moab, UT is a great place for a high RAAD. Judd Zimmerman gets it done.
When in doubt, add RAAD. I’ve set up more than 1,000 people, and I can’t think of any times we tried to reduce RAAD. For most people, bringing the bars higher and closer simply feels better.
If you pay attention, you’ll figure out which RAAD works best for you. This is less about the type of bike you ride and more about the way you ride. Once you know your ideal RAAD, set all your bikes up the same way.
Measuring RAAD is tricky. Method #1 is to run a string from the bottom bracket to the middle of the grip, then measure the angle with a phone app. Method #2 is to shoot a photo of your bike from far away so the perspective is flat (like the professional shots used by bike companies), then measure with a graphics program.
Modeling RAAD is easy. Using the RideLogic Rider and Bike Calculator at www.llbmtb.com, you can enter the parameters of your bike — head angle, reach, stack, stem length, bar rise and more — then see that setup’s RAD and RAAD (and some other cool numbers). This is a great way to tweak your setup before you buy parts, and to know how a bike fits before you buy it. Please enjoy 1/2 off the first month or year with the code “pinkbike”.
You can also learn more about MTB setup in the book Dialed.
I hope you find this helpful,
Lee
----
I’m Lee, and I Like Bikes. Over the years I’ve written 10 mountain bike books, built a bunch of pump tracks, taught thousands of riders, invented RipRow and devised the RideLogic bike setup system. Thanks to the knowledge I’ve discovered for the mountain bike community, I’m riding better — and having more fun — than ever.
Learn more at
www.leelikesbikes.com
www.llbmtb.com
www.riprow.com
Author Info:

 Member since Jan 1, 2000
Must Read This Week
Sign Up for the Pinkbike Newsletter - All the Biggest, Most Interesting Stories in your Inbox
PB Newsletter Signup
I've been playing with this information in a spreadsheet looking at frame fundamentals. It seems that while RAD changes majorly between brands and frame sizes, RAAD is very similar for bike frames across the industry and size ranges. Of the medium/large frames I've entered RAD ranges from 795 all the way to 743, while RAAD only ranges from 51.5 to 49.4 degrees.
So it seems that while frame RAD should be a major consideration when both buying and setting up a bike, frame RAAD is not a key value for that decision and must be addressed through bike setup (spacers, stem length, bar rise/sweep etc).
Is that correct?
www.calculator.net/triangle-calculator.html
Just measured my bike in about 3 minutes, entered it into the calculator and got 58.9. bike feels perfect to me.