Stories posted under Pinkbike Community blogs are not edited, vetted, or approved by the Pinkbike editorial team. These are stories from Pinkbike users.
If a blog post is offensive or violates the Terms of Services, please report the blog to Community moderators.
Cleat Setup Made Simple
So you just grabbed a sweet pair of new shoes/pedals, and you're all ready to set them up and go for a ride. You could just slap on the cleats and hope for the best... or you could take the time to set them up to your riding style. While we always recommend getting your bike professionally fitted, it’s sometimes useful to understand some bike-fit basics so you can take care of initial setup and minor changes yourself. This guide will explain the basics of cleat fit, and show you how position changes will affect the ride on your mountain bike.
![Five Ten Hellcat Pro]()
Setting up cleats:
There are three axes to cleat adjustment, fore/aft, lateral, and torsional. Fore and aft is the position of the cleat toward the toe or heel of the shoe (where the cleat is positioned in the tracks, and dictated by the shoes design). Lateral adjustment is built into the cleat, and refers to how far side to side (inside of the foot to outside of the foot) the cleat can be set up. Torsional adjustment is the angle at which the cleat is locked down compared to the plane of the cleat tracks. Torsional adjustment affects cleat float and how quickly the cleat disengages with the pedal.
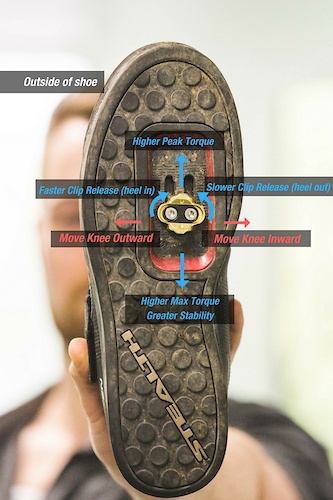
![Quick and easy graphic for setting up your cleats. For full details see our blog at www.livetoplaysports.com]()
Fore and Aft is determined according to rider preference. Much like fitting road cleats, it is a good idea to start the cleat just behind the third metatarsal of each foot (the knuckle inside your foot where your middle toe starts). This positions the cleat under the ball of your foot.
Moving the cleat forward will increase the lever effect of your foot and ankle. The foot is an inherently inefficient lever, and so this requires a considerable amount of effort from the calf to stabilize the foot in this position. The pro’s of a forward cleat position are that you can develop slightly more peak torque, and you’re likely to develop sweet shredded calves from all the extra exertion needed to keep your foot stable.
Most mountain riders will move their cleats farther back on the shoe (some preferring as far back as the shoe will allow). The benefits of this position are increased stability, less energy expenditure to keep the foot stable, (reducing fatigue on long rides and speeding up recovery), higher torque through a greater range of the pedal stroke, and a lower possibility of extreme ankle flexion on hard landings. That's a lot of pro's... the only major con's to a rearward cleat position are a lower necessary maximum seat height, and an increased possibility of toe-overlap on very small frames with steep head tube angles and large wheels. You can see why most riders prefer their cleats farther back.
Lateral adjustment is based on your physiology, and should be determined by a professional bike fit. The crux of the issue is that when seated and pedalling, your pelvis, knees and feet should be in a straight line. Cleats too far outboard on the shoe can move the shoes in toward the frame, and cause the riders knees to bow out, and the opposite can cause the knees to drop in. Knee pain and cleat position are intimately linked, so if you’re experiencing knee pain when riding, see a professional!
Torsional adjustment affects the engagement point of the cleats. All mountain cleats have a certain amount of float built into them (float is the amount that a cleat can twist before engaging the pedal release mechanism). If you assume that your cleats have 6 degrees of float (as Crank Brothers cleats have), a base setup would allow your foot three degrees of movement either direction without engaging with the pedal. Determine your starting setup by standing on the bike (in your shoes) without the cleats installed (if possible). Observe how your feet naturally want to sit on the pedals, and set the cleats up so that you can comfortably stand clipped-in in this position. By rotating the front of the cleat toward the big toe of the shoe you will make them disengage sooner than normal, and rotating the front of the cleat towards the small toe of the shoe will mean more movement is necessary before the cleats start to disengage.
And there you have it; cleat setup in a nutshell. A couple of last points: It’s a good idea to keep your cleats free of dirt and grime, and ensure that your cleat bolts are secured with blue lock-tite. Your local Live to Play Sports dealer can hook you up with a sweet pair of Crank Brothers pedals, and help you set up the cleats to ensure your rides are more comfortable and more confidence-inspiring!
Setting up cleats:
There are three axes to cleat adjustment, fore/aft, lateral, and torsional. Fore and aft is the position of the cleat toward the toe or heel of the shoe (where the cleat is positioned in the tracks, and dictated by the shoes design). Lateral adjustment is built into the cleat, and refers to how far side to side (inside of the foot to outside of the foot) the cleat can be set up. Torsional adjustment is the angle at which the cleat is locked down compared to the plane of the cleat tracks. Torsional adjustment affects cleat float and how quickly the cleat disengages with the pedal.
Fore and Aft is determined according to rider preference. Much like fitting road cleats, it is a good idea to start the cleat just behind the third metatarsal of each foot (the knuckle inside your foot where your middle toe starts). This positions the cleat under the ball of your foot.
Moving the cleat forward will increase the lever effect of your foot and ankle. The foot is an inherently inefficient lever, and so this requires a considerable amount of effort from the calf to stabilize the foot in this position. The pro’s of a forward cleat position are that you can develop slightly more peak torque, and you’re likely to develop sweet shredded calves from all the extra exertion needed to keep your foot stable.
Most mountain riders will move their cleats farther back on the shoe (some preferring as far back as the shoe will allow). The benefits of this position are increased stability, less energy expenditure to keep the foot stable, (reducing fatigue on long rides and speeding up recovery), higher torque through a greater range of the pedal stroke, and a lower possibility of extreme ankle flexion on hard landings. That's a lot of pro's... the only major con's to a rearward cleat position are a lower necessary maximum seat height, and an increased possibility of toe-overlap on very small frames with steep head tube angles and large wheels. You can see why most riders prefer their cleats farther back.
Lateral adjustment is based on your physiology, and should be determined by a professional bike fit. The crux of the issue is that when seated and pedalling, your pelvis, knees and feet should be in a straight line. Cleats too far outboard on the shoe can move the shoes in toward the frame, and cause the riders knees to bow out, and the opposite can cause the knees to drop in. Knee pain and cleat position are intimately linked, so if you’re experiencing knee pain when riding, see a professional!
Torsional adjustment affects the engagement point of the cleats. All mountain cleats have a certain amount of float built into them (float is the amount that a cleat can twist before engaging the pedal release mechanism). If you assume that your cleats have 6 degrees of float (as Crank Brothers cleats have), a base setup would allow your foot three degrees of movement either direction without engaging with the pedal. Determine your starting setup by standing on the bike (in your shoes) without the cleats installed (if possible). Observe how your feet naturally want to sit on the pedals, and set the cleats up so that you can comfortably stand clipped-in in this position. By rotating the front of the cleat toward the big toe of the shoe you will make them disengage sooner than normal, and rotating the front of the cleat towards the small toe of the shoe will mean more movement is necessary before the cleats start to disengage.
And there you have it; cleat setup in a nutshell. A couple of last points: It’s a good idea to keep your cleats free of dirt and grime, and ensure that your cleat bolts are secured with blue lock-tite. Your local Live to Play Sports dealer can hook you up with a sweet pair of Crank Brothers pedals, and help you set up the cleats to ensure your rides are more comfortable and more confidence-inspiring!
Author Info:

 Member since Apr 26, 2017
Must Read This Week
[UPDATED] Final Elite XC Results & Overall Standings from the Mairiporã XC World Cup 2024
42199 views
42199 views
Sign Up for the Pinkbike Newsletter - All the Biggest, Most Interesting Stories in your Inbox
PB Newsletter Signup
1 Comment
- 2 0
Helpful article Derek, Thanks. Will bear this in mind should anyone ask in the future!
Login or Sign Up