Zep's How-To Mythbusters – Leaning into Corners
In this latest installment of our Zeptechniques Mythbuster Series, we’ll be looking at the common techniques described when riding flat corners versus berms. This article is aimed at the discerning rider who's keen to learn more as we analyze certain techniques in more depth. We'll break them down and help separate the myths from the truths and hopefully improve your understanding of what techniques to use, when, and how much.
But before we get into it, be sure to take a look at our previous articles in the links at the bottom of this page to get a feel for what this series is about and why it’s important in helping rider's, not only improve their skills, but also improve their approach to learning through a “pro’s and con’s” ethos, rather than “right and wrong”.
How to Learn… one thing at a time
The most common thing we see with cornering tips is the typical "list" of all the things to do in a corner to improve your speed. It usually looks a little something like this and I've highlighted the core riding skills in brackets, to help show just how many different components of riding, what we call "Skills", are included in a corner:
1. Stay centred and mobile (Position & Balance)
2. Pick a good line, wide entry (Trail Scanning – line choice)
3. Brake before the corner (Braking)
4. Lean in (Angulation/Inclination) and rotate hips/knees (Rotation)
5. Pump at the apex (Pressure Control)
6. Look for the exit (Trail Scanning)
7. Pedal away (Gears/Cadence)
There are so many skills involved with every corner, but how many of them can you think about at once?!
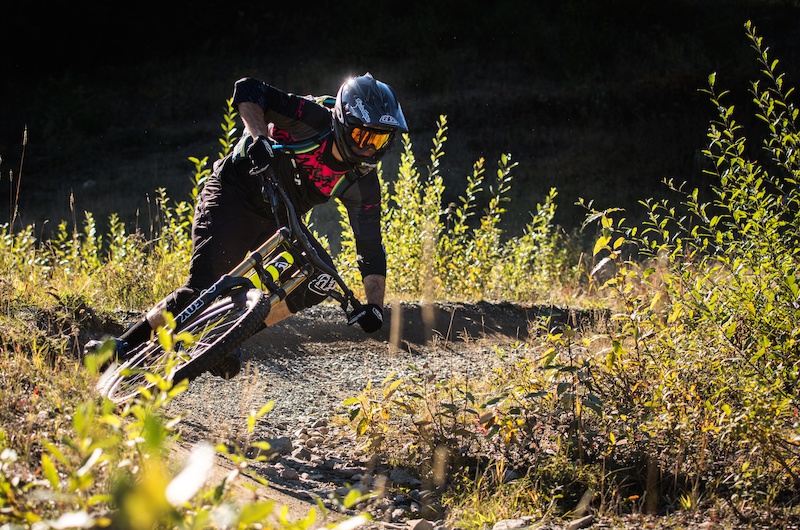
![ZEP How to - Corners]()
While this can be useful in terms of presenting information, this also represents a failure in understanding the difference between how to corner, versus, how to learn how to corner.
Why? Because to genuinely improve something, a student needs to have total focus to actively try different things with it, to help create different results or outcomes in their riding. However, there is simply no way a rider can think of all those things, or even three of them, through every corner and focus on any one of them effectively enough to genuinely improve.
So, even though cornering requires all of the fundamental components (Skills) of bike riding, the best way to refine your cornering is to work on one at a time. It's rather like upgrading your bike – you only need to change one component and the whole thing can feel better. This is the essential approach to learning how to corner effectively, and we call it Skill-based Teaching.
Another advantage of this approach is when the rider does feel an improvement, they'll know exactly why; the relationship between cause and effect is very clear. I've taught thousands of cornering lessons over the years and while we may address three or more of the things on the list above, each "part" of the lesson will only focus on one at a time. This helps create real, lasting, skill development, right there and then, on the trail, in the lesson.
Previous Zep Mythbuster articles (below) have primarily used this approach, discussing the skills of Position & Balance and Braking, independently. For this article, we'll take a look at the Direction Control skill of leaning the bike with Angulation and Inclination.
![ZEP Mountain Bike Camps]()
Angulation (bending): leaning the bike more than the body, using separation
Angulation involves a rider leaning the bike more than they lean their body. A rider can do this by:
Ready Position: Centred, low and wide, with elbows out and chin over the stem. This gives the rider a strong, stable position to move from, with more range of movement to lean and adjust the bike underneath them.
Arms: Extend the inside arm while bending the outside arm. This allows the bike to lean more than the rider and promotes good bike-body separation.
Rotation: To help lean the bike underneath even more, the rider can also move their hips to the outside of the turn to counterbalance, as they rotate their hips (and knees) into the turn: "pointing the belly button, into the turn" or "shining the freakin' laser beam"! As the bike turns left, the rider moves their hips to the right, while "rotating" their core, to the left. However, I want to focus on just the angulation part of cornering here, to keep you guys thinking about one thing at a time, so let's keep on track.
The bike-body separation from this angulation, therefore, gives three big advantages to a rider's Direction Control and cornering:
Stability
By keeping the rider’s weight more on top of the bike, this provides a more stable position. Being stable results in more “strength” and control as the rider is in a better position to react, adapt and manipulate the bike through the corner. Stability is particularly increased in faster and tighter corners, where the rider can lean the bike more, but keep the body more upright. The more the rider has to tip their mass into the turn (and away from their base of support), the less stability they potentially have.
Adjustability
Angulation promotes separation. Separation is the bike moving independently of the body, allowing a rider to move and lean the bike underneath them more easily, quickly, and even to a greater extent. This allows a rider to adjust through corners (controlling slides or changing lines), lean the bike more (for tighter corners and/or to corner faster), and to link corners with more flow and control. This ability to constantly fine tune and adjust into and through corners is one of the key benefits to angulation.
Traction
Angulation improves traction, firstly because it helps the rider lean the bike more to engage the side knobs of the tires, rather like engaging the edge of a ski. The side knobs are specifically designed to better handle the lateral (sideways) forces associated with a corner, so it makes sense to try and use them.
The other reason is a little more complex. With the rider's mass moved slightly towards the outside of the turn (relative to no angulation), their weight is more directly "over" the tires. This provides a more stable position to then push down on the bike, or to resist forces from the terrain; both resulting in more pressure and therefore grip, on the tires. It's this more stable riding position that angulation provides (along with engaging the side knobs), that makes it easier for the rider to control traction, through the corner.
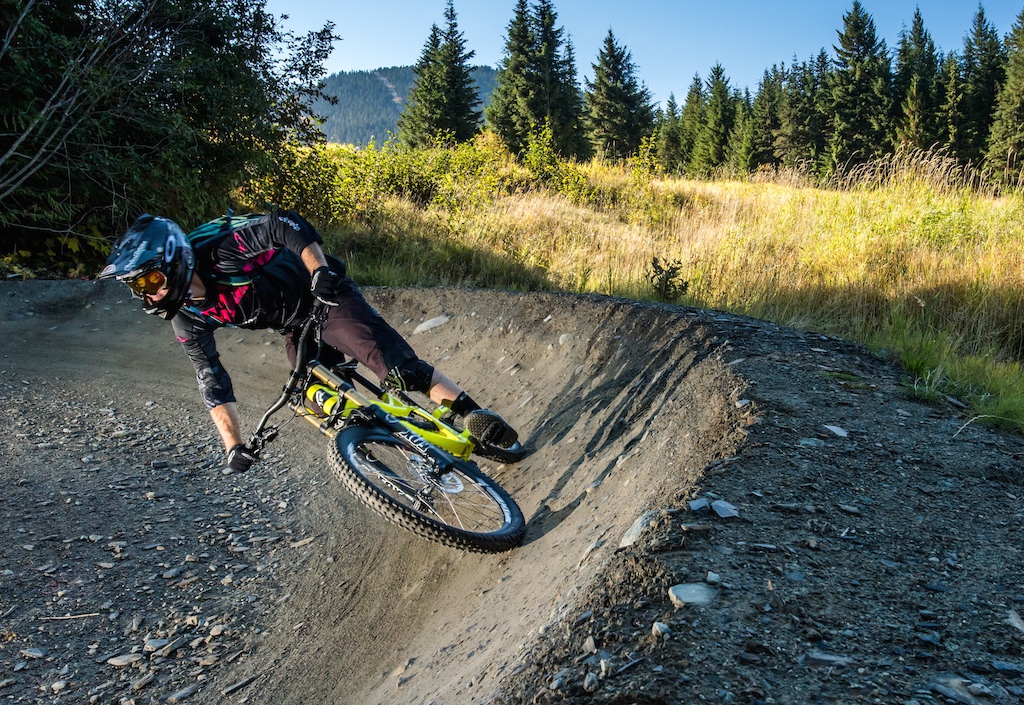
![ZEP Mountain Bike Camps]()
Inclination (tipping): leaning the bike and body together
Leaning the bike and body together is a fundamental technique for maintaining balance through flowing or downhill corners. Generally speaking, to initiate a change in direction and to be balanced, it requires a rider to lean the body into the turn (technically speaking, to have their mass inside the arc, relative to the tires). This movement is called inclination, or "tipping". In some cases, this movement is very small and sometimes even hard to notice, but it is still there.
Inclination is a key component to Direction Control and is present in almost all corners. The exception to this rule is very slow, tight, corners (e.g. uphill switchback) where a rider may need to counter balance the bike (lean it to the outside of the corner), and/or keep their body upright, instead of leaning, to avoid falling to the inside of the turn. Even high speed, flat corners still require a rider to lean their body into the turn a little bit. The two key movements for inclination, are:
Body: A rider can initiate the lean of their body in a number of different ways. Simple, small movements, like letting the inside shoulder "tip" into the turn, can be enough to get the rider and the bike, leaning.
Arms: Keeping the arms evenly flexed will ensure the bike leans with the rider so the bike and body can move more together, as one unit.
The Myths
The problem with people coaching or applying these two techniques is not so much how to do them, but more when and how much to do them. Here in lies the common myths for flat and banked corners. Below are some examples we see and hear when coaching in Whistler and around the world…
Flat Corners
• Always lean the bike more underneath you
• Keep the body upright
• If you lean your body, you'll wash out
Berms
• Always lean with the bike
• Don't angulate or tip the bike underneath you
• Keep your body and bike 90 degrees to the berm
The Solution
The reality is, just like in skiing, good, well-balanced cornering almost always involves both these components of "bending" and "tipping". From start to finish, most corners will require both; some angulation and some inclination. The point isn't when to do one and not the other but, given the type of corner, which one should be applied or focused on more. And here we find the place to improve your confidence, flow, consistency, and even speed, through all types of corners.
![Obligatory Brendog smashing a corner photo.]()
Flat High-Speed Corners
Advanced Riders
Common Flaw – Many riders lean their body into the corner too late and therefore quite often, not enough.
Solution – Although angulation is going to be important to keep more stable and to allow the rider room to control any potential slides, the rider still needs to lean their body. It's amazing what a small increase in body lean will do to help make high speed, flat corners, more stable and easier to initiate.
Learning Tips – Choose a wide entry line and practice leaning your body a tiny amount, very slightly before the corner. This essentially makes the corner larger and begins the movements earlier to get the bike leaning to make the turn. With the body tipped in just slightly, this also helps any angulation that needs to happen later in the corner.
Flat Corners
Beginner to Intermediate Riders
Common Flaw – Newer riders can ride too tall or stiff and/or find separation between the bike and body more difficult, reducing the ability to lean the bike independently from the body (angulation)
Solution – Relaxing in a lower body position to encourage a better range of movement for easier angulation and confidence.
Learning Tips – Find some mellow terrain with good traction. A dry, grassy field or empty car park, is ideal. Use the arms (extend inside arm, bend outside arm) to lean the bike left and right, as the rider also steers: turn the bars slightly to the left, as the bike leans left. The goal is to weave the bike left to right so the tires leave a "snake-like" trail on the ground (the tires shouldn't continue in a straight line, as you tip the bike side-to-side).
Try to have both bike and body leaning into the turn, but the bike leaning more than the rider. Feeling the bike weaving underneath you as your body remains relatively "quiet", is what you're looking for. Practicing this simple drill can do wonders for your riding. Challenge yourself with cones to help encourage closer, smaller or faster turns and wear some knee pads and gloves! The downhill athletes on our Zep Race Team love this one.
![Whistler Phat Wednesday - Race 1 - B Line Photo Credit - Laurence Crossman-Emms Photography]()
Tight Berms with Speed
Common Flaw – Riders don't commit enough to leaning into the berm, causing the bike to lose speed or track wide.
Solution – Try to find a slightly lower, more "Ready" riding position, by bending the elbows, hinging at the waist and keeping your chin over the stem (see previous articles, below). A lower, centred position makes it easier to lean, giving you more confidence to commit to the berm. This position will also allow you to lean and adjust the bike underneath you more easily if needed.
Learning Tip – Find a small to medium radius berm you are comfortable with that allows a rider to go quite fast. In this case, the berm should be well maintained, with good traction and a steep "wall", like on a pump track. Start mellow, but gradually ride the berm with increasing speed, leaning more as you go faster. To help you lean and commit, try to keep your shoulders parallel to the surface of the terrain. As the terrain "tips", let your shoulders (keeping the rest of your body moving together) tip into the turn as well. Don't forget to stay mobile so you can adjust the bike underneath you in the rest of the corner if you need.
![Adrien Loron]()
Linking Berms
Common Flaw – Riders are too "static" having been told to "lean with the bike in berms", making it difficult to flow from one berm to the next.
Solution – Loosen up and allow the bike to move underneath you, adding a little more angulation, into and out of (tipping the bike the other way) the berms.
Learning Tip – As an exercise, ride the berms with no angulation (staying together with the bike), then ride the berms using as much angulation as possible (leaning the body as little as possible). The right mix will be somewhere in between. Try and find the right balance where the body is moving only as much as it needs for stability, but the arms are doing most of the quick, dynamic work, to lead and direct the bike through the berms.
Aim to feel like you are maintaining flow and speed through successive corners, rather than each corner gradually slowing you down. This same idea will also help you adapt to different berms at different speeds, as you continue to find the right balance of skills and movements.
![Paul Howard PMBIA Technical Director]()
I think you get the point; corners aren't a simple thing. They involve every skill on a bike and every corner is different. Applying a simple "one size fits all" approach isn't going to cut it. There's so much to think about in corners so there's so much you can do to improve your cornering. Just be careful and don't fall into the typical maneuver-based approach, where you have to think of three, four or five things, every corner! Pick one thing, work on it, and you'll improve.
This article is a good example. Look how much we've discussed by just talking about leaning the bike. The less you focus on, the more you can learn about it and the more you can truly develop it.
The New Message
"Long story short, angulation (leaning the bike underneath you) isn't just for flat corners and inclination (leaning with the bike), isn't just for berms. Pretty much all corners can have both. Knowing and practicing this can help make your cornering faster, flow better, with more traction, stability, and confidence."
When to practice all of this and what about pedal positions?
This is a simple one. Make sure you have the basics dialed first. So many people try to work on leaning the bike underneath them, way before they can pick a good line, brake smoothly and maintain a strong, mobile position through the corners. Position & Balance is a fundamental component, without that, every other skill is going to be way harder. Check out our previous articles below that discuss Braking and Position & Balance.
If you're wondering about pedal positions and how these relate to angulation, check out the "How to Learn..." article below for more info. But in a nutshell, typically speaking you can drop the outside pedal down to help angulation on flat corners, and keep the pedals level to help inclination and stability, in berms. However, again, the opposite can also be true, it all just depends on the type of corner, riding style and desired outcome of the rider.
I'll leave you with this picture of Sam Reynolds racing in Speed n Style... the perfect example of showing how techniques can be applied in ways you don't think are "normal". He's riding fast, on a loose, completely flat corner, with absolutely no angulation! Not ideal for most riders, but still, it highlights our message. Techniques aren't "right" or "wrong", they're just tools to apply as much as you need, when you need, and with an open mind and good coaching, you'll continue to learn the right balance.
![Sam Renyolds]()
Safe riding and happy trails,
– Paul
About the Author
Paul Howard is the Owner-Director and Head Coach of Zeptechniques and the Zep Race Team, Technical Director of the Professional Mountain Bike Instructor Association, Head Snowboard Trainer for Whistler Blackcomb SnowSchool, Technical Education Committee and 2015 Interski Team Member for the Canadian Association of Snowboard Instructors, and has been teaching mountain biking and training mountain bike instructors around the world, since the late 90's.
About Zep
ZEPtechniques is a Whistler-based mountain bike camps and instructor training company. Established in 2006, Zep offers single and multi-week, adult specific Rider Improvement camps, as well as Weekend Camps, Float Plane Camps, Private Coaching and Tours. ZEP's Instructor Training services include the industry's original, multi-week mountain bike Instructor Training Camps; training riders four days per week with evening seminars on suspension set up, bike mechanics, nutrition, as well as strength and conditioning sessions, all with industry experts. As developers of the internationally available Professional Mountain Bike Instructor (PMBI) Certifications and Directors of the PMBI Association, ZEP has long played a key role in establishing and improving the finest teaching practices and instructor certifications, within mountain biking.
Zep's Partners
Transition Bikes
ANVL Components
Fox Racing Shox
Troy Lee Designs
Five Ten
MRP
Evoc
Evolution Whistler
Whistler Mountain Bike Park
Vorsprung Suspension
Spun Studios
Photos
Bike Park Photos
@parisgore
Previous articles
Zep Mythbusters – Position & Balance for Steeps & Heavy Braking
Zep Mythbusters – Body Position for Descending & Cornering
Zep Mythbusters – Braking in Downhill Corners
Zep Mythbusters – Climbing in Technical Terrain
Zep Mythbusters – How to Learn, featuring a discussion on Pedal Positions in Corners
MENTIONS: @zeptechniques / @TransitionBikeCompany / @foxracingshox / @troyleedesigns / @FiveTen / @evocsports / @WhistlerMountainBikePark / @VorsprungSuspension
But before we get into it, be sure to take a look at our previous articles in the links at the bottom of this page to get a feel for what this series is about and why it’s important in helping rider's, not only improve their skills, but also improve their approach to learning through a “pro’s and con’s” ethos, rather than “right and wrong”.
How to Learn… one thing at a time
The most common thing we see with cornering tips is the typical "list" of all the things to do in a corner to improve your speed. It usually looks a little something like this and I've highlighted the core riding skills in brackets, to help show just how many different components of riding, what we call "Skills", are included in a corner:
1. Stay centred and mobile (Position & Balance)
2. Pick a good line, wide entry (Trail Scanning – line choice)
3. Brake before the corner (Braking)
4. Lean in (Angulation/Inclination) and rotate hips/knees (Rotation)
5. Pump at the apex (Pressure Control)
6. Look for the exit (Trail Scanning)
7. Pedal away (Gears/Cadence)
There are so many skills involved with every corner, but how many of them can you think about at once?!

Fantastic – Whistler Mountain Bike Park
While this can be useful in terms of presenting information, this also represents a failure in understanding the difference between how to corner, versus, how to learn how to corner.
Why? Because to genuinely improve something, a student needs to have total focus to actively try different things with it, to help create different results or outcomes in their riding. However, there is simply no way a rider can think of all those things, or even three of them, through every corner and focus on any one of them effectively enough to genuinely improve.
So, even though cornering requires all of the fundamental components (Skills) of bike riding, the best way to refine your cornering is to work on one at a time. It's rather like upgrading your bike – you only need to change one component and the whole thing can feel better. This is the essential approach to learning how to corner effectively, and we call it Skill-based Teaching.
Another advantage of this approach is when the rider does feel an improvement, they'll know exactly why; the relationship between cause and effect is very clear. I've taught thousands of cornering lessons over the years and while we may address three or more of the things on the list above, each "part" of the lesson will only focus on one at a time. This helps create real, lasting, skill development, right there and then, on the trail, in the lesson.
Previous Zep Mythbuster articles (below) have primarily used this approach, discussing the skills of Position & Balance and Braking, independently. For this article, we'll take a look at the Direction Control skill of leaning the bike with Angulation and Inclination.
Angulation (bending): leaning the bike more than the body, using separation
Angulation involves a rider leaning the bike more than they lean their body. A rider can do this by:
Ready Position: Centred, low and wide, with elbows out and chin over the stem. This gives the rider a strong, stable position to move from, with more range of movement to lean and adjust the bike underneath them.
Arms: Extend the inside arm while bending the outside arm. This allows the bike to lean more than the rider and promotes good bike-body separation.
Rotation: To help lean the bike underneath even more, the rider can also move their hips to the outside of the turn to counterbalance, as they rotate their hips (and knees) into the turn: "pointing the belly button, into the turn" or "shining the freakin' laser beam"! As the bike turns left, the rider moves their hips to the right, while "rotating" their core, to the left. However, I want to focus on just the angulation part of cornering here, to keep you guys thinking about one thing at a time, so let's keep on track.
The bike-body separation from this angulation, therefore, gives three big advantages to a rider's Direction Control and cornering:
Stability
By keeping the rider’s weight more on top of the bike, this provides a more stable position. Being stable results in more “strength” and control as the rider is in a better position to react, adapt and manipulate the bike through the corner. Stability is particularly increased in faster and tighter corners, where the rider can lean the bike more, but keep the body more upright. The more the rider has to tip their mass into the turn (and away from their base of support), the less stability they potentially have.
Adjustability
Angulation promotes separation. Separation is the bike moving independently of the body, allowing a rider to move and lean the bike underneath them more easily, quickly, and even to a greater extent. This allows a rider to adjust through corners (controlling slides or changing lines), lean the bike more (for tighter corners and/or to corner faster), and to link corners with more flow and control. This ability to constantly fine tune and adjust into and through corners is one of the key benefits to angulation.
Traction
Angulation improves traction, firstly because it helps the rider lean the bike more to engage the side knobs of the tires, rather like engaging the edge of a ski. The side knobs are specifically designed to better handle the lateral (sideways) forces associated with a corner, so it makes sense to try and use them.
The other reason is a little more complex. With the rider's mass moved slightly towards the outside of the turn (relative to no angulation), their weight is more directly "over" the tires. This provides a more stable position to then push down on the bike, or to resist forces from the terrain; both resulting in more pressure and therefore grip, on the tires. It's this more stable riding position that angulation provides (along with engaging the side knobs), that makes it easier for the rider to control traction, through the corner.
Crank It Up – Whistler Mountain Bike Park
Inclination (tipping): leaning the bike and body together
Leaning the bike and body together is a fundamental technique for maintaining balance through flowing or downhill corners. Generally speaking, to initiate a change in direction and to be balanced, it requires a rider to lean the body into the turn (technically speaking, to have their mass inside the arc, relative to the tires). This movement is called inclination, or "tipping". In some cases, this movement is very small and sometimes even hard to notice, but it is still there.
Inclination is a key component to Direction Control and is present in almost all corners. The exception to this rule is very slow, tight, corners (e.g. uphill switchback) where a rider may need to counter balance the bike (lean it to the outside of the corner), and/or keep their body upright, instead of leaning, to avoid falling to the inside of the turn. Even high speed, flat corners still require a rider to lean their body into the turn a little bit. The two key movements for inclination, are:
Body: A rider can initiate the lean of their body in a number of different ways. Simple, small movements, like letting the inside shoulder "tip" into the turn, can be enough to get the rider and the bike, leaning.
Arms: Keeping the arms evenly flexed will ensure the bike leans with the rider so the bike and body can move more together, as one unit.
The Myths
The problem with people coaching or applying these two techniques is not so much how to do them, but more when and how much to do them. Here in lies the common myths for flat and banked corners. Below are some examples we see and hear when coaching in Whistler and around the world…
Flat Corners
• Always lean the bike more underneath you
• Keep the body upright
• If you lean your body, you'll wash out
Berms
• Always lean with the bike
• Don't angulate or tip the bike underneath you
• Keep your body and bike 90 degrees to the berm
The Solution
The reality is, just like in skiing, good, well-balanced cornering almost always involves both these components of "bending" and "tipping". From start to finish, most corners will require both; some angulation and some inclination. The point isn't when to do one and not the other but, given the type of corner, which one should be applied or focused on more. And here we find the place to improve your confidence, flow, consistency, and even speed, through all types of corners.
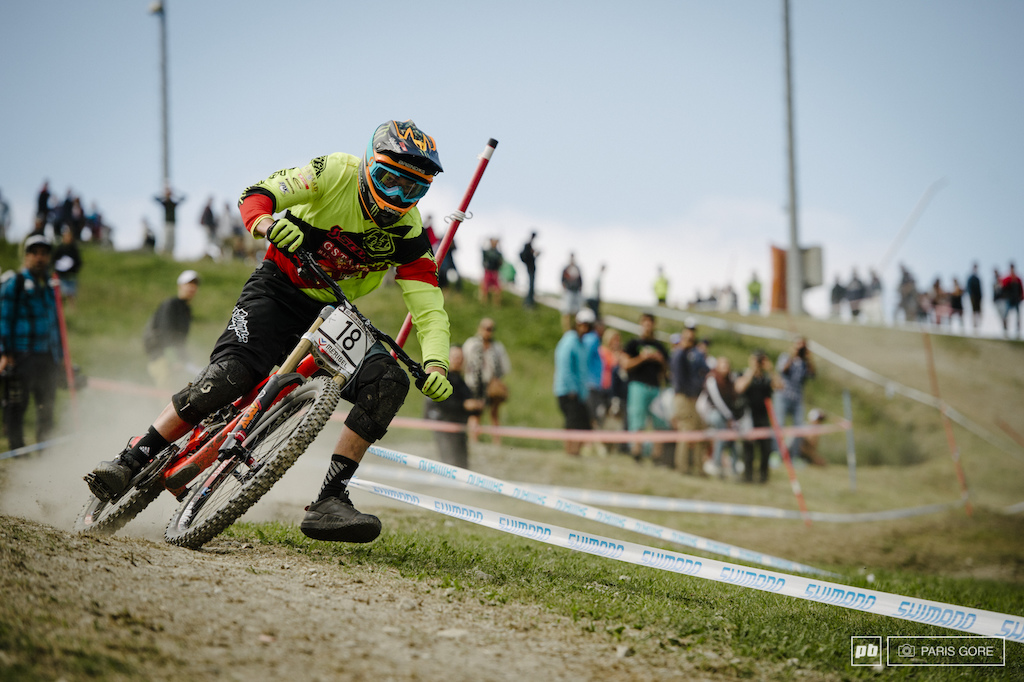
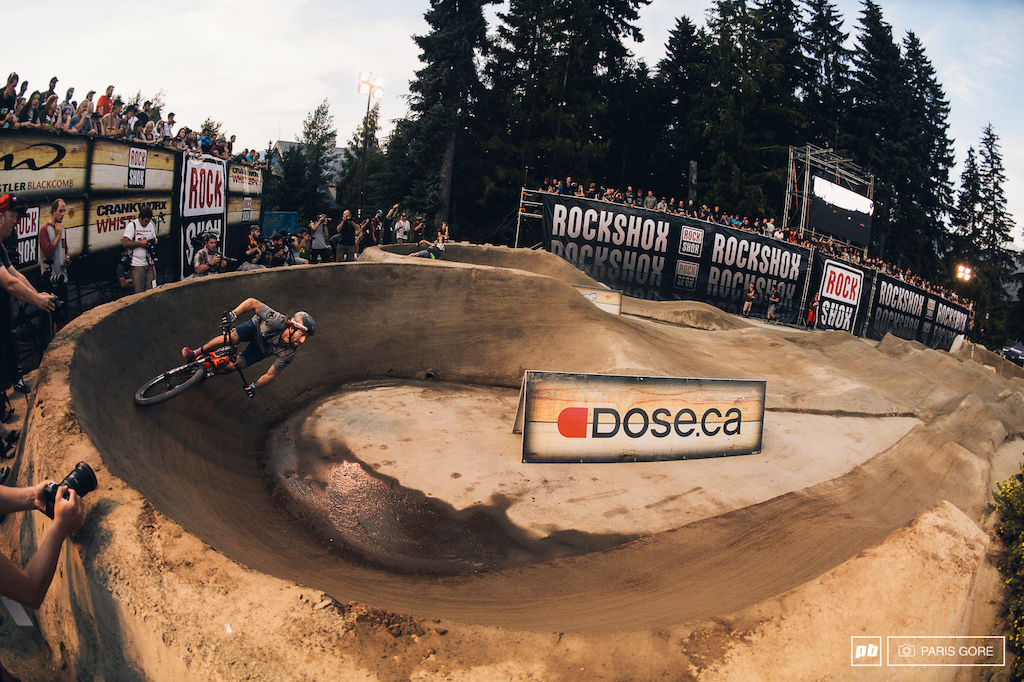
Brendog showing the perfect blend of skills; mostly leaning with the bike, but still using a small amount of angulation.
Flat High-Speed Corners
Advanced Riders
Common Flaw – Many riders lean their body into the corner too late and therefore quite often, not enough.
Solution – Although angulation is going to be important to keep more stable and to allow the rider room to control any potential slides, the rider still needs to lean their body. It's amazing what a small increase in body lean will do to help make high speed, flat corners, more stable and easier to initiate.
Learning Tips – Choose a wide entry line and practice leaning your body a tiny amount, very slightly before the corner. This essentially makes the corner larger and begins the movements earlier to get the bike leaning to make the turn. With the body tipped in just slightly, this also helps any angulation that needs to happen later in the corner.
Flat Corners
Beginner to Intermediate Riders
Common Flaw – Newer riders can ride too tall or stiff and/or find separation between the bike and body more difficult, reducing the ability to lean the bike independently from the body (angulation)
Solution – Relaxing in a lower body position to encourage a better range of movement for easier angulation and confidence.
Learning Tips – Find some mellow terrain with good traction. A dry, grassy field or empty car park, is ideal. Use the arms (extend inside arm, bend outside arm) to lean the bike left and right, as the rider also steers: turn the bars slightly to the left, as the bike leans left. The goal is to weave the bike left to right so the tires leave a "snake-like" trail on the ground (the tires shouldn't continue in a straight line, as you tip the bike side-to-side).
Try to have both bike and body leaning into the turn, but the bike leaning more than the rider. Feeling the bike weaving underneath you as your body remains relatively "quiet", is what you're looking for. Practicing this simple drill can do wonders for your riding. Challenge yourself with cones to help encourage closer, smaller or faster turns and wear some knee pads and gloves! The downhill athletes on our Zep Race Team love this one.
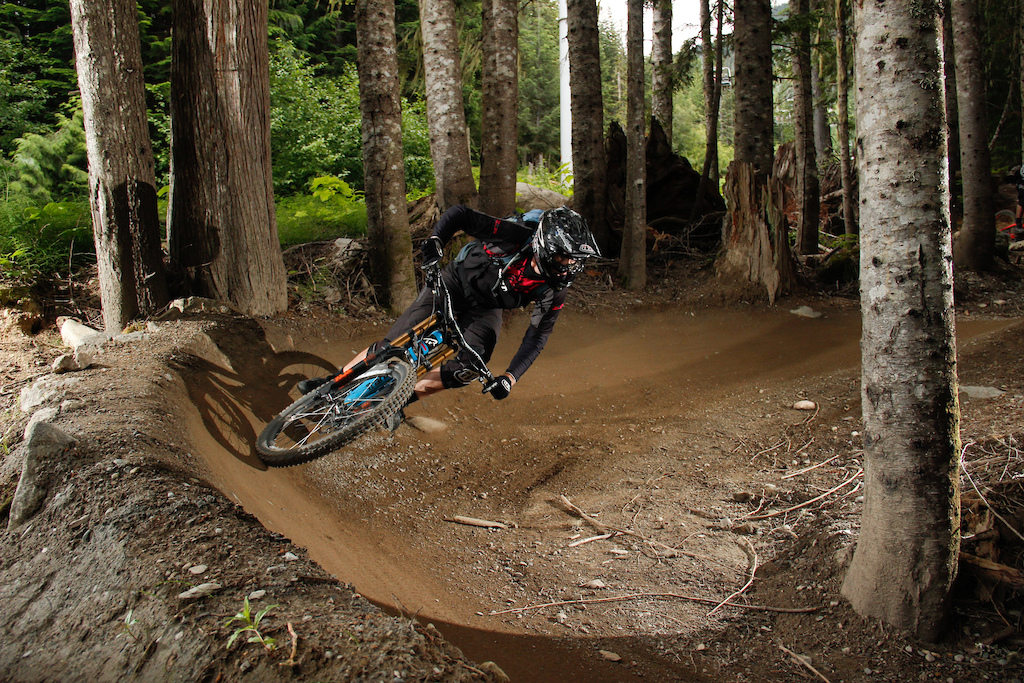
The master of flat, fast corners. Look how much Kovarik is leaning his body and not just leaning the bike underneath him. B-Line – Whistler Mountain Bike Park
Tight Berms with Speed
Common Flaw – Riders don't commit enough to leaning into the berm, causing the bike to lose speed or track wide.
Solution – Try to find a slightly lower, more "Ready" riding position, by bending the elbows, hinging at the waist and keeping your chin over the stem (see previous articles, below). A lower, centred position makes it easier to lean, giving you more confidence to commit to the berm. This position will also allow you to lean and adjust the bike underneath you more easily if needed.
Learning Tip – Find a small to medium radius berm you are comfortable with that allows a rider to go quite fast. In this case, the berm should be well maintained, with good traction and a steep "wall", like on a pump track. Start mellow, but gradually ride the berm with increasing speed, leaning more as you go faster. To help you lean and commit, try to keep your shoulders parallel to the surface of the terrain. As the terrain "tips", let your shoulders (keeping the rest of your body moving together) tip into the turn as well. Don't forget to stay mobile so you can adjust the bike underneath you in the rest of the corner if you need.
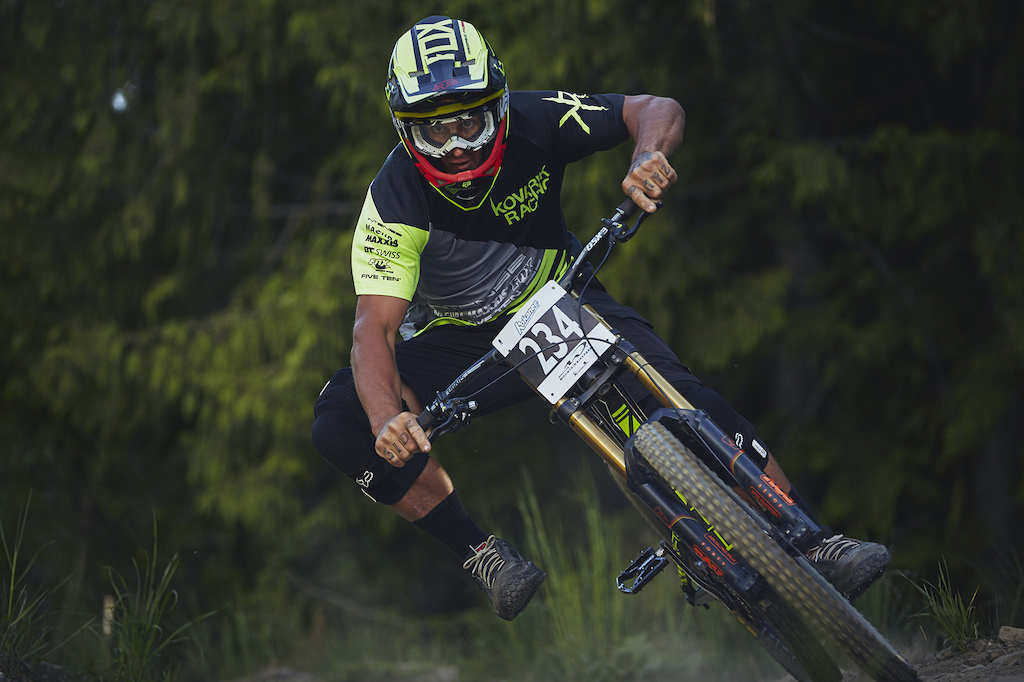
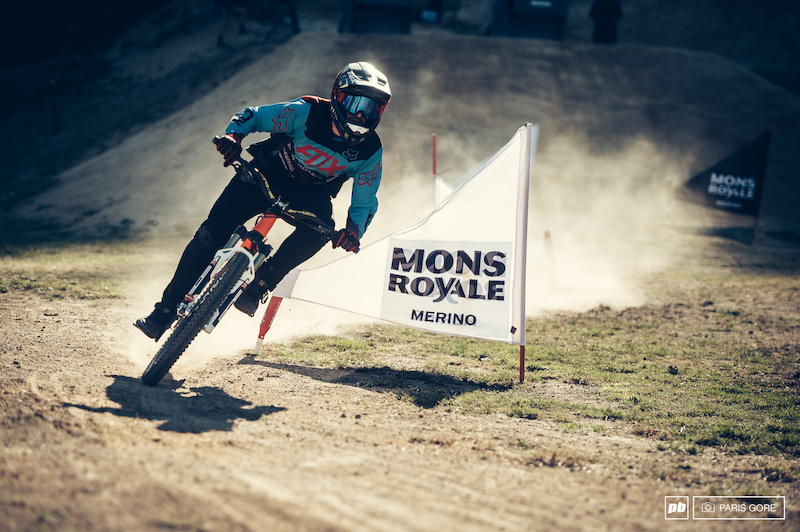
Pump Track Racing – Crankworx
Linking Berms
Common Flaw – Riders are too "static" having been told to "lean with the bike in berms", making it difficult to flow from one berm to the next.
Solution – Loosen up and allow the bike to move underneath you, adding a little more angulation, into and out of (tipping the bike the other way) the berms.
Learning Tip – As an exercise, ride the berms with no angulation (staying together with the bike), then ride the berms using as much angulation as possible (leaning the body as little as possible). The right mix will be somewhere in between. Try and find the right balance where the body is moving only as much as it needs for stability, but the arms are doing most of the quick, dynamic work, to lead and direct the bike through the berms.
Aim to feel like you are maintaining flow and speed through successive corners, rather than each corner gradually slowing you down. This same idea will also help you adapt to different berms at different speeds, as you continue to find the right balance of skills and movements.
Ninja Cougar – Whistler Mountain Bike Park
I think you get the point; corners aren't a simple thing. They involve every skill on a bike and every corner is different. Applying a simple "one size fits all" approach isn't going to cut it. There's so much to think about in corners so there's so much you can do to improve your cornering. Just be careful and don't fall into the typical maneuver-based approach, where you have to think of three, four or five things, every corner! Pick one thing, work on it, and you'll improve.
This article is a good example. Look how much we've discussed by just talking about leaning the bike. The less you focus on, the more you can learn about it and the more you can truly develop it.
The New Message
"Long story short, angulation (leaning the bike underneath you) isn't just for flat corners and inclination (leaning with the bike), isn't just for berms. Pretty much all corners can have both. Knowing and practicing this can help make your cornering faster, flow better, with more traction, stability, and confidence."
When to practice all of this and what about pedal positions?
This is a simple one. Make sure you have the basics dialed first. So many people try to work on leaning the bike underneath them, way before they can pick a good line, brake smoothly and maintain a strong, mobile position through the corners. Position & Balance is a fundamental component, without that, every other skill is going to be way harder. Check out our previous articles below that discuss Braking and Position & Balance.
If you're wondering about pedal positions and how these relate to angulation, check out the "How to Learn..." article below for more info. But in a nutshell, typically speaking you can drop the outside pedal down to help angulation on flat corners, and keep the pedals level to help inclination and stability, in berms. However, again, the opposite can also be true, it all just depends on the type of corner, riding style and desired outcome of the rider.
I'll leave you with this picture of Sam Reynolds racing in Speed n Style... the perfect example of showing how techniques can be applied in ways you don't think are "normal". He's riding fast, on a loose, completely flat corner, with absolutely no angulation! Not ideal for most riders, but still, it highlights our message. Techniques aren't "right" or "wrong", they're just tools to apply as much as you need, when you need, and with an open mind and good coaching, you'll continue to learn the right balance.
Safe riding and happy trails,
– Paul
About the Author
Paul Howard is the Owner-Director and Head Coach of Zeptechniques and the Zep Race Team, Technical Director of the Professional Mountain Bike Instructor Association, Head Snowboard Trainer for Whistler Blackcomb SnowSchool, Technical Education Committee and 2015 Interski Team Member for the Canadian Association of Snowboard Instructors, and has been teaching mountain biking and training mountain bike instructors around the world, since the late 90's.
About Zep
ZEPtechniques is a Whistler-based mountain bike camps and instructor training company. Established in 2006, Zep offers single and multi-week, adult specific Rider Improvement camps, as well as Weekend Camps, Float Plane Camps, Private Coaching and Tours. ZEP's Instructor Training services include the industry's original, multi-week mountain bike Instructor Training Camps; training riders four days per week with evening seminars on suspension set up, bike mechanics, nutrition, as well as strength and conditioning sessions, all with industry experts. As developers of the internationally available Professional Mountain Bike Instructor (PMBI) Certifications and Directors of the PMBI Association, ZEP has long played a key role in establishing and improving the finest teaching practices and instructor certifications, within mountain biking.
Zep's Partners
Transition Bikes
ANVL Components
Fox Racing Shox
Troy Lee Designs
Five Ten
MRP
Evoc
Evolution Whistler
Whistler Mountain Bike Park
Vorsprung Suspension
Spun Studios
Photos
Bike Park Photos
@parisgore
Previous articles
Zep Mythbusters – Position & Balance for Steeps & Heavy Braking
Zep Mythbusters – Body Position for Descending & Cornering
Zep Mythbusters – Braking in Downhill Corners
Zep Mythbusters – Climbing in Technical Terrain
Zep Mythbusters – How to Learn, featuring a discussion on Pedal Positions in Corners
MENTIONS: @zeptechniques / @TransitionBikeCompany / @foxracingshox / @troyleedesigns / @FiveTen / @evocsports / @WhistlerMountainBikePark / @VorsprungSuspension
Author Info:

Must Read This Week
Sign Up for the Pinkbike Newsletter - All the Biggest, Most Interesting Stories in your Inbox
PB Newsletter Signup
You do such a great job of articulating and demonstrating skills in a static fashion, it's really awesome and enormously helpful. Please keep posting these!!
I'd love to see one on drops. I feel like that's one of those subjects that there are a lot of misconceptions about.
step 2: huck it to flat
One of the things that helped me get the smaller ones in technical sections down was the Fluidride Like A Pro DVD, you can find it on Amazon as either a DVD or digital copy. He covers this subject really well IMO and breaks from the normal "you need to manual" technique that a lot of people preach (that certainly is a technique, but it doesn't work in every situation). The technique he teaches for this is to lower your chest as you approach the drop and come forward slightly, then either let the bike roll away or reach for the landing (depending on your speed and the size of the drop). If you have a good starting body position, you'll find that by the time your front and back wheel land, you'll be back to center and ready for the next one.
Riding in some places, hucking it off every drop just isn't going to work, because by the time you land, you've already started down the next one. I'm no expert by any means, but the prior has worked well for me so far.
Something else you can do is watch some side YT videos (Jeff Lenosky's are good) and slow them down, then analyze everything the rider does and compare it to what you are doing. I've found most people are not very good at articulating what they actually do when they ride and it's easier to watch what they do rather than what they say (with a few exceptions, the author of this article being one). That's helped me a bit with some techniques, as well.
All that said, I'd really love to see @zeptechniques go into more detail on this and get his take.
I like Lee McCormack's explanation that you can roll any drop shorter than the distance from your hand to your shoulder without any impact if you pull your chest all the way to your hands and then push them all the way out down the drop.
www.vitalmtb.com/videos/features/Vital-RAW-Eddie-Masters-Reece-Potter-Skyline-MTB-Park-Madness,28279/sspomer,2&utm_source=feedburner&utm_medium=feed&utm_campaign=Feed:+VitalMtbSpotlights+(Vital+MTB+Homepage)?cpage=2&csort=desc&embed_type=other&mobile=false&page_a=8&page_b=1Vital+MTB+Homepage
If you can read and spell it does