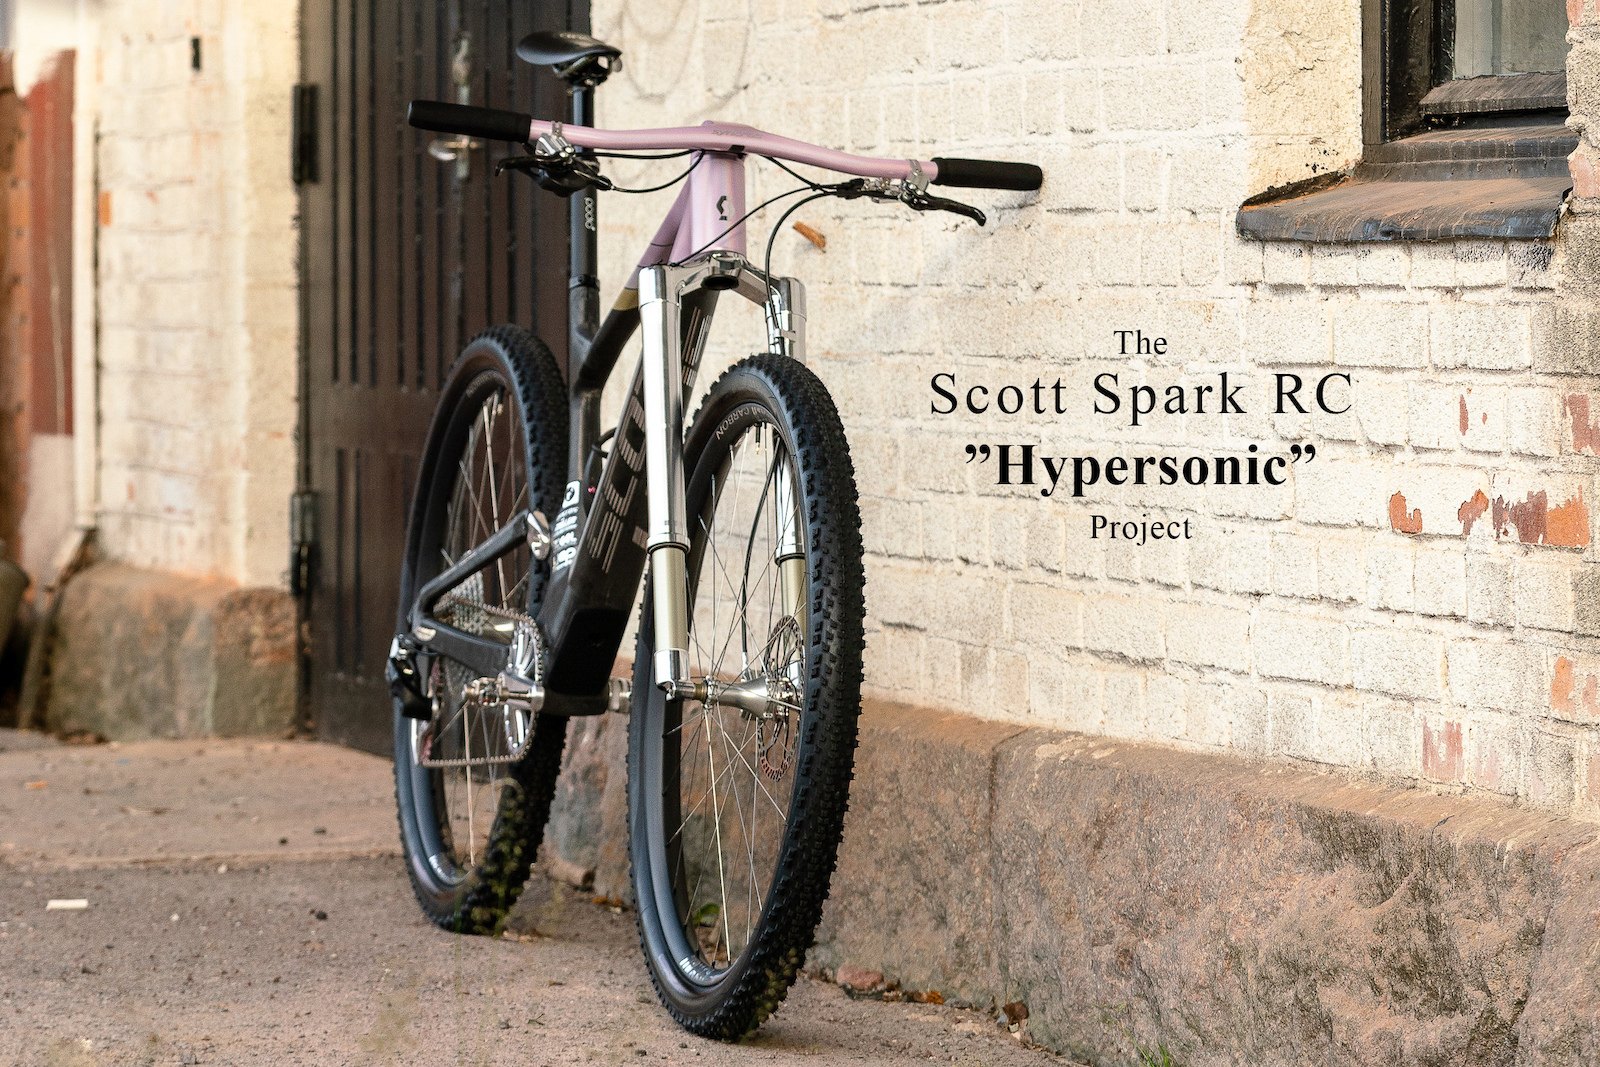
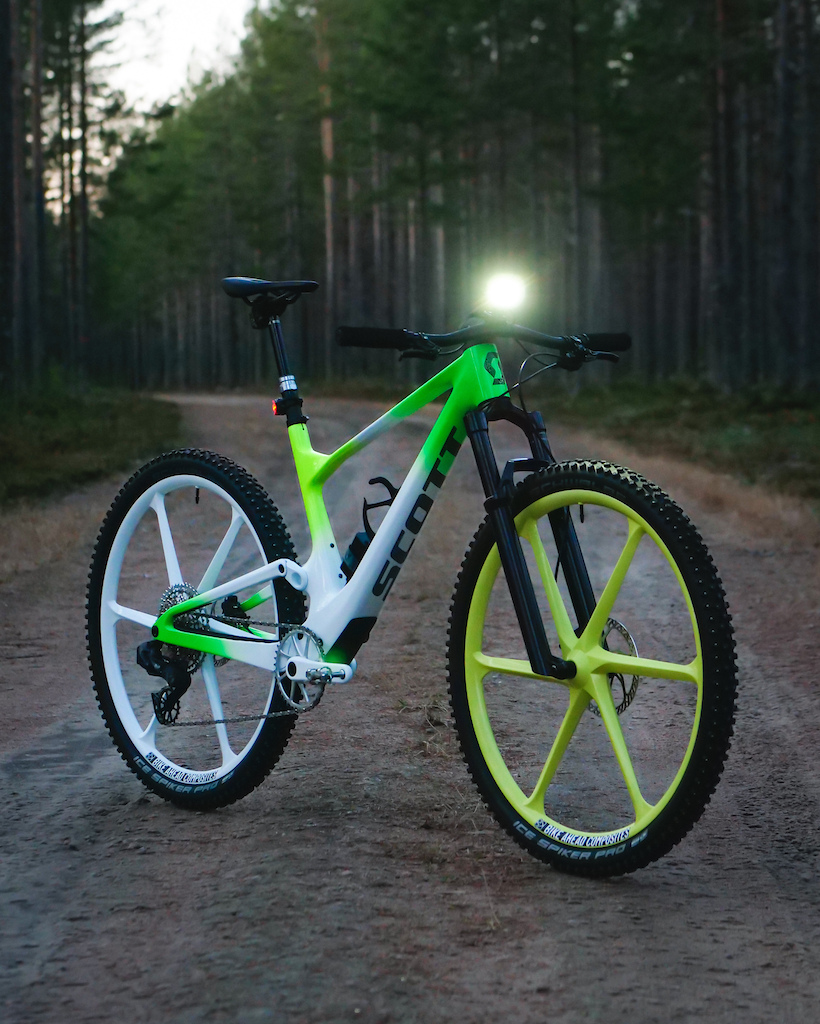
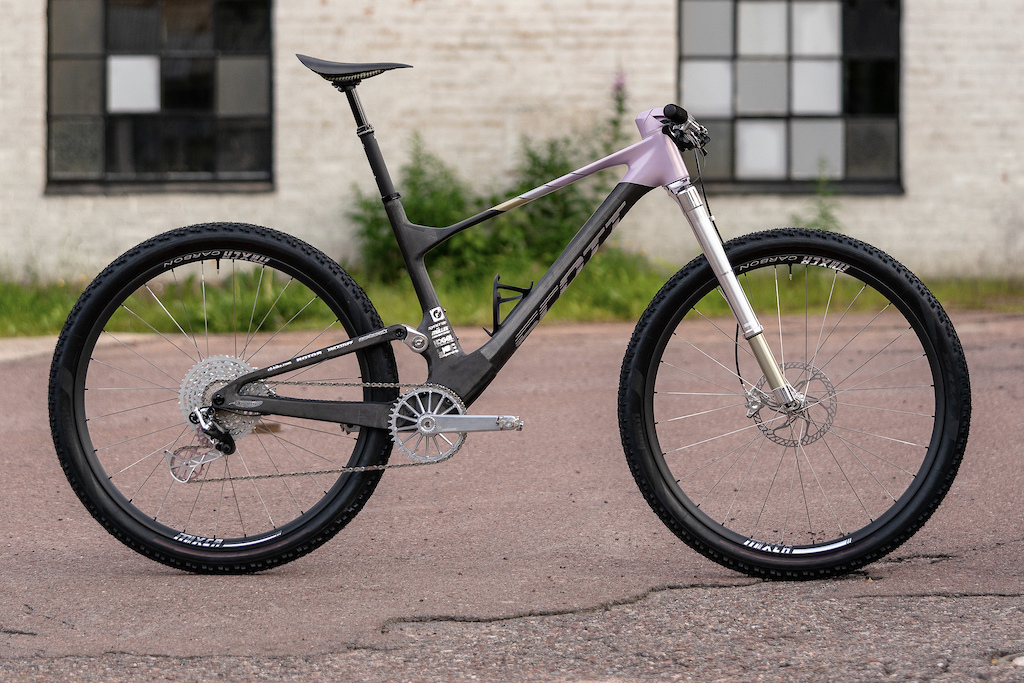
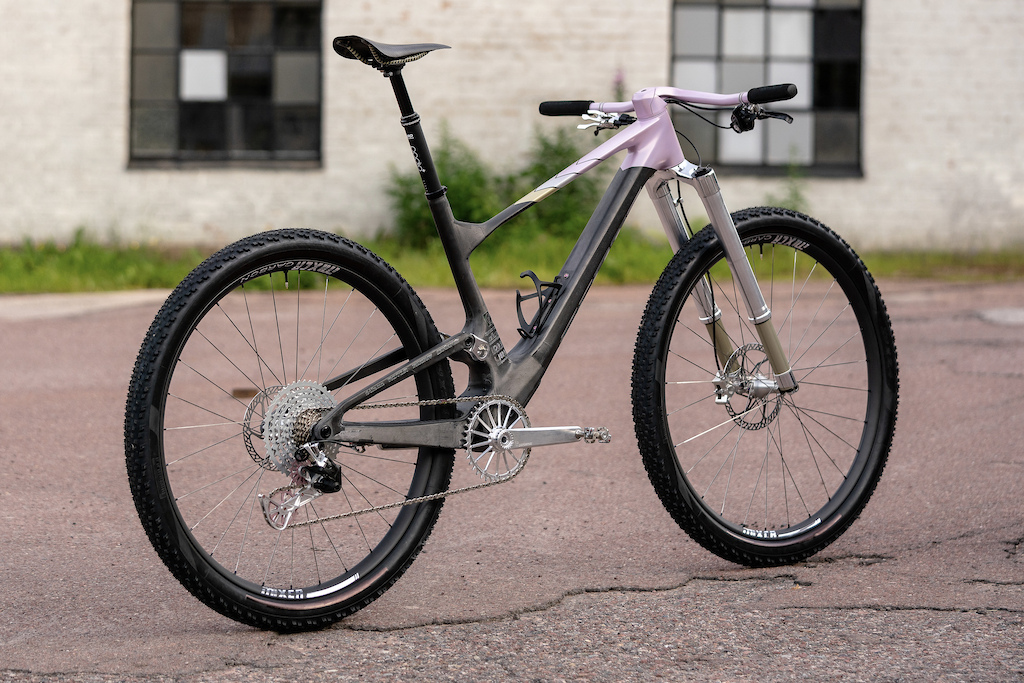
Dangerholm's Scott Spark RC Hypersonic Project
Old vs. New
In the last 10 or so years we've seen some incredible development when it comes to mountain bikes, including cross-country specific models. There has been many heated discussions in the comment sections you could take as additional proof of this, along with quite a few roasted new products and designs, but here we are with some pretty amazing bikes.
Things like 1x drivetrains, dropper seat posts, 29" wheels, wider tires, longer and slacker geometry, more travel and wider handlebars are now standard. And there's no question that this has resulted in bikes being more capable, faster and more fun to ride. You can most likely ride faster and in better control on the downhills on Nino Shurter's World Cup winning cross-country rocket than on the trail bikes of yesteryear.
A natural result of some of the aforementioned innovations and improvements however is slightly increased overall bike weight compared to previous times. Of course wider bars and wider tires, for example, will weigh more than their narrower counterparts.
Almost a cliché by now...
...but modern XC bikes sure are fun and quite capable.
While I can be a weight-weenie to say the least, having built some of the lightest bikes in the world, I'm the first to say that weight isn't everything. I'll happily take a capable and fun modern bike over any old but slightly lighter bike, no question. At the same time it can't be denied that a super light bike shines in some situations like technical climbing, making uphill fun - believe it or not, dear gravity riders. And that's coming from someone who once sat in a chair lift laughing at the mere suggestion of riding cross-country.
Luckily for me the new Spark RC is one of the lightest bikes on the market as it is. Despite adding more travel, stiffness, better integration (easy now, we'll get to that later) and geometry it barely adds any chassis weight at all over the previous generation. But when really tuning and personalizing a bike there is of course room to push things a little further still.
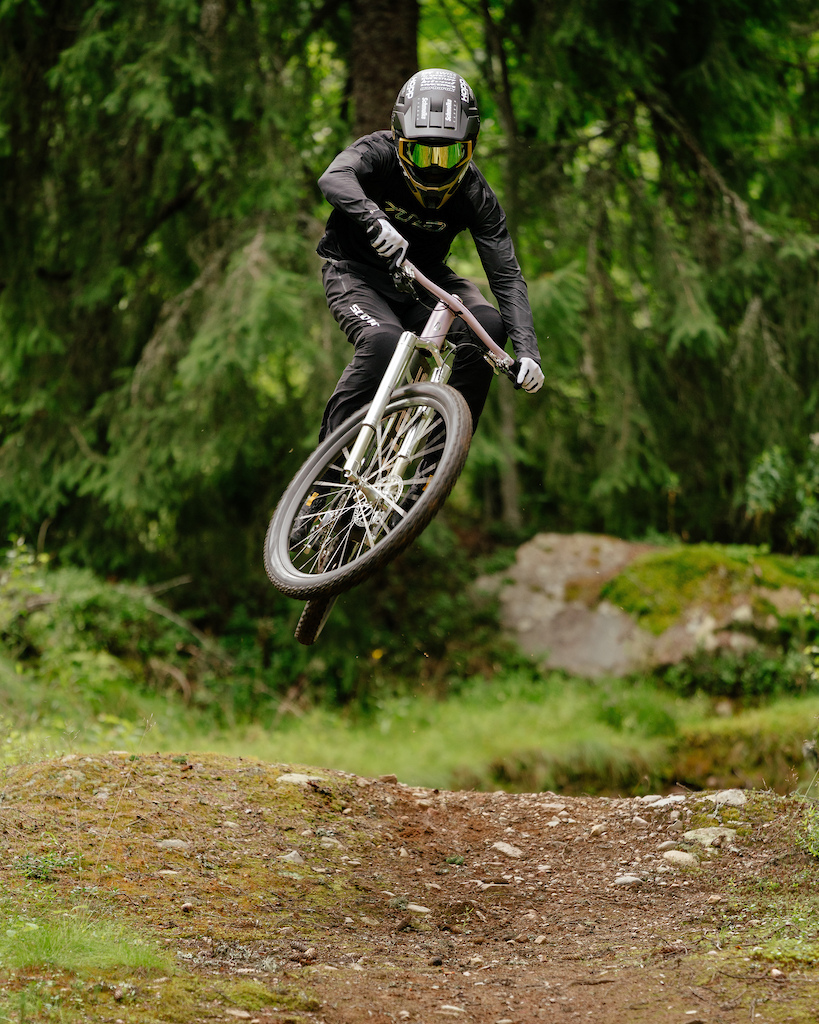
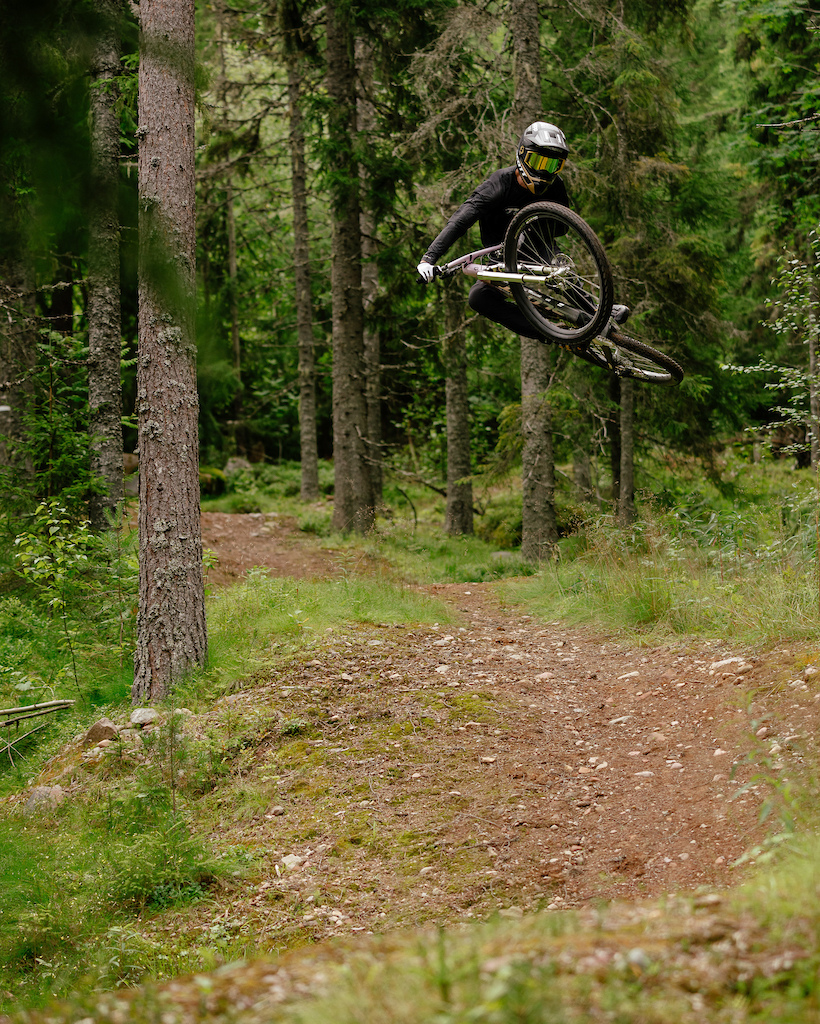
So the plan for this bike was to build a modern cross-country bike with all the new important features such as a capable frame and 120mm travel suspension, dropper seat post and 2.4" tires but at an old-school low weight. Quick and responsive on the climbs, fast and fun on the descents. In short - the best of two worlds.
Frame
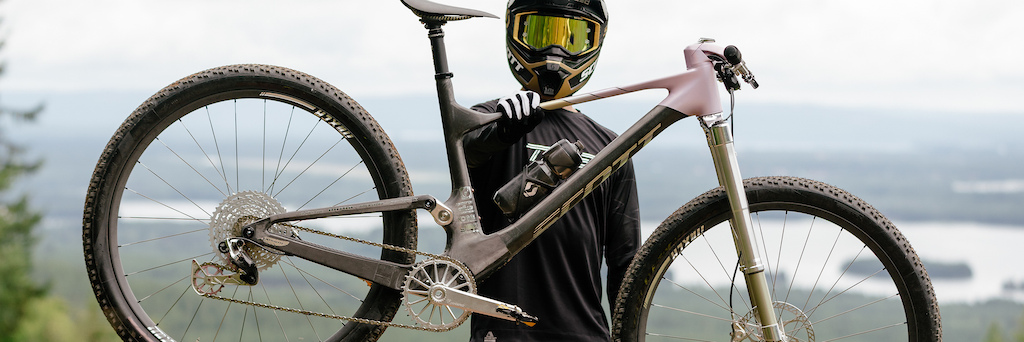
Naturally there's a Scott Spark RC frame at the heart of the build, more specifically a size Large in HMX carbon which sits just below the even lighter HMX SL in the model hierarchy. As always depending on the paint job and small production variations the weight can differ a little bit on carbon frames, but the one I'm using here weighs 1956.1g including shock and hardware. If you're thinking "that's light but nothing special", it might be more impressive if you consider that the trail bike models feature the same frame only with a bigger volume rear shock and 10mm more fork travel.
So with Nino winning races and Brendog sending gaps on essentially the same frame, it can be seen both as a super capable cross-country frame and a super light trail bike frame.
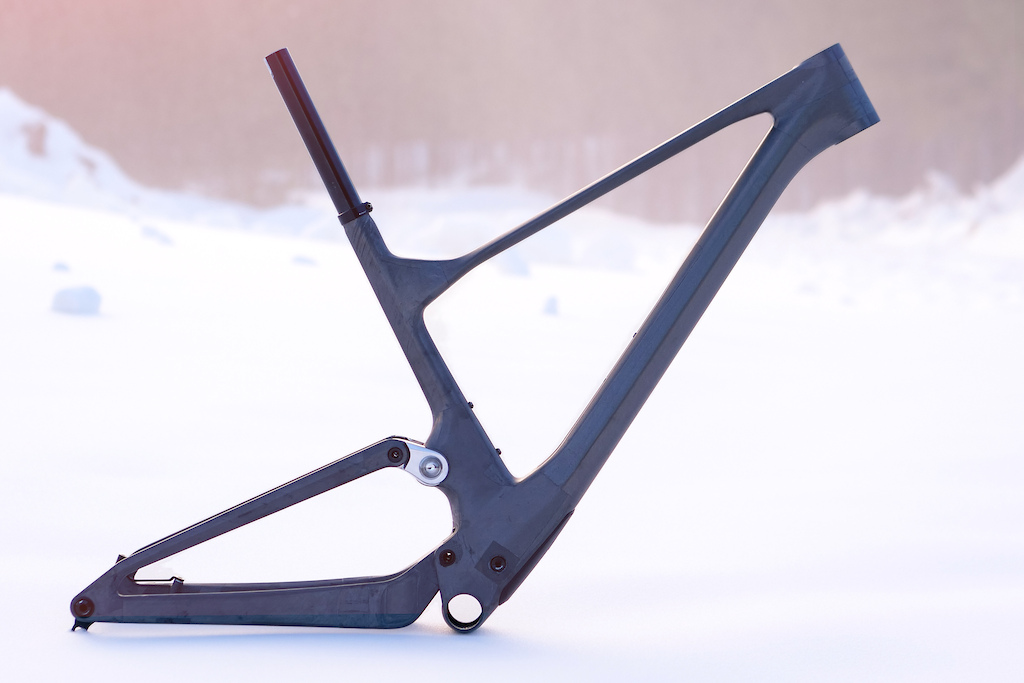
Having spent a huge amount of time on the previous generation Spark RC released in 2016/2017, I can say that while the old one was an incredible bike the new 2022 Spark RC is a different beast. Of course, there is the visual aspect with the hidden rear shock, but big technical changes like 120mm travel and new geometry makes it a very different bike to ride. A very nice feature is that the "Traction Mode" sets the rear suspension to 80mm which helps you put the power down when needed too, perfect for pedaling on trail sections.
I think that my first words after my first spin on one was that "it climbs like the old Spark but feels like a mini-Genius on the downhills".
It's always nice when a new bike is pushing things to the next level, and personally I love how the new Spark RC is so much fun for training and general riding while obviously also being a very fast race bike. And I'd say that for most of us mere mortals it makes a lot of sense to have a bike that's really fun for training and riding along but also can be raced on the rare occasion.
Fork
To match the frame there is an equally visually striking fork up front, the new Intend Samurai XC with 120mm travel.
The weight is a very low 1435.5g and if that's not light enough there is also the Samurai CC version with carbon fiber steerer tube. You could also lose some more weight by running plastic brake hose guides but I opted for the better looking metal guides. One thing that makes such a low weight possible is how the fork legs are slightly angled at the crown, allowing for the extremely minimalistic and short dropouts. Travel can be shortened in 10mm steps and it's using a standard 3-position SCOTT Twinloc compatible RockShox Charger RaceDay damper cartridge. But obviously the fork chassis is quite unique with its upside-down design.
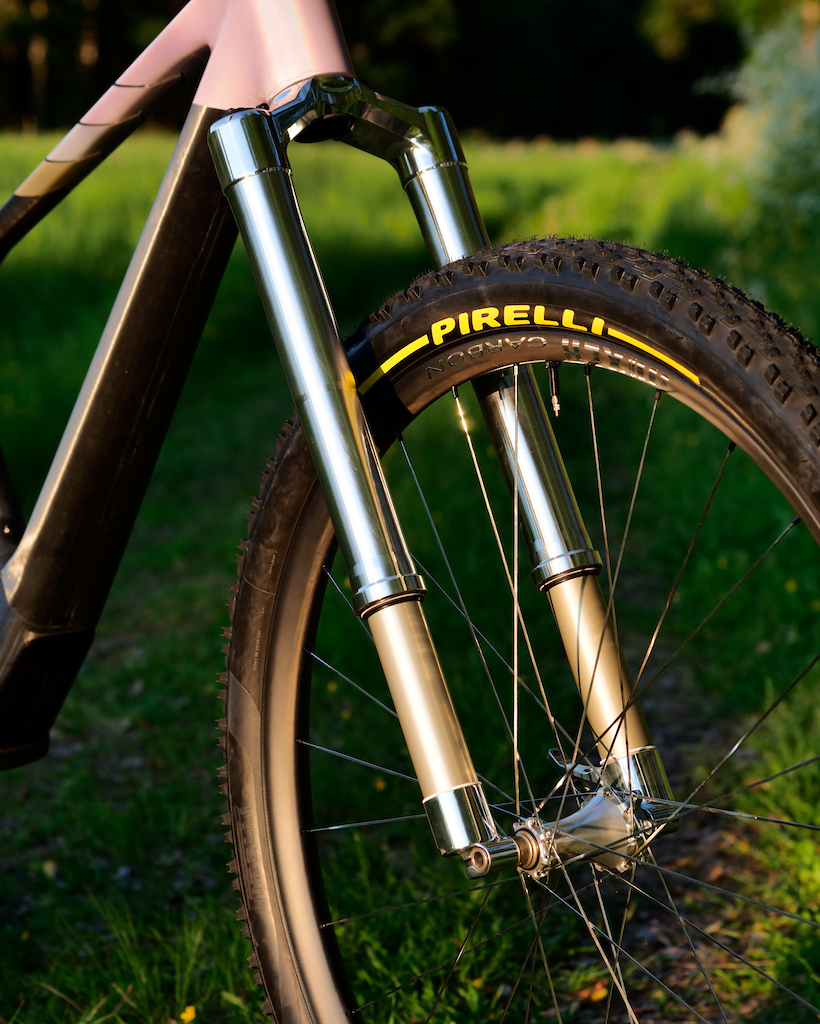
There's just something about fully machined forks.

Minimalistic dropouts and matching hard-anodized surfaces.
Still having a slightly bad reputation from the past, these types of forks actually offer some really cool riding characteristics when designed right. The fore-aft stiffness is better compared to a traditionally designed fork thanks to the added mass in the upper section, and it also allows for greater bushing distance. Two things that can counter fork binding and improves the general feeling and performance of the fork.
The way flex has been talked about for many years now makes it easy to forget that flex can be something good too and not just a negative. An upside-down fork will most likely have a little more wheel flex compared to traditional models, but for me as a rider that is a predominantly good thing. When riding through a rough or off-camber trail section, a little flex will allow the front wheel to track better and is less likely to throw you off your line.
In the end both designs have their pros and cons, and a lot comes down to rider weight and preference. A very heavy rider smashing berms may prefer the added front wheel stiffness from a traditional fork, whereas someone lighter like myself prioritizing overall trail riding characteristics really enjoys riding upside-down forks like the Samurai.
It should also be noted that this fork is incredibly supple. It's especially easy to notice if you non-scientifically test break-away force, just lightly pushing down on the fork to see how much stiction it has. Doing this back to back with some competitor forks shows a pretty big difference.

Let's Talk About Integration
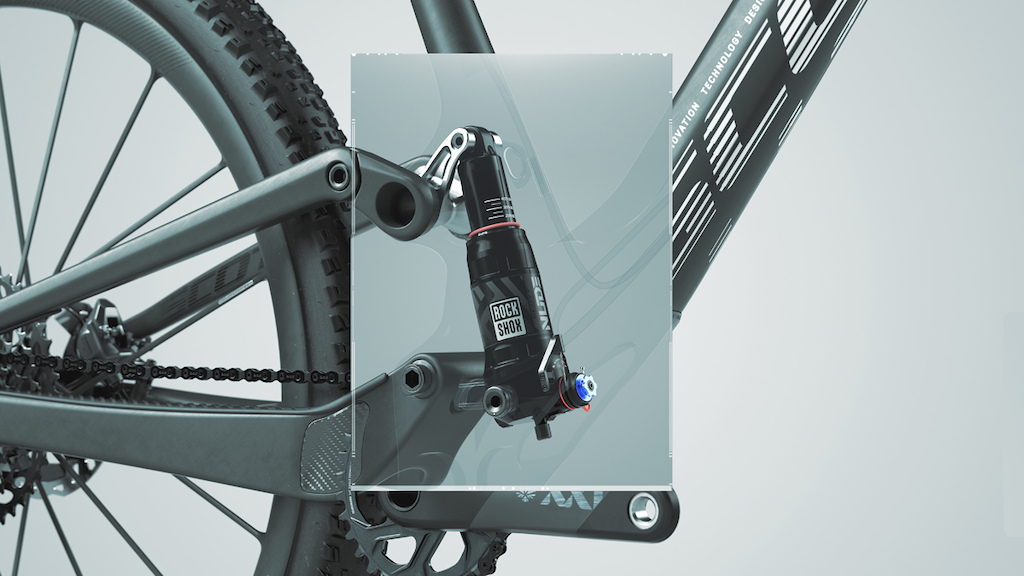
The new design also pushes integration a lot, with the integrated shock and new cable routing. One good thing with tuning bikes like I do is that you strip them down to bare molecules and build them back up, so you get a really good understanding of the design and how it is to work on. And while the new Spark can look complicated to work on at first glance, the new bike is actually really easy in almost all aspects. Last year upon its release there was a lot of talk about the integrated rear shock complicating things, and lately it's the comments about cables going through headsets getting the most upvotes.
So let's go through it all.
Swing arm: Routing the rear brake hose, and possible derailleur housing for the non-AXS crowd, from the swing arm into the mainframe is one of the few things that takes a little bit more work compared to the old model. However, it's still very straightforward. You remove the main pivot axle, hold the swing arm back a little and run them through a rubber opening. So it's similar to what you see on some competitor frames. Once inside the mainframe you tighten them down with zip-ties in dedicated guides, keeping them in place and preventing them from rubbing the rear shock. There are instructions on which one goes on which sides if you look at the plastic cover for the hole in the down tube.
Loosening the main pivot axle can be a little bit tricky using just a Torx tool, but if you need some additional leverage and less risk of stripping any bolt head you can use a 10mm hex key from the drive side.

Once inside the mainframe they are zip-tied in place.
Rear shock: It's surprisingly easy to remove the rear shock or just lower it to get better access when routing the remote cable. After all it's still just three bolts like on any other trunnion shock equipped frame. I guess the only small trouble here can be that depending on your chain ring size, you might have to remove your crank arm to get access to the lower right hand side trunnion bolt - just like on many other bikes. The upper bolt is accessed behind a rubber cover on the left hand side of the seat tube.
Once you've removed the two lower bolts you can now either just let the shock hang down a bit in order to for example work on the remote cable, or remove it completely. Personally I have installed the remote housing and cable several times without even removing the shock at all. Might be a bit tricky if your hands are very big, but it definitely can be done.
Linkage: If you want to completely disassemble the frame set for some reason, it's quite easy work to remove the linkage too. Just loosen and remove the Torx bolt and pull the outer linkages straight out. You might want to put the frame on its side while doing this though, or simply grip the inner linkage part to make sure it doesn't fall straight down.
When assembling everything again you just take the inner linkage, line it up and insert the outer linkages through the bearings and into it. You can't do anything wrong here since the splines only fit one way.
Very straightforward once you've wrapped your head around it.
Dropper post routing: With no need to remove your bottom bracket and with a big hole in the down tube this actually couldn't be much easier. There's also an additional housing guide molded inside the frame, which you route the housing through so that there's zero chance of it rubbing the rear shock.
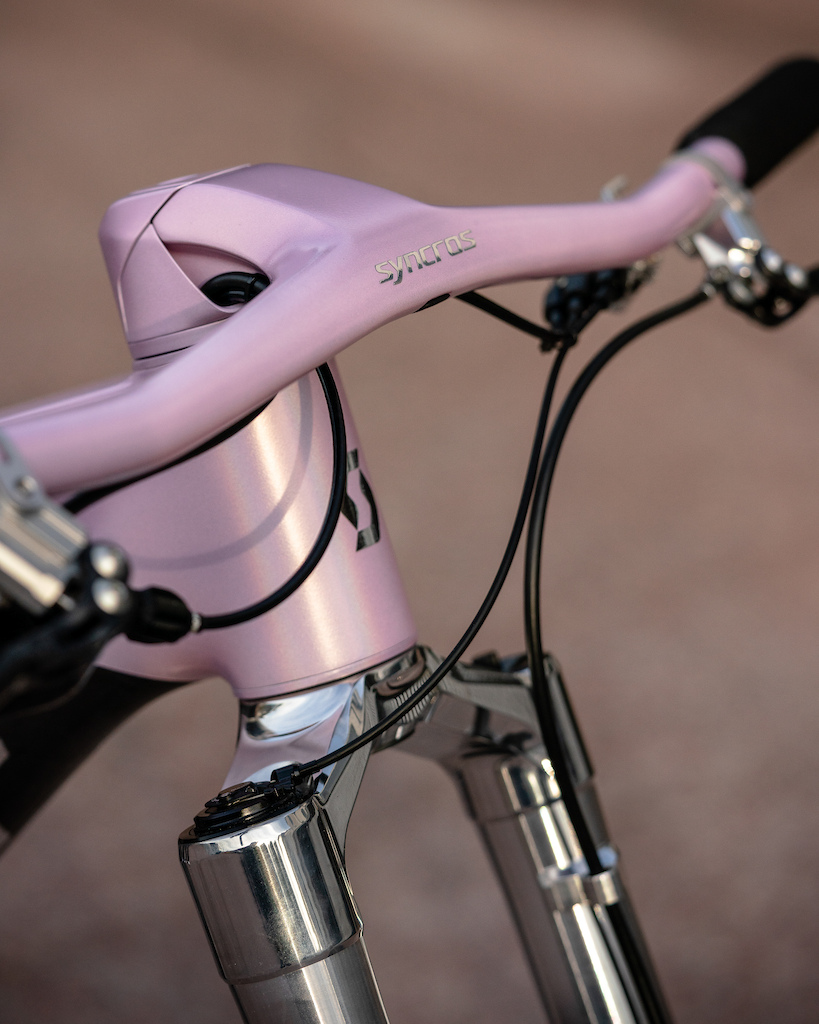
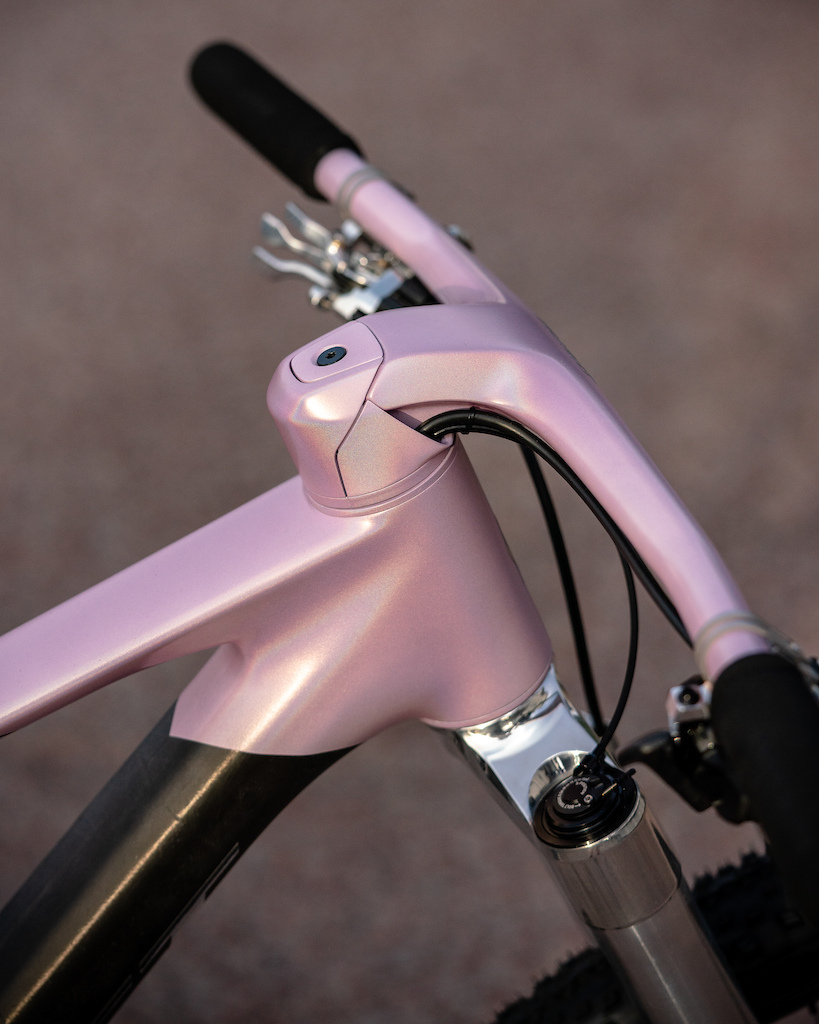
Headset: Okay, time to grab the Pinkbike bull by the horns and talk about the cables going through the headset. Just like with most things there are pros and cons, but let's get a few other headset related things out of the way first.
You can change the head tube angle on the new Spark by rotating the headset cups 180 degrees, unless you run neutral cups like I do here. To do this you simply loosen the stem and slide it up a couple of centimeters which gives you enough room to rotate the cups. It can even be done trailside.
You can of course also play around with spacers and handlebar height. The spacers can be split into two parts so that you can remove or install them without touching any cables. So if you for example want to try a lower handlebar position you slide the stem off, split a spacer and remove it, install the stem again, put a regular round spacer on top of the stem and tighten everything down. Go for a test ride and if you like it then go ahead and cut your steerer tube.
As for the cable routing itself, it's very straight forward. After all, a head tube hole is bigger than any traditional cable ports you'll ever see. To install cables coming from the bottom, like how you usually install the brake hose and rear derailleur housing, just pull them up through the head tube, slide the headset parts on, insert the fork and shorten them to correct length.
When it comes to the dropper post and rear shock cable housing you can leave the fork and handlebar installed. Just start from the top and push the housings down through the headset and into the frame.

You can run up to three cables per side.

Below the cover there are no surprises.
The obvious catch, and perhaps main reason for comment section uproar, is of course that if you ever have to replace your upper headset you have to re-bleed your brakes and re-cable your remote controlled parts. Personally I think I'm yet to break or wear out an upper headset cartridge bearing but of course wear and tear depends a lot on many factors, like how much you ride in wet weather.
To counter the latter problem both headset bearings on the new Spark actually have additional soft-lip seals, making it pretty much impossible for water to rest on the actual bearing seal. Another thing that would essentially eliminate this problem which I think we'll see a lot more of in the future, is "Solid Lube Technology" bearings. The easiest way to explain these is probably to think of them as bearings that instead of being filled with grease are completely filled with a self-lubricating plastic-like material. So water and grime actually can't get in, making them perfect for an application like this.
You can already get headset bearings like these for the Spark and other frames from CeramicSpeed, but hopefully we'll see some trickle-down versions stock on many bikes. Then pretty much no one would have to worry about headset bearing replacements at all.
Integration summary: As you now hopefully can see, this bike is far from the mechanics nightmare of doom that it has been portrayed as in so many comments. With a huge access hole in the down tube and no miniature cable ports by the head tube many things are even easier to do on it. Having the rear shock hidden from the elements is also really good.
So if you don't usually replace your headset bearings every other month there's really not much to worry about, and it's a huge difference compared to working on road or gravel bikes where you have to route the cables through the handlebars too.
With the cables entering the headset on each side of the steerer tube here instead of at the front like on most road bikes, you also run way less risk of steerer tube rubbing problems.
So is it worth it? Since it's not worse than other frames with internal routing, except for that odd headset replacement scenario, you kind of end up back at the by now almost age-old discussion of external vs. internal routing. To me you might as well go this route (pun intended). Once component manufacturers catch up and start offering for example brakes with the hoses not pointing forward and by using some wireless parts on top of that, we can have some really clean cockpits without even having to route anything through the handlebars.
The more roomy installation also opens up for some new nice possibilities like routing cables for external batteries to lights, or maybe even at some point mount and hide such batteries inside.
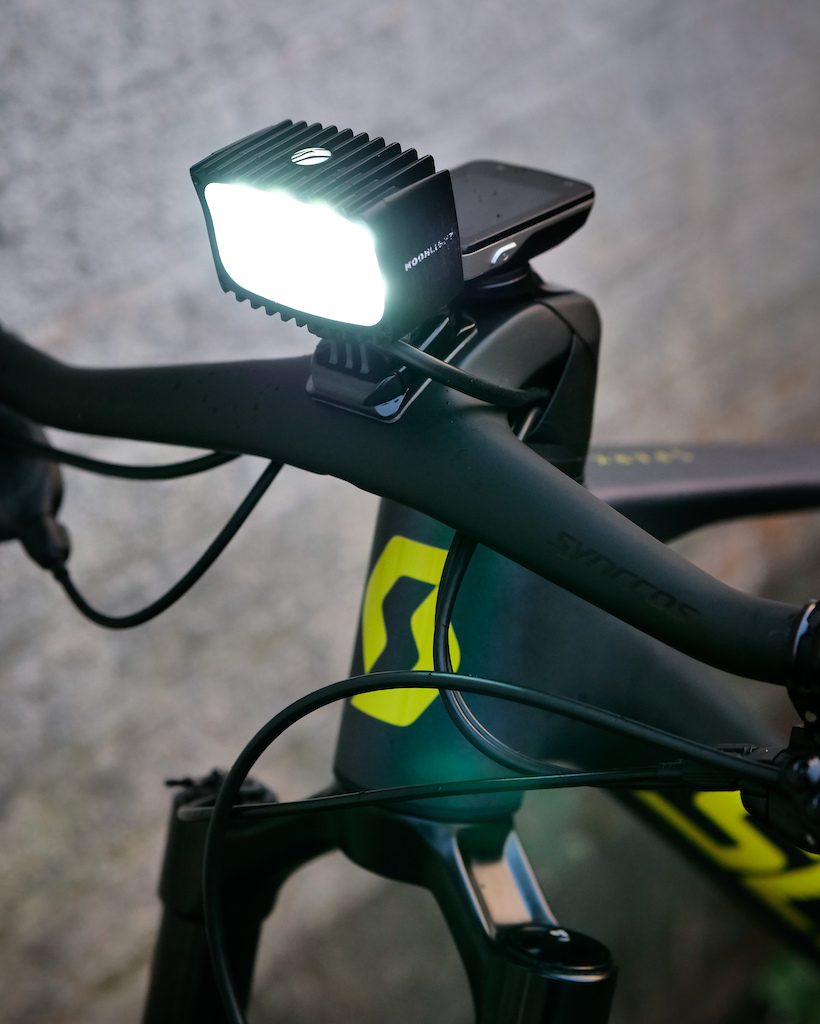
The headset allows for new ways of integration, and ALL the cables in this case.
Clean looks yet a 4000 lumen Moonlight lamp with external battery.
Components
Cockpit: The full carbon handlebar unit is a Syncros Fraser iC SL in 90mm length and -30-degree angle, which has been cut down to 730mm width. You can however get these in all sorts of lengths and angles. With a one-piece construction like this the engineers have greater control to better tune strength, weight and stiffness - and of course it offers very clean and striking looks.
It integrates perfectly to the frame using specific spacers and covers, and offers two different options to mount your cycling computer. And while it's not easily spotted the clamping bolts for the stem section have been changed to Kogel titanium bolts here.
Rather aggressive with -30 degrees angle...
...but there are plenty of versions available to suit most riders.
While not going to total extremes I am after all trying to build a lightweight bike, which means choosing small parts with great care. So to save a bit of weight I'm using an Extralite UltraStar 4 expander weighing just 4.5g, making it the lightest one out there. The Syncros headset has been tuned by using an Extralite UltraBottom 51-52 lower bearing and bearing race.
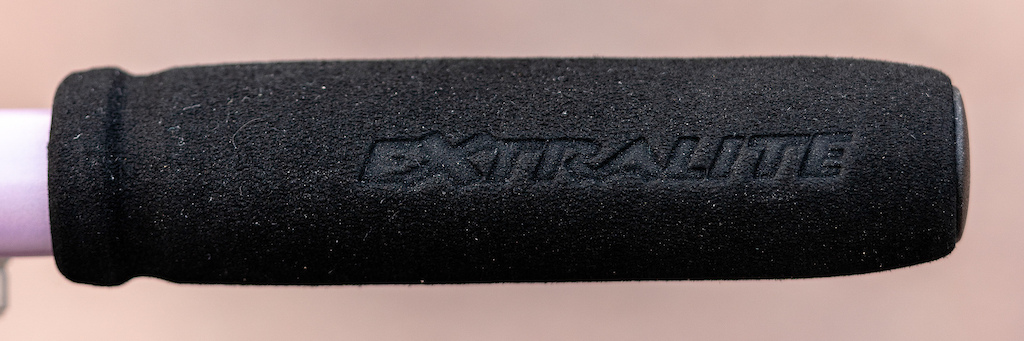
To top things off are the incredibly light Extralite HyperGrips MDS which weigh just 18,8g including plugs. As you perhaps already know or by now have started to understand, the Italian company lives up to its name. For many years now they have been producing hubs, wheels and top quality tuning parts, and should be high on your list if you're looking to save weight on your bike.
Remote: For 2022 the Scott Twinloc remote got quite the facelift with a completely new design, especially the triple function version. Now the dropper remote lever sits below the other two instead of above on the clamp itself like it did on the previous version. Believe it or not but it actually does make a lot of sense ergonomically when having all three functions in one place. Since your thumb grips or rests below the handlebar it is of course easier to reach a lever positioned low than one that's almost above the handlebars.
So ergonomically it's a win and the new version is finally Matchmaker compatible so that you have the option of mounting it directly to your brake lever clamp.

Stock vs. modified.
But to me there was still room for improvement. The first thing was that the positioning of the Matchmaker mount puts it way too far out when using it with Trickstuff brakes, leaving no room to grip the handlebars. And I wanted to keep things clean and not use a separate clamp just for the Twinloc. The second was that ergonomics is after all quite individual so I wanted to shorten the suspension levers a little bit. And finally, while I think the design is great for what it is let's be honest here - it's no easy task making a three-lever remote look good.
So I set out to make my own version that would fit the Trickstuff brakes as well as my hands. This meant spending a couple of days with the Dremel and small metal files, essentially making a new one with parts from the 2017, 2019 and 2022 version Twinloc.
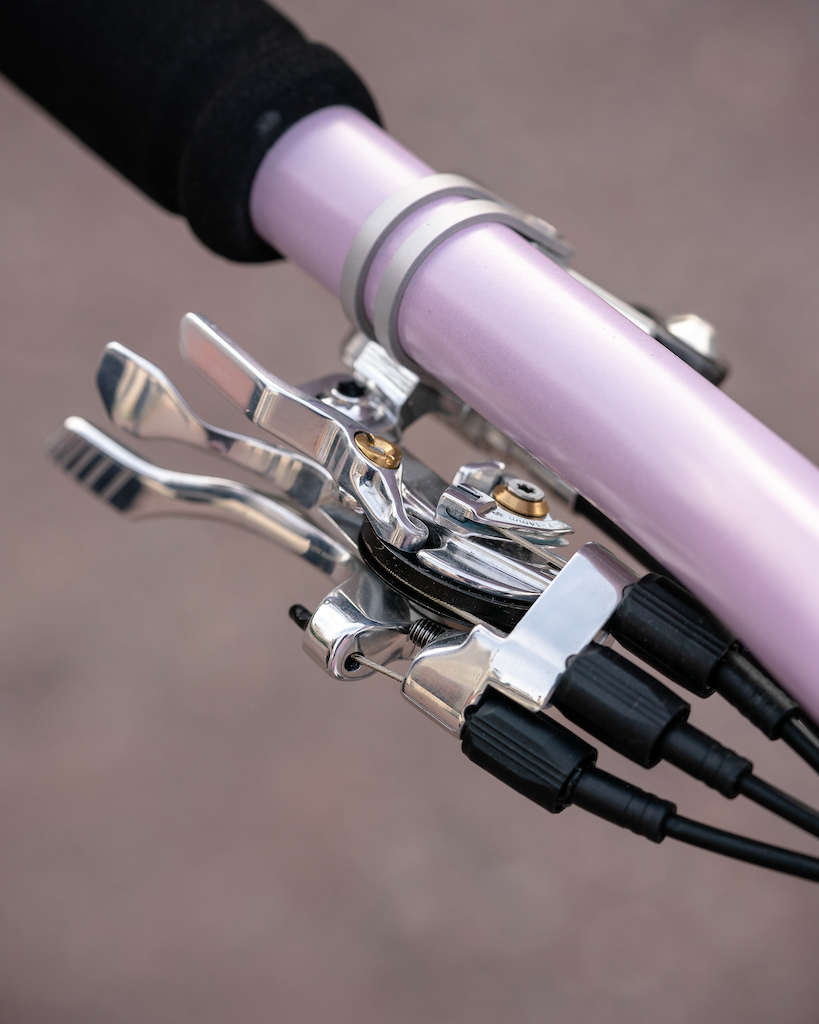
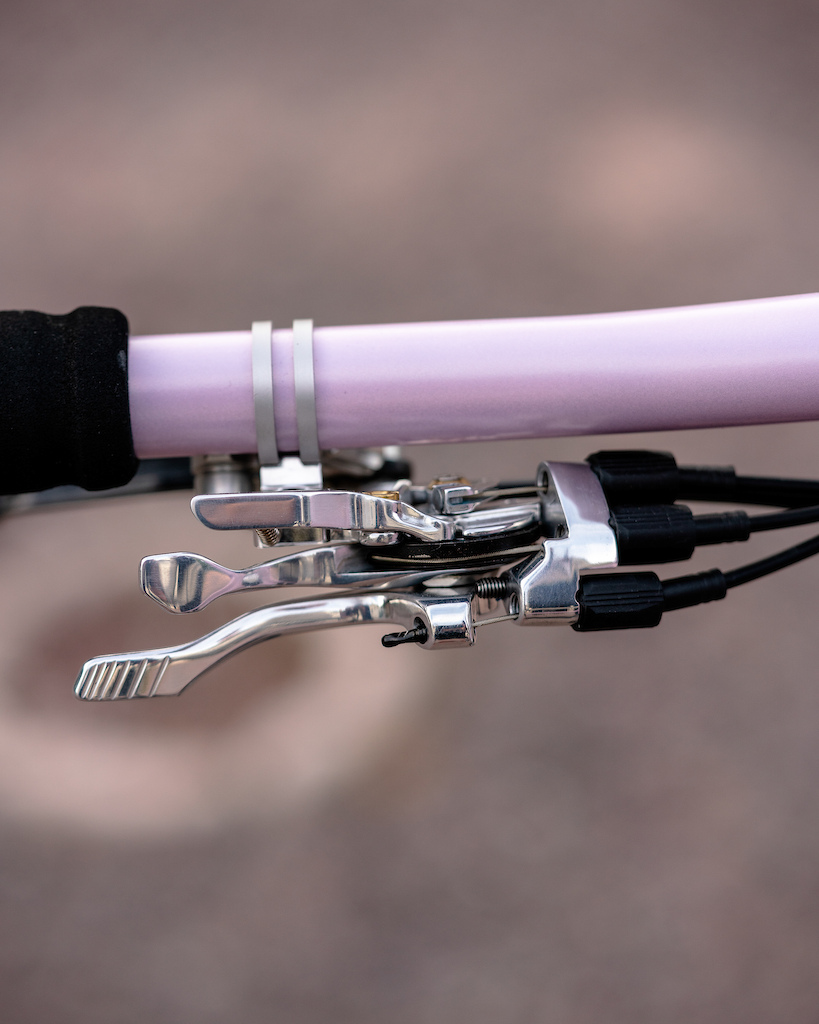
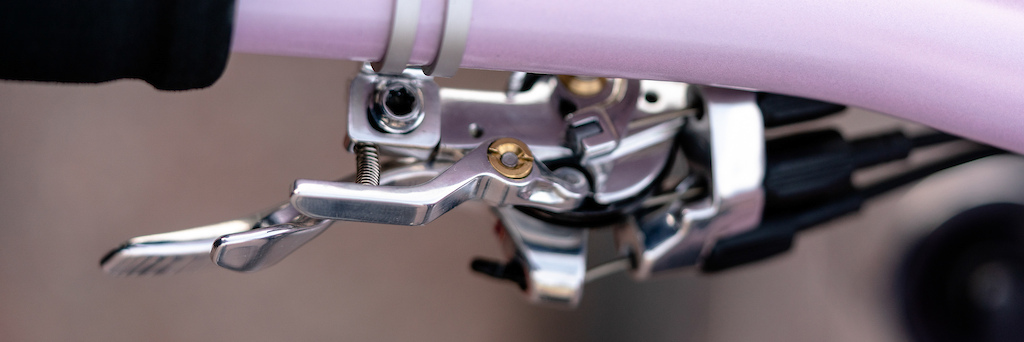
The end result clamps directly to the brakes, has slightly smaller levers and looks quite good on the bike along with all the other silver or polished parts. While not perfect and could have been improved with some actual new parts machined instead of just Dremel modifying, it works really well.
Brakes: Trickstuff Piccola Carbon are not just the lightest mountain bike brakes in the world, but also very powerful with an amazing lever feel. This is achieved by a clever design, extensive machining and carbon levers. Every detail has been highly refined, from having each lever run on four small bearings to polishing internals to minimize friction. Expensive for sure, but a better performance investment for your bike than many other things.
One unique feature making them perfect for bikes with internal routing, is that the brake hose exits very close to and in line with the handlebar. The brakes are available with two different banjo couplings: a traditional one pointing the brake hose to the front and the angled ones used here putting the hose close to the handlebar. What makes it really nice is that you still have some adjustment room meaning you can fine tune the angle as well.


The brake discs are Trickstuff Dächle UL, with UL standing for UltraLight. They're not the lightest out there, but instead they offer a very good balance between low weight and braking performance. If you don't mind a little extra weight and want some more material for your money, there is also the regular Dächle version. Both have chamfered edges for easier wheel installation.
The discs are fastened with Kogel titanium bolts and the calipers use titanium bolts as well. Extralite for the rear caliper, which are the lightest ones out there, and generic hex ones for the front caliper in order to work with the tighter clearance flat mount on the fork. Because of said tight clearance one of the bolt heads is actually drilled by Intend so that you can tighten it from the side with a 2,5mm hex key. But I found that you can also use a normal size 4mm key, but more specifically the ParkTool HXS-3 Stubby which are shortened to fit in tight places.
Drivetrain: At the center of the bike you'll find a very interesting component, a brand new prototype crankset from Garbaruk. It's incredibly light at just 384g for crank arms and spindle, putting it just some 20g above carbon fiber Sram XX1 DUB cranks. Low weight aside, they are simply beautiful with their clean design and especially so in the raw finish shown here. But knowing Garbaruk I'm guessing they'll be available in all sorts of anodized colors once they hit the market. They feature a 30mm spindle with each crank bolted on, and everything is installed or disassembled using common tools.
My crankset here is using a 3D printed plastic threaded preload adjuster which works great, but the production version will probably see something more refined.
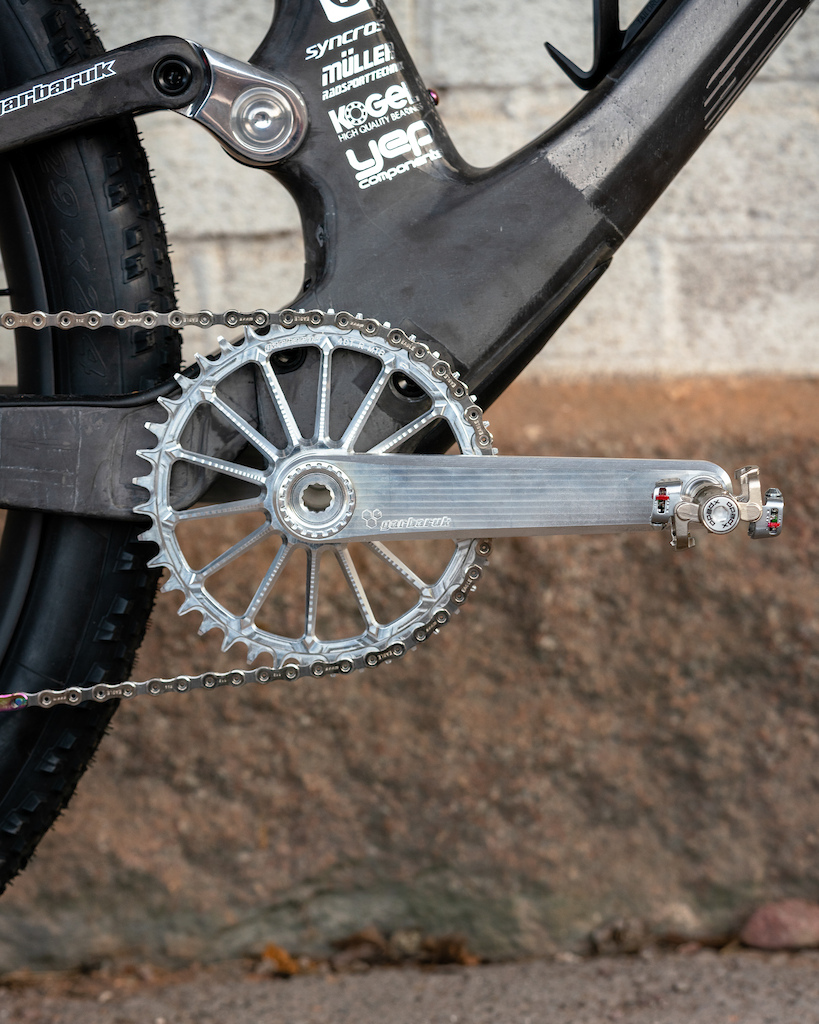
Around 20g heavier than popular carbon cranks...
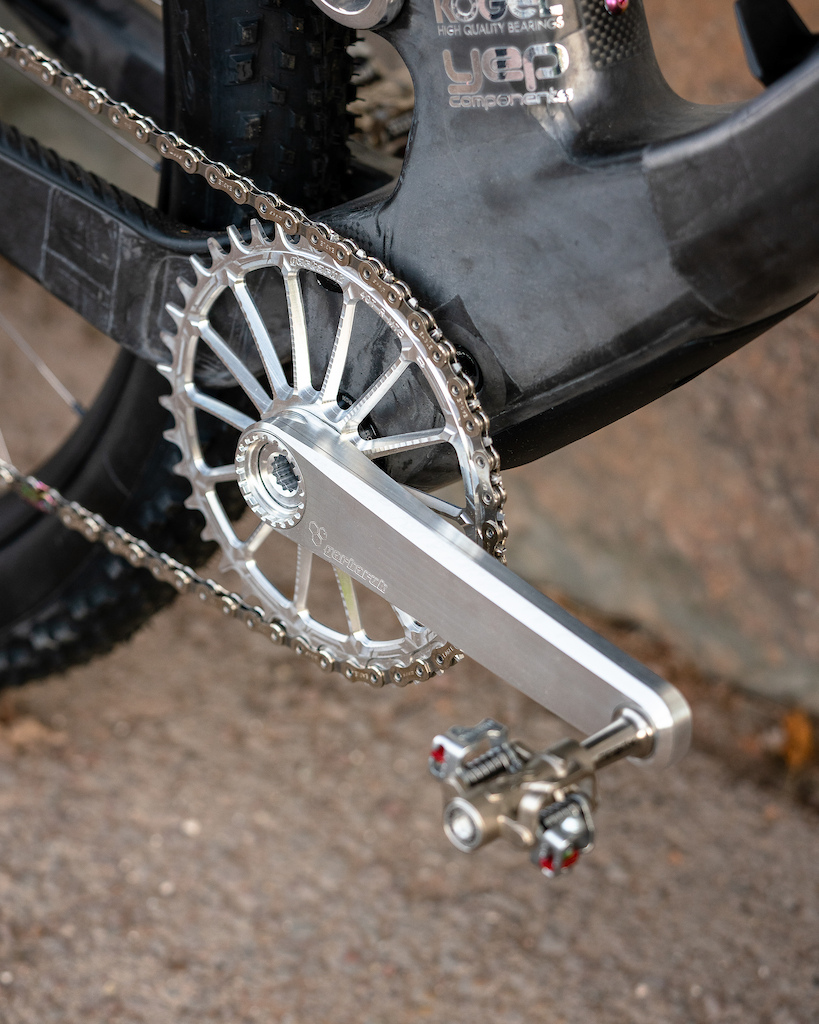
...but around 20 times better looking?
The chainring is a Garbaruk 40T in matching finish. While that's not exactly a small size, the bike is intended to go fast and the low weight plus lock-out helps quite a lot on the climbs. Going to a bike like this from your enduro bike I'd say that most people can definitely jump up at least two or four teeth in chainring size.
The bottom bracket is a Kogel ceramic with road seals, meaning a bit more maintenance but even lower friction. Kogel also makes the oversized pulley wheel system for the derailleur which is called Kolossos. And for this bike it's something quite special as it is a limited edition version Kolossos based on my color choices for this very bike. The small scale and custom-made version features a raw aluminium cage, rosé titanium bolts and Cerakote Champagne Pink pulley wheels. Cerakote is as the name suggests a ceramic based type of paint. Being very durable it's an alternative to traditional anodizing while offering totally different colors that pops really well since the texture is more like traditional paint.
The reason for the ceramic bearings and oversized pulley wheels is slightly lower drivetrain friction.
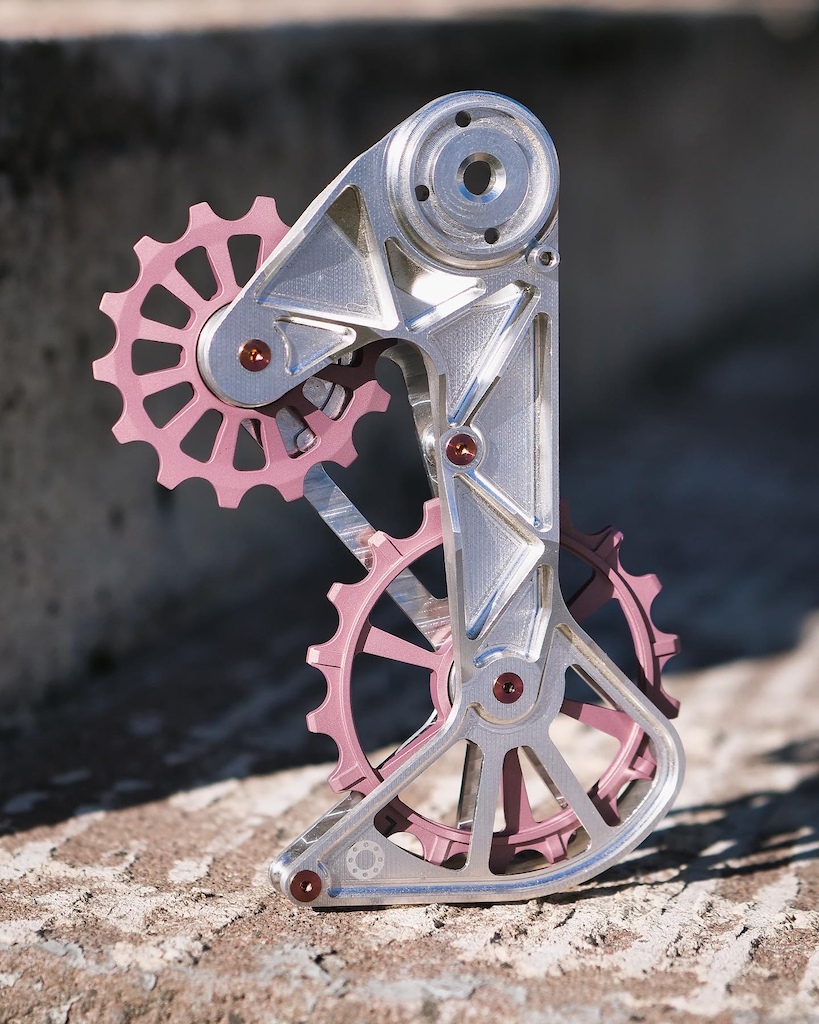
The limited edition Kogel Kolossos is an eye-catcher.
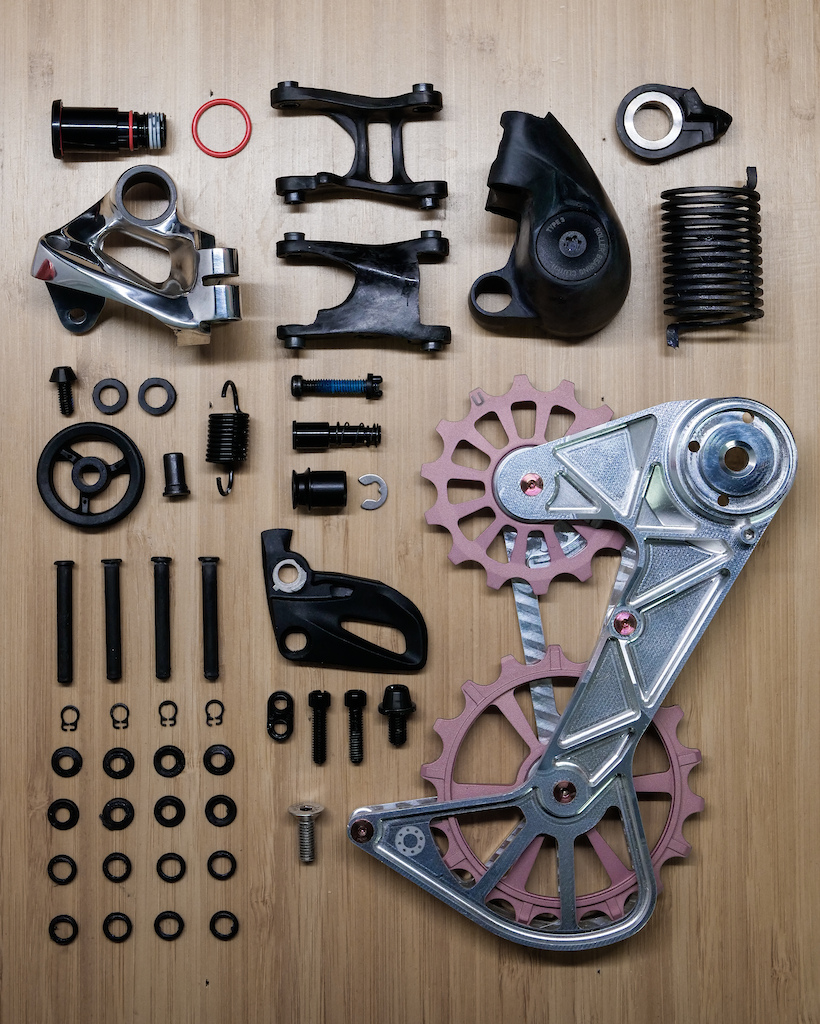
Do you know where all the things go?
Aside from the limited edition cage, not much remains stock on the Sram XX1 Eagle rear derailleur as it has seen quite a lot of tuning overall. The b-knuckle has been polished, the cover for the cable wheel removed and several parts such as the parallelogram and the pins holding it together are made of carbon fiber by Hopp Carbon Parts. The end result is a derailleur offering lower chain friction and at the same time being lighter than stock.

The 11-46T range means tight gearing steps.
Cassettes can often be a little bit overlooked, you take whatever matches the name of your derailleur and go. But while it's mostly good to have a really big gearing range, here I wanted to optimize things a little further. So, I'm running a Rotor 12-speed cassette in 11-46T gearing as my main cassette. The 11T cog means slightly less friction than the more standard 10T, and the 46T top means tighter gearing steps. Sure, we are talking a lot of truly marginal gains when it comes to this drivetrain, but the devil is in the details.
If I'm too out of shape or spending time in some really steep mountains, I have a Rotor 11-52T cassette that I can install as an alternative. Both shift well and are very light at 294,4g and 326,3g respectively, but it's worth noting that they only fit traditional Shimano HG style freehub bodies.
The chain is a SRAM XX1 and the pedals are Xpedo M-Force 8Ti.
Wheels: One of the most impressive things on the bike is the 1039g wheel set, which despite the low weight features traditional steel spokes and 30mm inner width rims.
The hubs are the HyperBoost 3 from Extralite. Depending a bit on which freehub body is used they weigh just 224g for the pair, about the same as a single rear hub from some of the most popular brands. As far as I know, they are the lightest mountain bike hubs out there. The machining makes them into little works of art, and when working on the hubs you immediately notice that the tolerances are incredibly good. They use a spring-backed floating ratchet ring and have an external bearing preload adjustment. All you need in order to work on them is two 17mm closed wrenches and their own "Alugrease", so service is done in no time.

The lightest mountain bike hubs in the world.
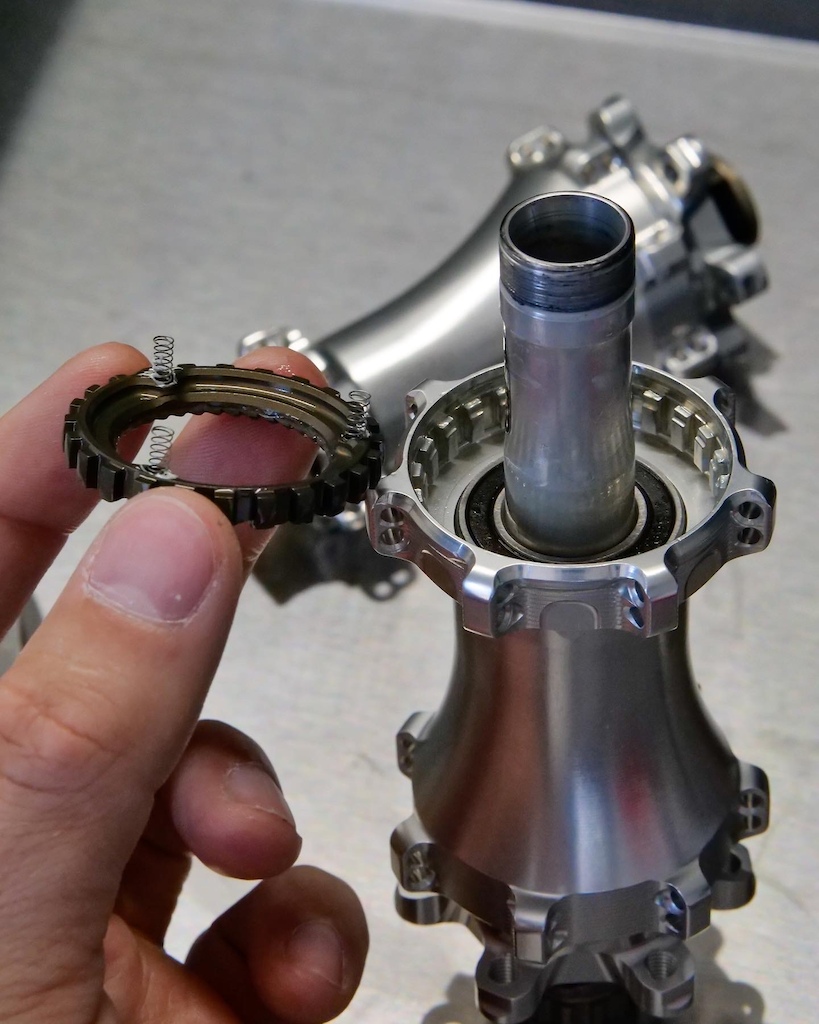
A closer look at the spring-backed floating ratchet ring.
To match the rest of the bike I'm using a limited-edition silver version of the hubs, and I wanted silver spokes as well. Unfortunately the Sapim CX Super spokes, which are the lightest steel spokes available, only come in black so they have all been sanded by hand and polished.
The wheels were then built by German wheel building specialist shop Radsporttechnik Müller, who are also behind the super light Müller MXCR rims. Even with their modern 30mm inner rim width they just weigh around 280g each. So it's no overstatement to say that these are some incredibly responsive wheels when it comes to accelerating and steep climbing.
While you might think a wheel set this light must come at an astronomical cost, they're actually about the same price range or as other top tier wheels from big brands. Not including the two days I spent polishing the spokes that is.

559,5g rims. For the pair that is.
For tires I'm running Pirelli XC RC Lite 2,4" which are quick and good all rounders for hard-pack and generally fast terrain. They're set up tubeless using Syncros Eco Sealant.
Saddle and seat post: We're finally starting to see some really lightweight dropper seat posts, and among the ones leading the charge you find the top-quality Swiss brand YEP and their latest Podio seat post. It comes in at 345g but can be cut depending on how much insertion depth you run, so on my bike here it's just 328g. But perhaps even more importantly for a dropper seat post it features some very clever design and high production quality to actually function well too.
Installation is very easy using the dedicated machined aluminum tool that comes with the seat post.

YEP droppers have a very good reputation.
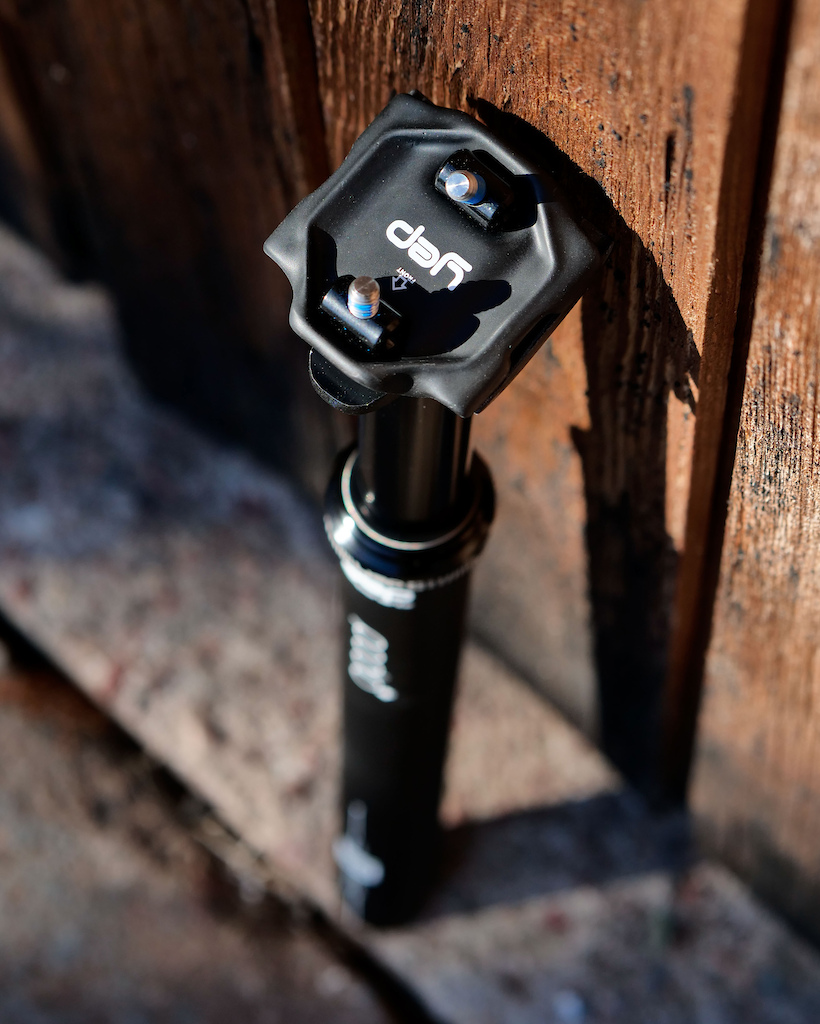
The top clamp is carbon fiber.
For cable housing I'm using Jagwire Lex SL in 3mm version for both the dropper and suspension remotes. The smaller diameter makes them very easy to route and even saves a tiny bit of weight. It's also nice that they improve the aesthetics too thanks to their slim looks.
The YEP Podio is held in place by an Intend Corona seat post clamp and on top you find a stripped-down Tune Speedneedle saddle. The Speedneedle is a true classic, first introduced well over 20 years ago and still being handmade in small quantities in Germany. Carbon fiber saddles might look extremely uncomfortable, but the good ones actually offer a lot of shell flex similar to old leather saddles. With the right shape a carbon saddle might just be the best you've ever tried.

Handmade in Germany, tuned in Sweden.
Options: No cross-country bike is training or race ready without a good bottle cage and a GPS mount. So I'm running one or two Syncros Tailorcage 1.0 Carbon bottle cages, not the latest or the lightest model but a personal favorite of mine. Super solid and a breeze to insert the bottles.
As for Garmin mounts the Syncros handlebar system allows for two options, which are both made in the USA by K-Edge. One is a very sleek top cap mount version, and the other is a front mount which also allows you to for example attach a light thanks to the GoPro mount at the bottom.
Paint and design: Me using some raw finish carbon and polished aluminum parts probably doesn't come as a big surprise. Some might think it becomes repetitive or even a little bit boring, but I like to think of it as how musicians and bands have their sound.
The goal this time around wasn't to build the most beautiful bike possible. Sure I wanted it to look good, but more in a raw yet colorful way. You can think of it a bit as with race cars in their wild liveries and paint jobs. They can look totally awesome but maybe you wouldn't want it on your daily driver back home.
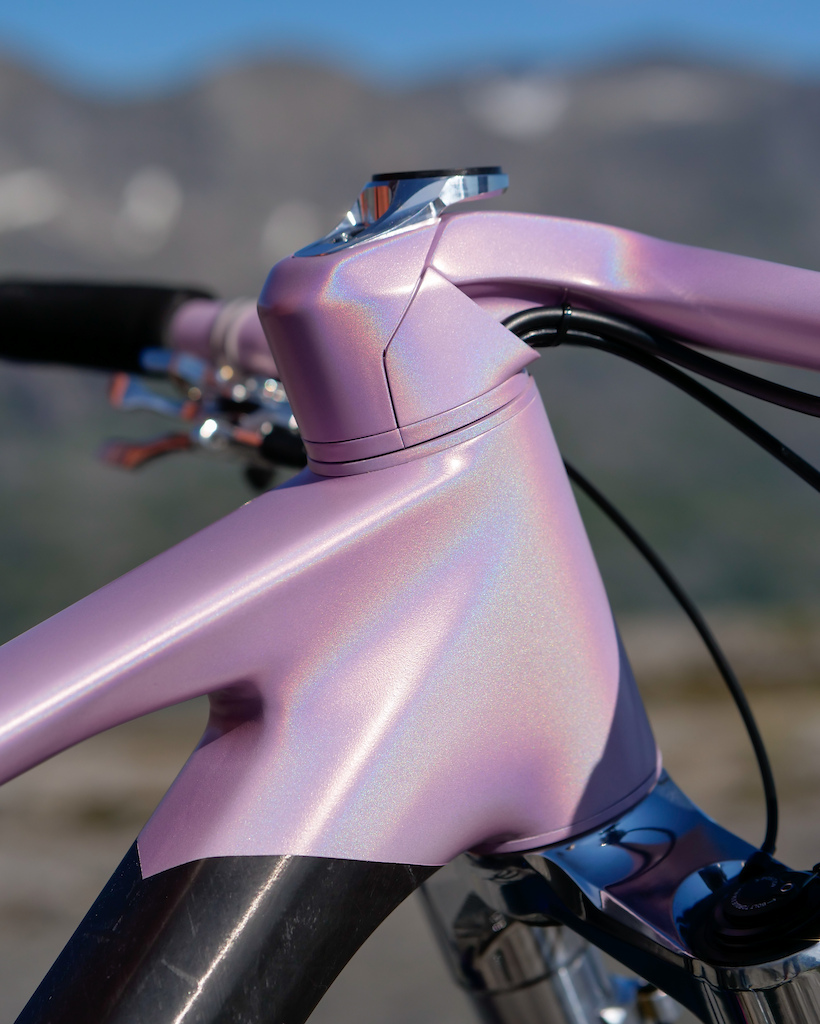

So in addition to the Cerakote pink pulley wheels which set the theme, I went with "Spectracoat" pink, silver and gold. A very expensive type of paint but with a very cool effect. In the shade or indoors these colors mostly look like any other pearlescent or metallic paint, but in sunshine they come alive with rainbow colors shimmering all over.
Definitely something that puts a smile on your face when rolling the bike out of the garage on a sunny day.
Scott Spark RC "Hypersonic" - Weight: 9.19kg / 20.26lbs including pedals


Summary
While I must admit I was hoping for sub9kg, just because it would look nice on paper you know, it sure ended up being a lightweight yet truly all-round and fun cross-country bike.
The geometry, 120mm travel suspension, amazing brakes and solid feeling handlebar makes you want to hit things just a little faster. In fact, the low position of said handlebar along with the slightly limited 80mm saddle drop are pretty much the only two things holding you back from going way too fast on the downhills considering the bikes intended use.
And all of this is why I expect this to become the bike I spend the most hours riding. The combination of a quick and responsive feeling, fun and inspiring ride characteristics along with the general versatility - I mean, with locked-out suspension it's even quite fast on gravel sections - you have a great training companion in the Spark RC. And perhaps especially so if you tune it a little (or a lot) to your own preference.
Thanks for reading and feel free to keep up all the other builds via my Instagram.

For the nerds.


Honorable mention
While this bike hasn't seen its final form yet and will be completely remade this winter, it's a great example of said versatility of the Spark chassis. On one hand it can be built into a lightweight cross-country rocket, on the other you can take the same frame and turn it into something of a trail/down-country monster.
Not gonna lie, it will hurt putting the knife down on that paint job...

Warning and disclaimer:
Please keep in mind that any modifications such as paint stripping, repainting, sanding or in any way modify frames, components or safety equipment is potentially dangerous and can lead to crashes and injuries. It will always void any and all warranties, and is strongly advised against by SCOTT Sports and all other manufacturers, who take no responsibility. If you choose to modify your bike anyway, always make sure to do so with safety in mind and remember the points above.Editor's Note: Gustav is affiliated with many of the brands used for this build, and the opinions in this article are his alone. Especially the one about routing housing through headset bearings...
Author Info:

Must Read This Week
How to Watch the 2024 Mountain Bike World Cup [Update: Staylive Offering Access in New Zealand, South Africa & More]
59228 views
59228 views
Sign Up for the Pinkbike Newsletter - All the Biggest, Most Interesting Stories in your Inbox
PB Newsletter Signup
Never stop nerding out! 3
Personally I still think headset cable routing is unnecessary but if the only downside is like 1-2 extra brake bleeds over the life of the bike I don't think I really care that much.
This podcast is a very good listen
cyclingtipsnerdalert.libsyn.com/2021/09
*Don’t do that with our frames.
For an incredible -18g, unpainted version.
LVL 9999 of featherness: wash out all of the grease from bearings -> saves around 6 more grams.
And nice sales pitch but you move failed to sell headset routed cabling to be as well.
Once test rode an S-works Epic
On slickrock trail.
Climbing was fun
As I passed everyone.
My "light" bike is 35#
Thighs check out.