Reader Story: The Rig v1 – A Custom Hardtail Frame with a Pinion Gearbox

Frame building has been something that I've wanted to try my hand at for many years now. The process of designing, building and finally getting to ride a frame that you've built with our own little hands was ever-intriguing - like an itch that needed to be scratched. Earlier this year things finally fell in place when it came to much-needed guidance and required tools. Instead of just theorizing, it was time to get my hands dirty.
Why Would One Want to Build a Frame?
The market is ever-growing and most likely bigger than ever. Why on earth would someone want to build a frame himself since perfectly good options can be found straight from the shelf? And, most importantly, with a much more affordable price. More on that later.
The reasons behind this undertaking were two-fold:
First of all, I see the design and build process as a creative outlet. Anyone who knows me even remotely can say that I’m the furthest thing from an artist, but after practicing some mental gymnastics around the issue, this was the conclusion I reached. Frame building can be anything between a form of art – as can be seen in shows like NAHBS and alike – to a strictly industrialized and optimized process. Doing something with your own hands and seeing the end-result forming is as rewarding as it gets. Peter Korn´s book Why We Make Things and Why It Matters: The Education of a Craftsman summarizes the matter more eloquently than I ever could.
Secondly, believe it or not, there wasn’t a readily available option in the market as the geometry and specs that I was after were very particular. The main reason being that I wanted the transmission to be based around the Pinion Gearbox. The only off-the-shelf option would have been the Sick Headbanger, but the geometry was not exactly what I was after. Being picky about the specs and not settling with the Headbanger turned out to be a lucky choice since things have gotten sketchy with the company. This led me to two options: go custom or build the thing myself. Naturally, I wanted to do it the hard-way and chose the latter option. The project of building the Rig had started.
Besides, I hold an MSc in mechanical engineering and I am a tinkerer by nature when it comes to bikes. Leaving an opportunity like this on a table would have haunted me until the last swing of my rocking-chair in the pensionhouse.
The Design Drivers
It was a given from the start that the frame would be a hardtail because of the much simpler build process. Adding a pivot or two in the mix might not sound much, but it adds complexity by several magnitudes. Even with a simple single pivot frame, like the ever-so-beautiful Starling MurMur, getting the pivot placement and alignment right and designing the rear triangle is quite a task. Will I tackle this in the future? Maybe. However, as an entry-point to frame building, it would have been a tall order, even more than I understood at the time. Luckily for once, I did not start with an overly ambitious undertaking. Besides, there are several reasons why hardtails are the way to go in my mind!
Design drivers are features and ride-characteristics that I wanted the frame to have. They act as guides for the design process. The main ones are as follows.
1) Capable all-rounder. I wanted the frame to have a home-field advantage, no matter the terrain, length of the ride or line choice. Naturally, one bike cannot be the burliest descender and XC whippet at once, but the balance reached was pretty good.
2) Long, low & slack. To describe the geometry, I just prefer to use the term modern. More on this later.
3) Pinion Gearbox. This was a big one! Ever since reading about the Pinion gearbox, I was intrigued for several reasons. The German-engineered drivetrain solution boasts several benefits: getting rid of the rear derailleur, equal gear range compared to 10-50 cassette, superior weight placement, the possibility to shift while coasting – what’s there not to like? Pinion proved to be a true winner as you will learn later.
4) Made of steel. Steel, or high-quality chromoly tubing to be more exact, is still a very worthwhile material. It’s relatively cheap, strong, has good fatigue properties, easy to work with and does not require heat treating after welding. On top of these properties, one big plus is that a steel frame can oftentimes be easily repaired if damage occurs. Considering all these points, it is not surprising that steel is by far the most used material among the artisan frame builders.
Geometry Matters
Deciding the geometry was surprisingly straightforward. Much of this can be attributed to the fact that I've had the opportunity to test quite a lot of bikes in recent years. Some of this includes the On-One DeeDard, Last FastForward v1, Pole Taival and the beautiful Pässilä Bicycles Rämäkkä Long. Couple this with the notion that I’ve finally started to understand bike geometry and handling a bit more (one could say it was about time at this point.)
Pole and Pässilä frames provided very good benchmarks and the aim was simply to provide a mix of the two. I wanted the longer reach than the M-sized Pole had, but also keep the seat tube somewhat short to keep the bike easily maneuverable. The lengthy 515mm reach of the Pässilä frame was a tad too much for my liking, so I decided to cut back on that department a bit.
The Numbers
• Wheel size: 29"
• Reach: 505mm
• Head angle: 64.5°
• Seat tube angle: 78° (The intention was 77°, but funny things can happen during the build process.)
• Seat tube length: 440mm
• Chainstay: 445mm (adjustable)
• BB height: 60mm(ish)
• Wheelbase: 1300mm
• Hub spacing: 142mm (Since the jig did not have an option for going Boost. Sometimes you take what you get.)
In the past, chainstay length has caused some mixed feelings for me. I’m coming from a BMX background which has caused me to favor short chainstays to keep the bike at least somewhat nimble feeling and easily maneuverable. The short 420mm chainstays of the Last FastForward made it easy to manual and bunny hop, but when reaching higher speeds, the bike lost stability to the point that it felt as if playing ping pong on a bike between rocks and roots.
The first ride on the Pole Taival opened my eyes to the importance of chainstay length and especially having a proper balance between the rear and front centers. Every aspect of the handling is improved by lengthening the chainstays which will result in a more balanced weight placement and central riding position. This can be noticed especially on high-speed sections as improved stability. Climbing is also easier and when cornering, the bike is almost on rails.
Lengthening the chainstays means that it takes a bit of handling and body-English to get the front end off from the ground, especially up to a proper bunny hop height. At first, it felt almost as if having a solo ride on a tandem in the front seat, but after getting used to it, the use of more aggressive manners became a second nature when the bike needed to get airborne from flat ground.
Shopping Time
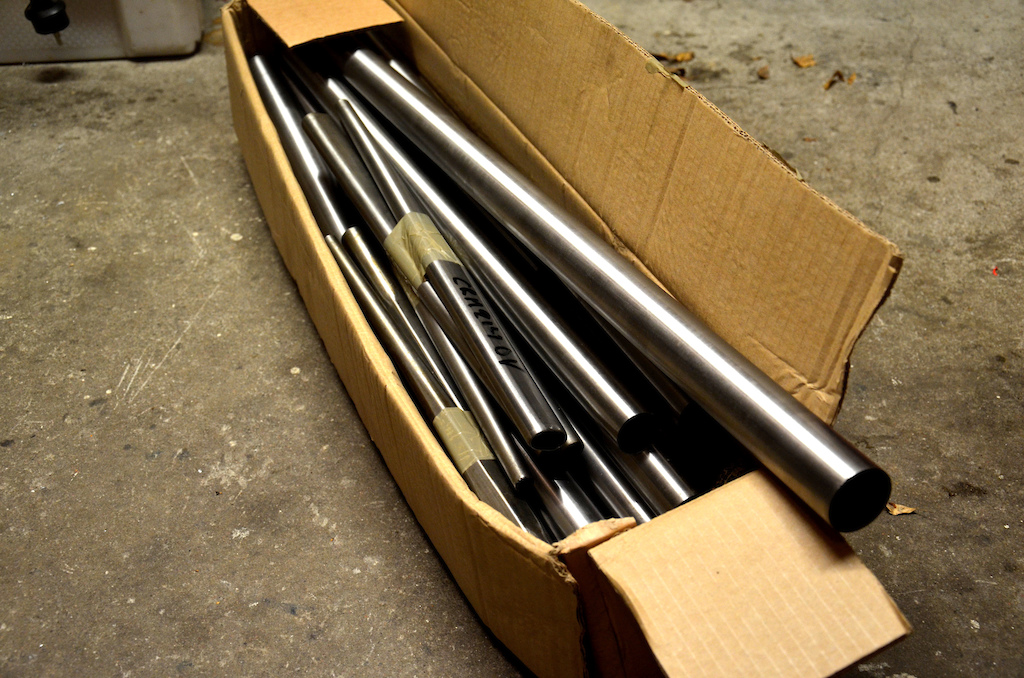
Gathering the needed ingredients was the next step of this undertaking. Tubing would be bought from the legendary Reynolds Technology who has been in the business for a very respectable 120-years! I chose a set of Reynolds 853 tubes for the front triangle. Not that I had much of a choice since a reach measurement north of half a meter requires a lengthy downtube - not a common commodity. A Reynolds employee told me, "A tube this long pushes the limits of our machinery." The BX3038XL tube I ended up buying has a length of 850mm with a butt profile of 1.15/0.6/0.9 meaning that the wall thickness in the mid-section is 0.6mm with a growing thickness towards both ends.
Why bother with butted tubes and not just settle with straight gauge type, which is easier to find and cheaper? Simply, because thicker wall thicknesses in the middle of the tubes do not provide any benefits in my opinion (besides dent resistance) and add a considerable amount of "dead weight".
The rear triangle was a bit of a cocktail of whatever I could find from a friend's workshop. The chainstays were Italian Dedacciai ones with a nice oval and tapered shape. Seatstays might even be plain straight gauge tubing if my memory serves me correctly. The rather small diameter and sleek looks made a nice match, though.
The small tidbits that are essential for a frame were bought across the pond from Paragon Machine Works. These included a straight 44mm headtube, slider dropouts, dropout inserts, rear axle, bottle and cable mounts. One of the many revelations during the build process was how much work goes into deciding these small but essential details which you do not even give a second thought when buying a frame off the shelf. Related to that, it was first shocking and then just funny how much money you can pour into these seemingly trivial parts. A pair of sliding dropouts made from stainless steel sets you back about $60, dropout inserts is another $40 and stainless steel cable stops a whopping $9 apiece! Getting the Pinion and rear brake cables neatly attached to the frame would total a figure north of 100 bucks. This made me consider the option of routing the cables internally.
High-quality Reynolds tubing, a set of dropout with a thru-axle insert and a 44mm straight headtube. I don't believe you should bother making it if you can buy it - at least when starting out.
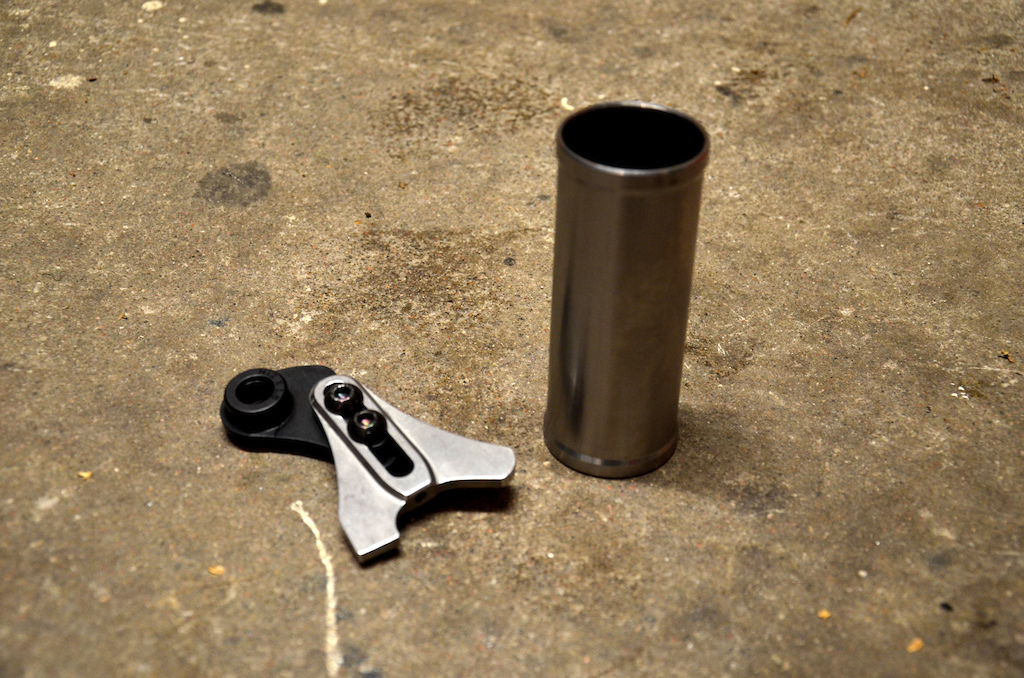
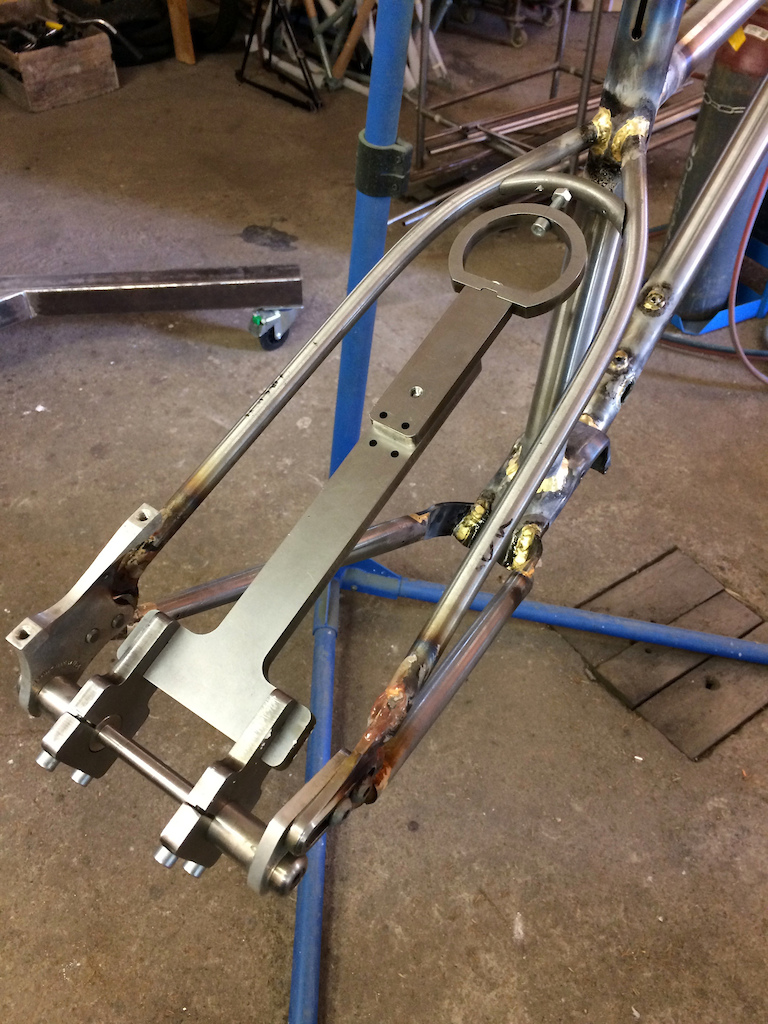
A question that has come up repeatedly is about the Pinion mount. Since I went to the gearbox route, there is no need for a BB shell. What is needed, however, is an interface for the Pinion gearbox. The bridge, as Pinion calls it, is a forged plate that has six mounting bolts for the gearbox. It is a nicely made piece of hardware that equals the design and finish-quality of the gearbox itself. A big plus is that the Chromoly version does not break the bank either since it is only marginally more expensive than a regular BB shell.
TIG weld or Braze?
When it comes to putting a frame together, there are two options: welding or brazing. If you’re new to the frame building game, brazing might be something that you’re never heard of before. I’s "an old-school" way of joining steel. The main difference is that with welding, the base materials and filler metal are melted together so when cooled all three of them form a uniform structure.
In brazing, the base materials joined by melting and flowing a filler metal (usually brass) into the joint, the most notable difference being that the base materials do not melt since the filler material has a much lower melting point. The filler metal flows and fills the gap between the tight-fitting parts by capillary action. If you have ever had a chromoly frame and wandered why the cable guides and other small tidbits have a gold-colored seam, those are brazed into the frame.
A good and strong joint can be made with both brazing or welding. The distinctive difference is that TIG welding is exponentially harder to learn, in my opinion. I spent a weekend trying my hand with a TIG welder under some very good guidance and had little more to show for it besides some holes burnt in the tubing that was used for practice. With brazing, one can get the basic idea and make some decent joints within a day or so.
Although I’m going to take a second round with TIG welding, brazing was the way to get my toes wet with frame building and putting the Rig together. The thought of getting close to carefully mitered and pricey tubes with a TIG was akin to dropping in blind into a run on Red Bull Rampage. Therefore, brazing was an obvious choice. The practice weekend with a TIG welder was a very educational one and made me appreciate the skill of welding to the extent it deserves.
Mitering & Cutting
Credits should be given to where those are due. The whole project would have ended like a chicken´s flight without the help of Antti, the mastermind behind the Konga Bicycles! He provided tools, machinery, workshop space and help to the level of true mentorship! Just about every stage of the build process had some nuance or small detail, whether it be how to fix the tubes to the jig or the order of doing things, that would have led to many hard-learned (and expensive) lessons if I would have tackled the process by myself.
Mitering is the process of fitting the tubes together before joining them together. It's simple on paper and laborious or complicated in practice, depending on the way you do it. The first option is to rely on the tools that have been available since the industrial revolution, i.e. hacksaw and file. The second option is to employ a hole saw attached to a sturdy pillar drill or milling machine. When you have the needed tools for this, it makes the mitering process faster to the level that it almost feels efficient and pleasant. The challenge is how to hold the tubes in place and calculate the correct angles so that the result provides the mitered joint that you are after. As I learned many times over, frame building is a lot about how to hold metal parts securely in place, Mitering is just one example of this.
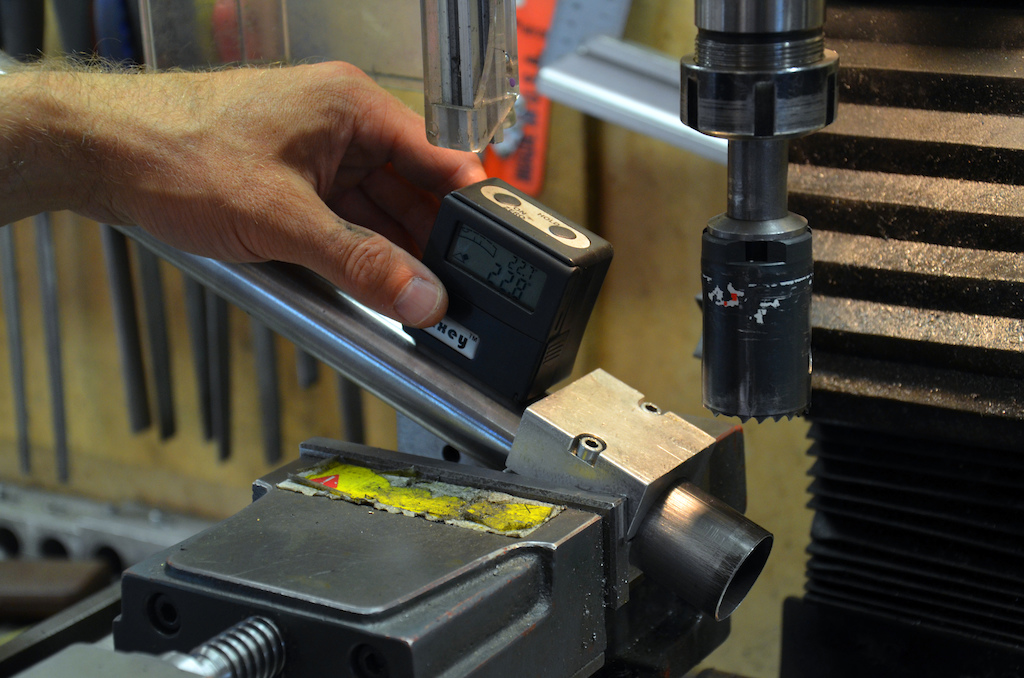
Being able to use a mill for the mitering was a luxury.
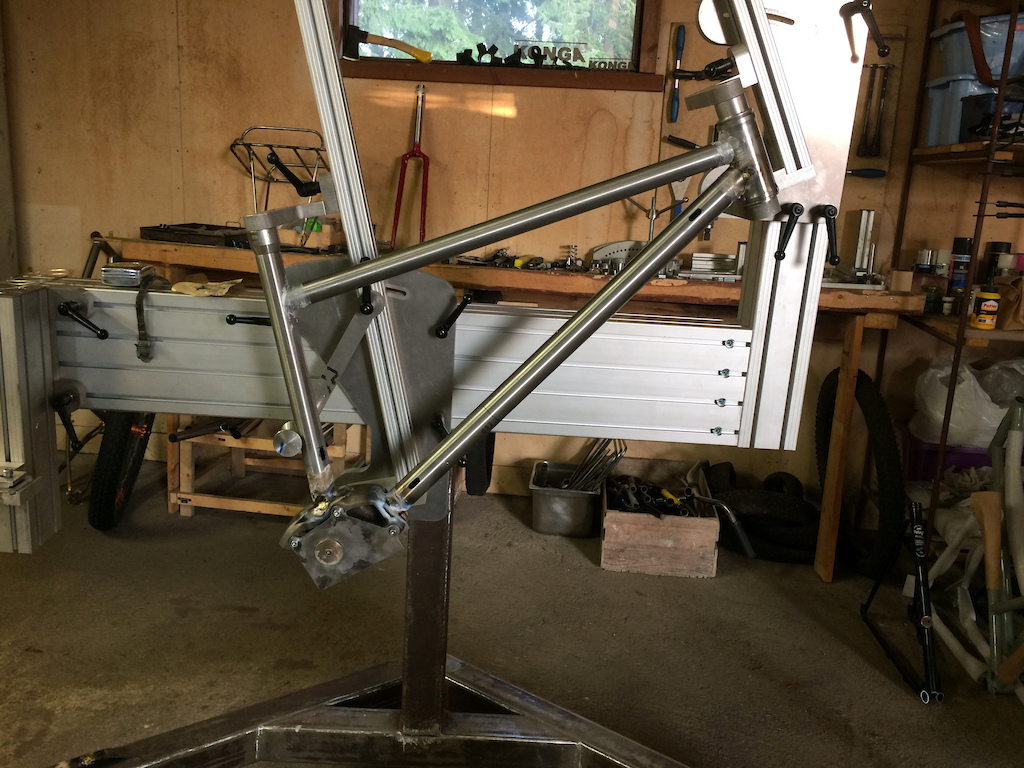
The mitering process was quite straightforward after getting the feel for it. The biggest and most time-consuming hurdle presented itself when it was time to fit the chainstays to the Pinion mount. The task isn't easy since the surfaces that are supposed to pair with the chainstays are convex in two directions, i.e. somewhat roundish. Joining a round tube to a surface like this proved to be an arduous task which made the move to a yoke-based solution an easy one. Some quality time was spent with a file, nevertheless to make it all fit.
Another thing about the mitering process is that the better the fittings are, the easier you make your life in the following stages. A tight miter is easier to braze or weld, there’ s less distortion and the joint will most likely be stronger in the long run as well.
Getting the Torch Out
Once miters were getting ready and the frame was starting to take shape, it was time to take the torch out. As one could imagine, pointing the 3000°C oxy-acetylene flame to the somewhat pricey carefully honed tubing produced some nervous moments. Confidence developed rather quickly though after brazing a couple of joints I almost felt as if I knew what I was doing.
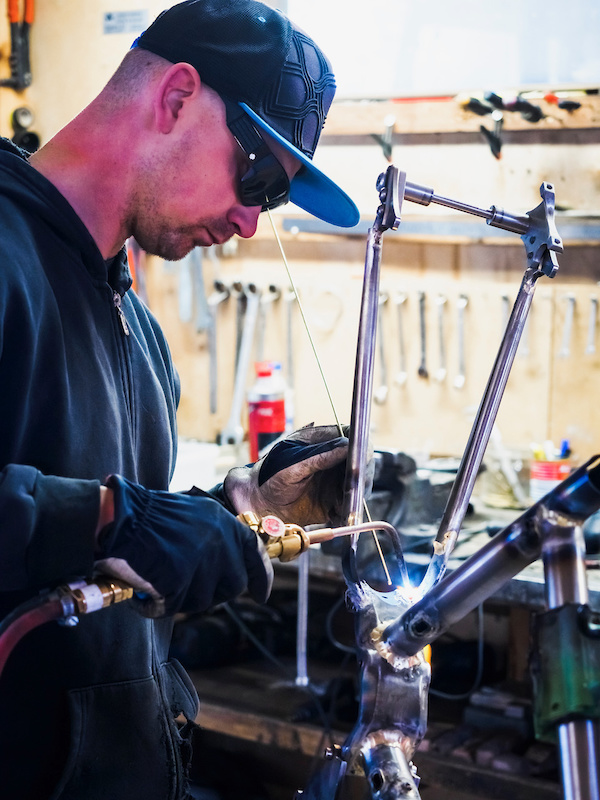
Brazing underway! There's something elemental about joining metal parts together and when the result is a working bicycle, all the better. Photos by Antti Konga.
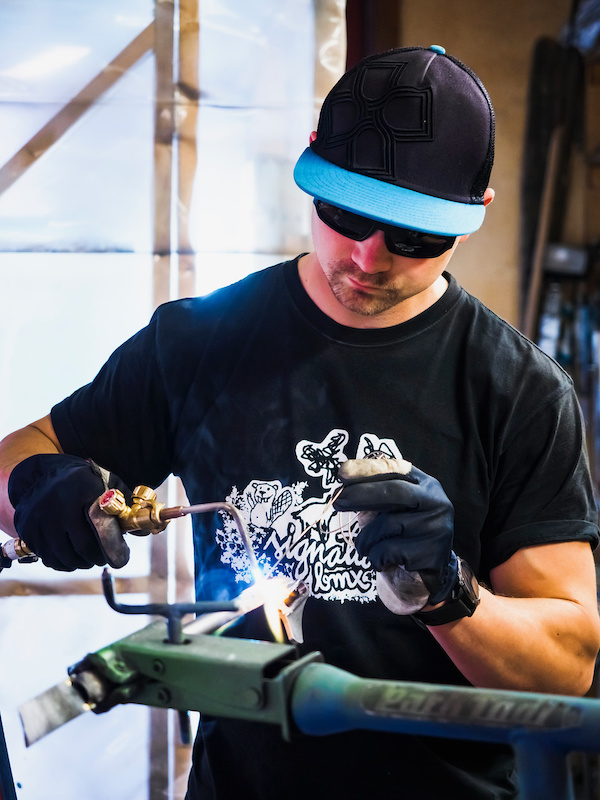
Surprisingly the brazing process went without a hitch. The fillets were not beautiful by any means but I had high hopes of them being worthy of the task that would follow. A good TIG welder will produce a frame that is ready to be painted after it has cooled down. But, with brazing, there is a lot of finishing work to be done before the frame is even close show-worthy and ready to be painted. First of all, the flux that is needed for soldering has to be soaked off, then it’s up to the builder how much time he wants to use for smoothing out the fillets - the range being rough, but functional up to a piece of art. My fillets were a lot closer to the former than the latter.
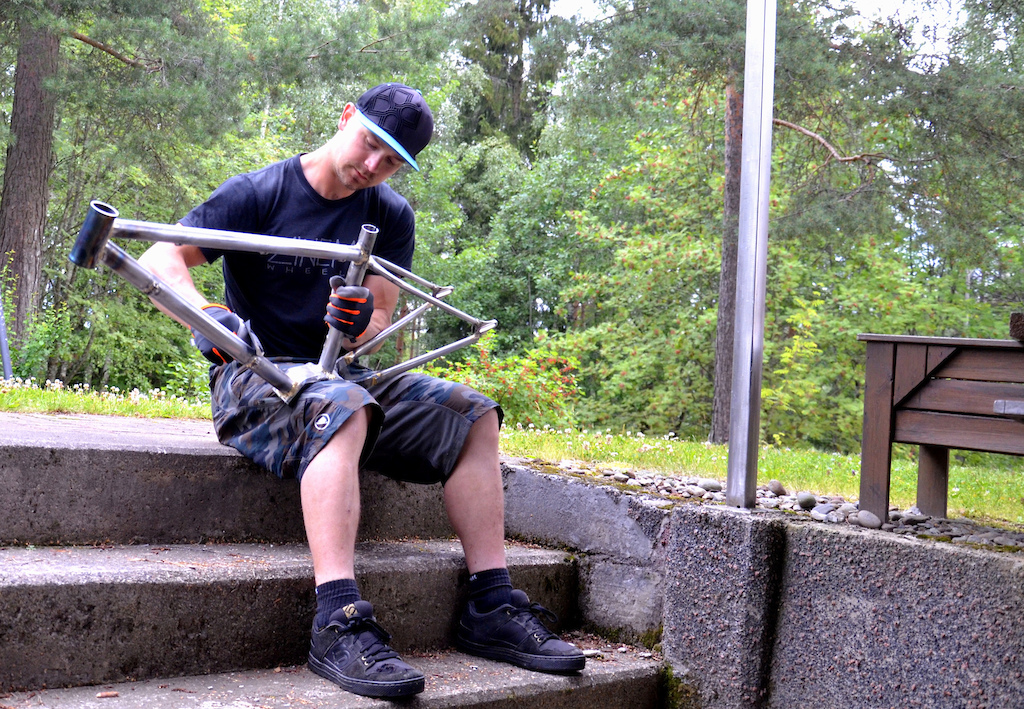
Frame alignment is something that one takes for granted when buying a new frame. When you’re building the frame tube by tube in a three-dimensional space, it’s everything but given that the frame ends up straight. Somewhat surprisingly, my frame turned out to be aligned quite well, so that no deviations could be noticed during inspection. Much, or most likely all of, this is attributed to the excellent jig and guidance provided by Konga Bicycles.
Finishing work meant plenty of quality time with sandpaper.
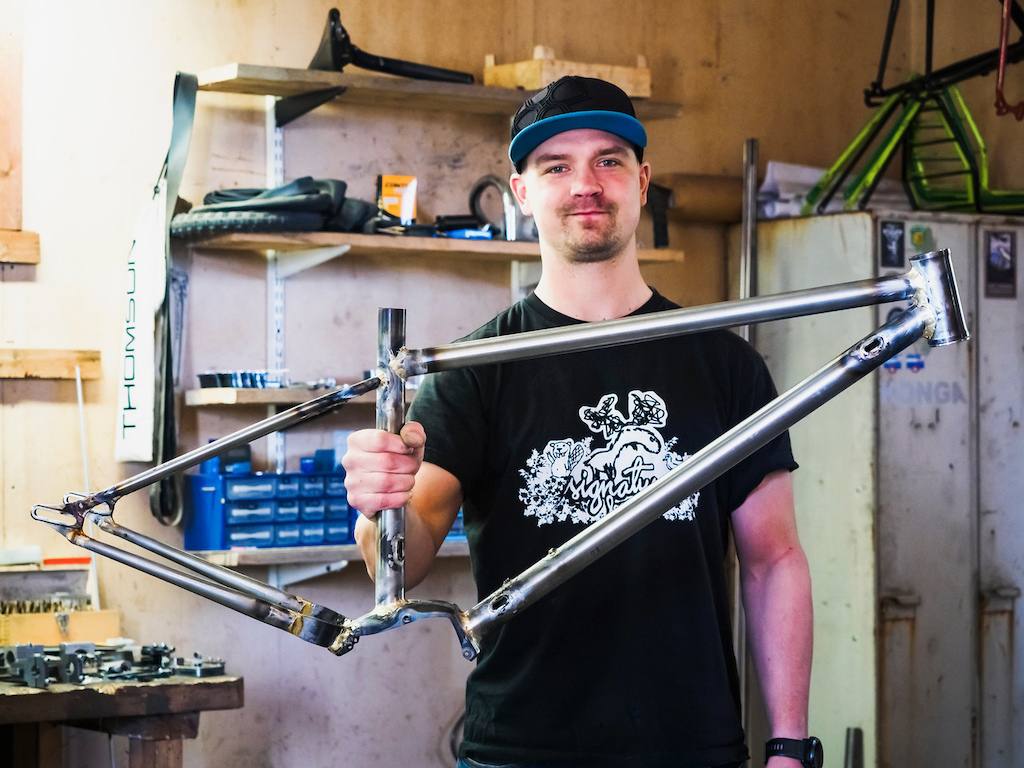
An almost finished frame and one happy camper! Photo by Antti Konga.
Componentry
When you spend considerable time and money building a frame, you're not hanging the cheapest parts on it. I wanted to make a build that I was happy with and wouldn't break the bank.
Fork:MRP Ribbon Air, 140mm of travel - Although the suppleness of a coil fork is hard to match, I like the adjustability that the FullFill air-spring system provides with separately adjustable positive and negative air-chambers.
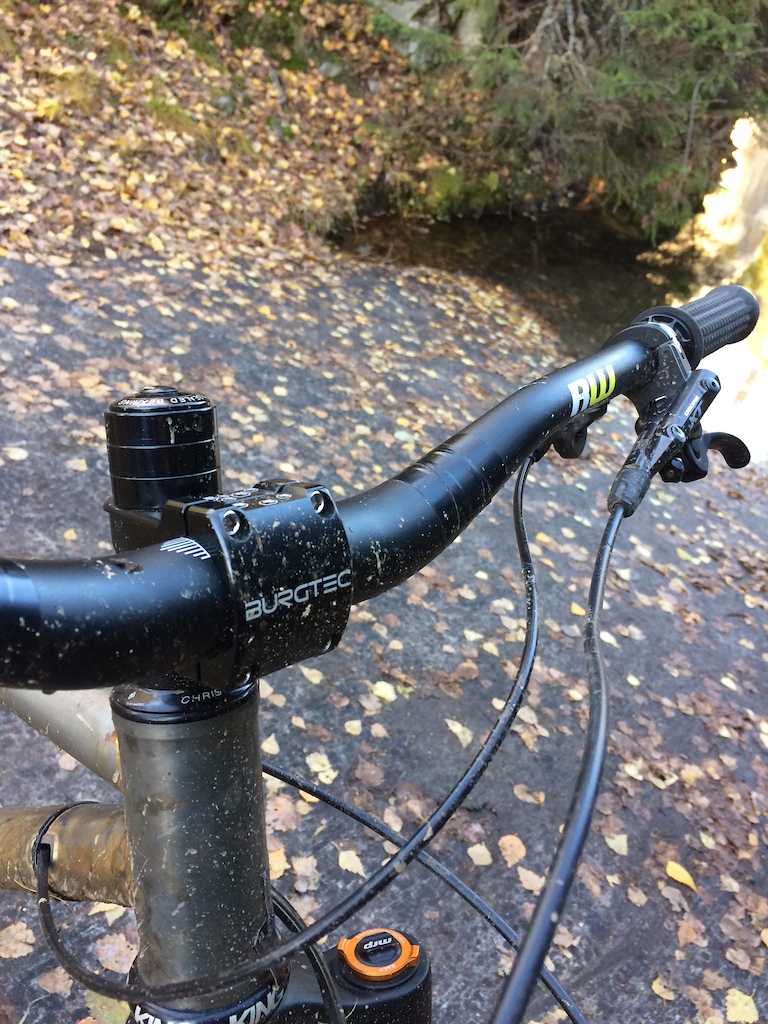
Handlebar and stem: Burgtec Ride Wide, Ratboy Edition and Enduro MK2 in 42.5mm length - The 800mm wide bars give a feeling that one is steering some heavy machinery and give enough stability even to the fastest sections.
Grips: Revgrips - Grip shift compatible, medium diameter - The choice of grips is somewhat limited when running the Pinion shifter. This made me bite the bullet and try out the very intriguing offerings from Revgrips.
Shifter: Pinion DS1, 9-speed - A refined and better looking DS2 model is available and I'm going to make the move to that in the near future.
Headset: Chris King Inset 7, black
Brakes: Shimano XT, old 2-pot versions - 180mm disc in front, 160mm in back
Dropper post: OneUp Dropper, v2 - 180mm of travel
Saddle: SDG
Cranks: Pinion CNC, 165mm - The 165mm crank length is a winner in my books on all fronts! More ground clearance and fewer pedal strikes without any noticeable compromise in pedaling performance.
Pedals: DMR Vault, Brendog Edition
Wheels: Superstar Electro with 35mm wide Alex Rims hoops. The quick engaging Electro rear hub with the POE number of 102 made a good pair with the Pinion box. After less than 6 months of use, the freewheel mechanism suffered an unexpected failure.
Tires: Maxxis Minion DHF 2,5" in front, High Roller SS 2,35" in back.
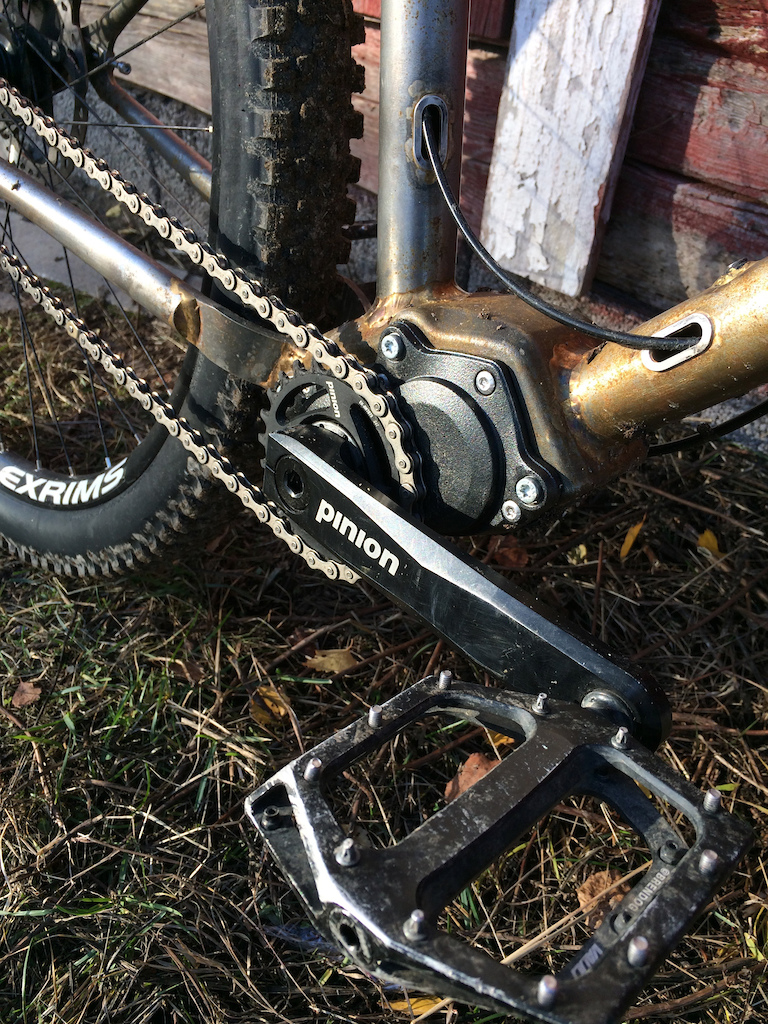
Steering duties are handled by the Burgtec Enduro Mk2 stem and Ride Wide bars. Pinion CNC cranks were paired with DMR Vault's. Pardon the overly long steerer tube.
What about the weight of the whole package you might ask? I don't really care and haven't taken the time to put the bike on a proper scale. A number around 14.5kg would be my educated guestimate, though. When people lift the bike off the ground, the usual reaction is that they consider it surprisingly light.
How Does It Ride?
The most important question is how the thing rides. Did all the effort pay off? In short, yes! The feeling of rolling just on the street with a bike I built yourself is something special. When I hit a trail with decent speed, special changes to almost unexplainable. Even after riding the bike for more than six months, I still grin like an idiot (even more than usual) when plowing through a rock-garden or pushing the bike into a bermed corner. It is a beautiful thing when all the work – both the design and craftsmanship – come together and take form in the trail.
The modern geometry provides plenty of stability which can be felt especially well on high-speed sections and rough sections. The slack head angle and long wheelbase make me forget at times that I'm not sporting any suspension in the back. So far this feeling hasn't been nearly as strong on any other bike. The long front end took some time to get used to especially while cornering. I found myself moving back and unweighing the front end too much when a tricky and/or fast corner presented itself. After some conscious effort and a couple of deep leans, things started to fall in place.
The Pinion gearbox creates a central and low center of gravity, akin to an e-bike. I remember clearly the first time I got the bike airborne using a small rock as lip and thinking as is if there' s a light motor and battery on board. There's certainly case to be made that a weight placement like this is beneficial which has been pointed out numerous times since the advent of e-bikes. The same line of thinking is behind the removable weights in the downtube.
Ride quality is also something that I haven't found anything to complain about or even improve on. The bike does not feel too flexy or neither too stiff. What about the magical springiness and comfort of steel frames? If it exists, I haven't found it yet or my antennae do not hold the precision to sense such a thing.
One very neat feature about the Pinion and hardtail combination is the lack of any unwanted sound. Tires gripping the trail, fork doing its thing and the buzz of the freewheel are the only things that can be heard when coasting. This might not sound like much (pun intended, if you will), but the difference in ride feel is significant to me. Going back to the derailleur-based system with the accompanying chain rattle feels like going backward. I think that a silent bike is not only much nicer to ride, but the subjective feeling is that you can ride faster as well since you don't get the impression that the bike is falling apart when going gets tough.
I quickly made several top five placings in downhill KOM segments on my local trails, placed 14th out of +40 riders in a two-day race called Himos Epic, which consisted of 15 stages equaling a combined time around 3h 20mins - an endeavor I'm still recovering mentally from. The season was capped with enduro race on one of the local hills which produced a 2nd place in the hardtail category. Any of these results aren't anything to write home about, but they are a somewhat good indication that the frame is at least rideable.
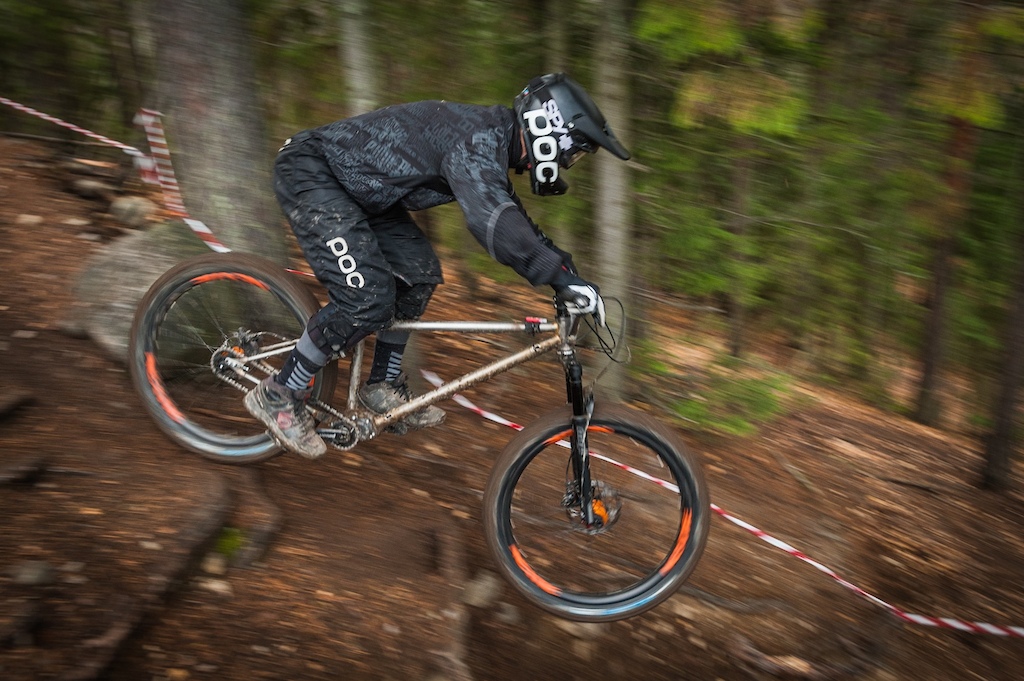
The lack of shoulder knobs on plus-sized tires made some interesting times in the wet conditions at Mustavuori Enduro. Photo by Tuomo Turunen.
Things I learned and What I'd Change
Here are some things that I learned while dipping my toes in the deep waters of frame building. Some of the things listed are observations that happened instantly during the work process and others did some time to germinate.
• The hardware side - Let's start off with the things on the structural side. There are only two things that I would do a bit differently if I'd build the frame again, make a 2nd revision, or produce a batch of them: I would have a slightly taller headtube and more tire clearance in the chainstays. When it comes to the head tube, it' s mostly about the looks, but getting rid of 25mm of spacers underneath the stem would add some stiffness to the front-end. The rear end has just enough real estate for a 27.5x2.8" sized plus tire. Increasing the clearance would only be a matter of angling the chainstay yokes a couple of degrees further out which would considerable amount of space without causing problems with crank arm clearance. Both of these are just small inconveniences in the big picture but I believe that learning is the process of making mistakes and not repeating them the second time around.
• This is hard work and worth a premium price - If you're around for a custom hand-made frame, please pay the asking price. When you have even the slightest idea of the amount of work, exercise, cost of materials and good old' craftsmanship that goes into every frame, haggling will feel almost degrading. For example, the £1000 price that Burf at BTR Fabrications is asking for a frame is a bargain in my opinion.
• Don't make it if you can buy it! - For the aspiring builder, the temptation might be significant to make everything from scratch. A noble goal by all means, but if you want to actually get something finished, settle for a bit easier options first. As simple things as the disc brake mounts would have added complexity to the level that it would have taken at least one full day more to get the frame finished and most likely with a worse end result. Considering all this, the Paragon slider dropouts are a truly great piece of hardware.
Leave the full custom route for the true artisans who know what they're doing and have plenty of finished frames to show for it.
• Building frames can not be considered as a cheap hobby - Frame building is an interesting endeavor since it creates the possibility to build even more expensive hobby on top of an existing one! If you're considering to build your own frame to save money, do a reality check based on some real calculations. Tackling a project of building your own frame can come with some unexpected benefits, as the saying goes: "Frame building - cheaper than therapy".
The Konga Dummy Wheel/tire Tool. Some of the specialty equipment and tools are needed only for minutes during the build process, but they're still mandatory or at least make your life so much easier
Future Developments
Some of you might have wondered why I left the frame raw. The reasons behind this were practical in nature. Firstly, I was lazy and wanted to try out the thing before taking it to a paint shop. Secondly, this state of surface finishing was a good choice for the testing period since possible cracks were easy to spot and repairs would be just as easy. Paying some good money for a paint job and having it sanded away just a couple of months later didn't seem like a tempting possibility. The frame has certainly developed some patina over the months (aka. rust) which means that some cleaning is in order before treating it with a well-deserved powder coat.
On the component side, a new set of wheels is an obvious one after the failure of the first set. The new set of hoops will be built around Onyx Cam Zink signature hub set to make the most out of the Pinion gearbox by minimizing the slack.
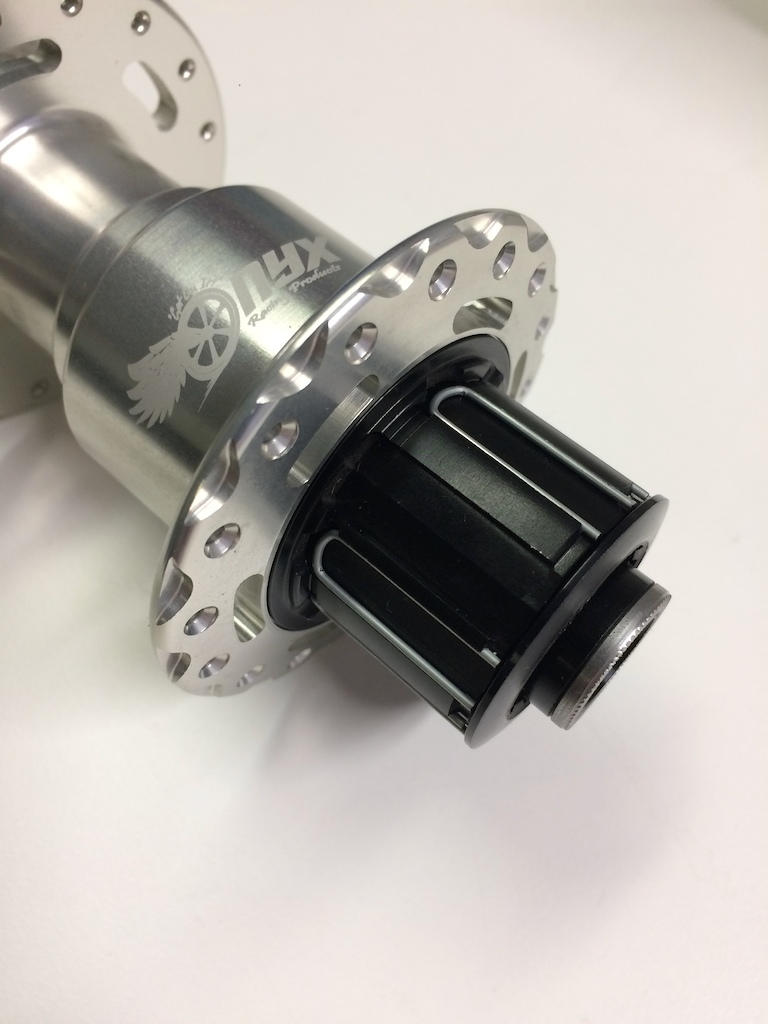
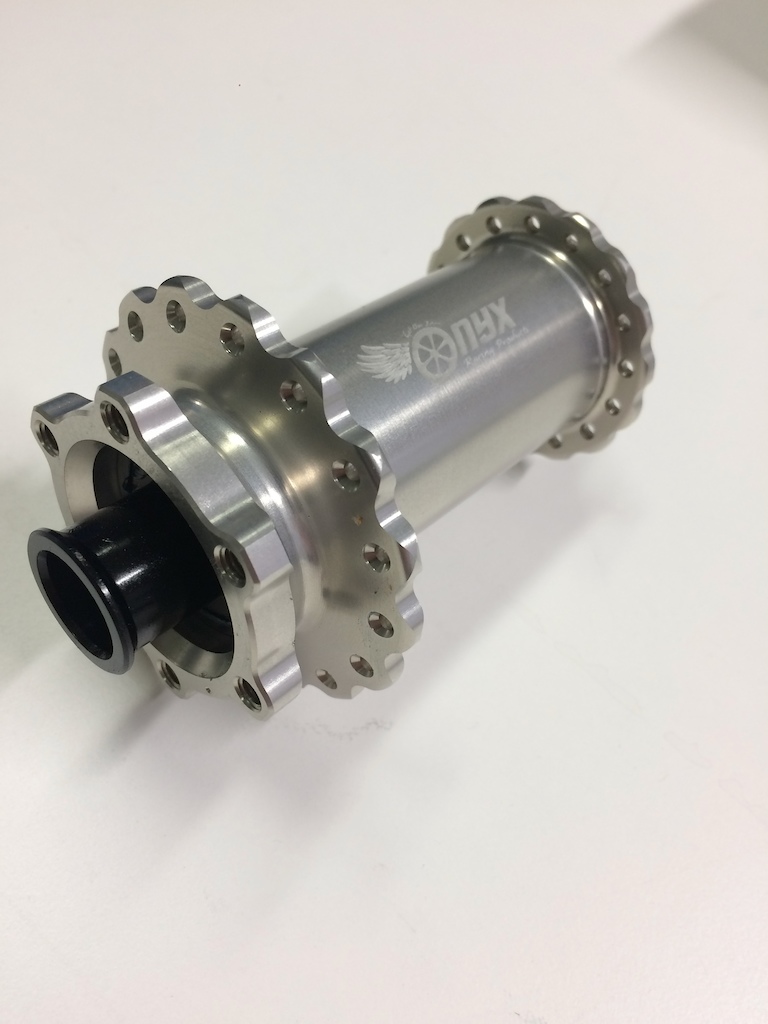
The Rig will be rolling soon on some hubs made by Onyx Racing Products. The sprag clutch freewheel mechanism provides instant engagement which makes a good pair with the Pinion.
Somewhat surprisingly, I've received several inquiries if I'm going to make these frames available for sale which makes me honored and humbled. This is a possibility if I can find a reliable manufacturer for a batch of frames since there's no way I'm going to build the frames myself. If you're interested hit me up with a message.
That's Not All Folks!
Please do note that my story did not cover a lot of the essential things out of the build process. Some of these include bending tubes, drilling vent holes, alignment checks, clearance for fork crown and rear tire, reaming and most importantly, working sequence and sub-assemblies. However, if your interest is still sparked by the idea of trying your hand in frame building, these previously published articles on Pinkbike are good sources for further and more detailed information.
Podcast: What It Takes to Build a Bike Frame from Scratch?
Reader Story: Building a Custom Bike Frame at Home
Author Info:

Must Read This Week
[UPDATED] Final Elite XC Results & Overall Standings from the Mairiporã XC World Cup 2024
41956 views
41956 views
Sign Up for the Pinkbike Newsletter - All the Biggest, Most Interesting Stories in your Inbox
PB Newsletter Signup
And even better I have learnt I Rev Grips have grips for twist shift ! Perfect for my Zerode Taniwha
Cheers
Thought about frame making myself, but will (most likely) not pursue the idea.
I will stick to clothing and bags for now, the sewing machine is easier to handle
One thing led to another and there will be a small production run of these - made by no other than Nicolai Bikes! Check out further details if you're interested. www.4130.fi/rig-v2-frame-set
Your work has resulted in a beautiful HT, nice job!
It's great feeling to make real stuff for somebody and our society need it.
And even more, sharing the skill of framebuilding is a very good way to improve our passion.
Thank for the great article.
See you around (Bespoke, NAHBS, concours de machine...)
@jukka4130
Did you procure the gearbox and the bridge directly from Pinion? Do they even sell them openly?
Very nice built by the way. Congrats on the courage to get your feet wet.
Thanks!
Nice build, pretty cool you had access to all those frame building tools, I’d totally build a frame if I had that.
I always dreamed of learning and making a steel frame. I mainly ride a Stanton Switchback for several years now and steel hardtails keep on being the kind of bikes I prefer so far. Yours is gorgeous, radical as I like, a brutal piece of art. I hope you`ll do some more. Looking forwards... Cheers!!! ;-)
Good call on the brazing vs TIG too, it's so much harder getting to a solid TIG'd joint than a braze (although I know a few local (Portland) builders that "started" with brazing and moved to TIG- they were actually TIGing the joint but brazing over it cause their welds weren't pretty or structurally sound...)
I got the impression that they found the 853 to have a racier feel, and expected to choose that, but surprised themselves when their choice was revealed.
Can you comment on the steep STA? Isn't 78° a bit excessive in a HT, especially given the moderately long CS? Don't get me wrong, being 191cm tall, I'm all for both longer CS and steeper STA, but surely there must be a limit at which it becomes a hindrance rather than the opposite.
Btw, how tall are you in the first place, to put the geometry in the context?
It does remind me a fair bit of the honzo, moxie and lacrau, to be honest. Although I think your chainstays and reach are significantly longer. Or maybe a primer with pinion?
Good lick with your future endeavors, I hope to see more of your work on pinkbike or elsewhere!
All the best
As to downs if you hit stuff with pedals you probably shouldn’t pedal in places where it happens anyways. Staying smooth and pumping backsides takes people further than bitch cranking.
For XC and Enduro, I find that 165mm work best, although they might require a period of getting used to.
Means you can easily just run an external lower cup for tapered steerer tube forks.
Everyone! Be quick if you're in the market for an awesome BTR frame - me included.