Tech Spotlight - Brake Piston Balancing
Pinkbike and BikeCo.com are excited to bring back the mechanical “how-to’s” with the new Tech Spotlight articles that you can (usually) expect to see on the last Tuesday of every month. Joe Binatena, BikeCo’s owner and world class mechanic, will help walk riders through a variety of tasks, from basic jobs to more advanced work that you'll be able to read about in the future. We aim to provide readers with a gauge on difficulty and risk for these projects, and also encourage you to post any questions in the comment section below when it comes to things that need more explaining.
Brake Piston Balancing
The caliper houses the hydraulic slave cylinder and piston system that clamps the pads down onto the rotor. Modern brakes typically employ either two or four opposing pistons, and a big factor in getting the most performance boils down to symmetry in the piston's power and stroke - this service is aimed at achieving exactly that. Whether you have brakes that have been in hard use for many seasons or a set that's straight out of the box, balancing pistons will increase your brake performance and longevity. New brakes typically only need to be balanced, but brakes that have been in service will likely need to be cleaned and then balanced.
The performance advantage of the steps described below have been proven on the race course, trail riding and commercially through BikeCo.com and other highly capable mechanical resources. As with any type of service, make sure you have the appropriate confidence and skill required to successfully complete the job before you start - you can be seriously injured or even killed if your brakes aren't working properly! Don't attempt this service if you have any doubts about your abilities.
![uneven pistons cause poor pad wear]()
Symptoms of unbalanced pistons:
• Long lever throw. This can be from one of the pistons not moving as intended, with the extra throw required to drive the operating piston across the gap left by an ineffective piston.
• Stiff lever throw but low power. Assuming that there is no fluid contamination of the pads or rotor, this condition is typical of a higher friction coefficient needed to drive the pistons. Slow pad return is often a telltale sign of excessive friction. If you apply the brakes and note that one or more of the pistons is slow to return after lever release, you could have contamination that is keeping the piston from returning smoothly.
Important points to remember:
• Mountain bike brake pads are easy to contaminate, and contaminated pads lack power and will be noisy. Contaminants can include any sort of cleaner, lube, grease, and even the oils naturally on your skin. Bottom line, don't let anything touch the pad's braking surface.
• Pistons can be easily damaged, so do not pry directly onto the piston material. You're far better off utilizing an old set of “dummy” brake pads to protect your pistons - slide them into place anytime you need to relocate the pistons.
• Commercial brake cleaner may be used to clean pistons but DO NOT allow brake cleaner to contact pads - mountain bike brakes do not generate enough heat to burn off commercial brake cleaner. After using commercial brake cleaner BikeCo will thoroughly rinse the caliper with an ammonia based window cleaner.
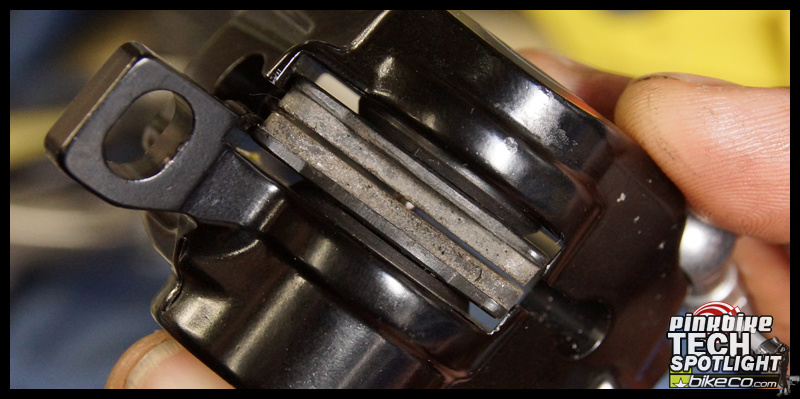
![cocked piston]()
Cleaning Steps
• Remove your brake pads and put them in a safe place where there is zero chance that they'll be contaminated - it's mind blowing how far some lube or cleaner can travel when over-sprayed. Install your old dummy pads to protect the piston surfaces.
• In order to protect your bladder within your master cylinder, uncap the bleed screw to open the hydraulic system. A Shimano brake bleed cup is a great tool to minimize bubble ingress while still providing an open system. If you utilize the bubble bleed, we suggest opening the system when servicing pistons or replacing pads. This is a good time to review brake fluid condition - if the fluid is roached or you have air in the line you should complete a full service brake bleed.
• It's now time to assess piston movement. This is often the moment of truth for those who have been fighting brake performance issues. Squeeze the lever slowly and only part way through its stroke so as not to drive the pistons completely out of the caliper. This could be a concern if your dummy pads are well worn, and you might need to insert an old rotor between them in order to keep this from happening.
• Is one piston not moving at all? This means that you have a frozen piston that may require you to rebuild the caliper, but there is a trick to try before resorting to that. Start by applying pressure on the functioning piston (you remembered to install your dummy pads, right?) while pumping the brake lever gently. If you're lucky this may provide enough leverage to break the sticky piston free.
![Uneven Pistons]()
• If your pistons are moving but sticky, you will need to assess the level of cleaning they require. Riders who run their brakes into the ground, put extreme heat through the system, or who are generally hard on components, may use commercial brake cleaner. Less aggressive riders may simply use ammonia based window cleaner to get the job done.
• Start by pulling the brake lever in order to expose the pistons. Take a close look at the pistons and inner walls of the caliper - is there burnt debris and filth everywhere? If so, utilize a commercial brake cleaner by spraying it across the pistons and then completely cleaning the same area with window cleaner. However, if your pistons and caliper aren't suffering from any build up you can use a gentler ammonia-based window cleaner. Push the pistons back into their bores only when the area has been cleaned properly, and then check to see if they each travel evenly. Repeat this process until your pistons drive and retract freely. DO NOT lubricate the pistons. Remember, DOT systems are designed for DOT fluid and mineral oil systems designed for mineral oil - mismatching any fluid as a "lubricant" may lead to failure.
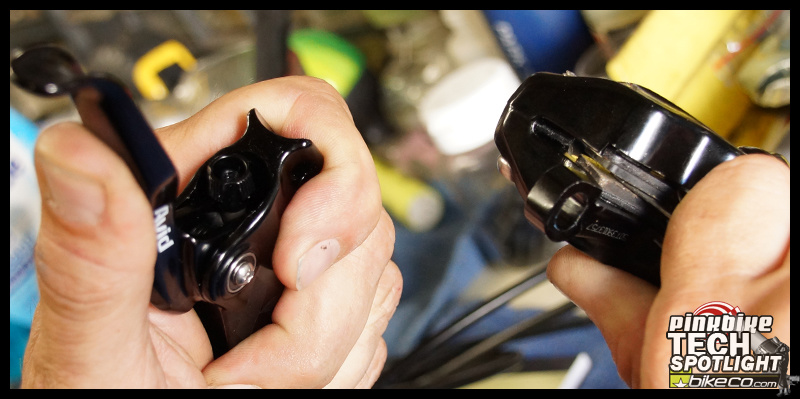
Piston Balancing Steps
Both sets of brakes photographed for this article were straight out of the box and had never been used, yet both had piston balance issues that could cause power loss and uneven pad wear, so don't assume that your calipers are working perfectly just because they're brand new. Balanced pistons provide better lever feel, even brake pad wear, and are much easier to mount onto your bike. Those with a touch of OCD will need to remember, however, that absolute symmetry isn't possible in all cases. Ideally, you want the pistons evenly exposed, with near equal stroke and power application. If you’re starting with brakes offset in the caliper but driving with equal stroke and power, the goal is to simply reset the natural location.
![Offset Piston Reset]()
• Begin by resetting both pistons into their bores - insure that you have the bleed screw cracked and your dummy pads installed. If they drive out evenly when you pull the brake lever, you're golden. If one drives more aggressively, apply slight pressure to it to retain its position while allowing the slower piston to advance towards it until both are even with each other. Take your time and don't pull on the brake lever too hard; remember that going slow will get the job done correctly.
![Pressure on free piston to break other pistons loose]()
• If your pistons are not sticky but will not balance, it's a sign of another issue: end of service lifespan. At the very end of a brake's service life the pistons can often develop grooves across the cylinder barrel. These are typically too minute to see or feel but can be measured with machinist tools. What does this mean? Basically, brake pads wear quickest from new to approximately the fifty percent mark, and due to heat cycles and other variables the brake pad material hardens, producing less bite and heat capacity, while allowing the pistons to stay in a slightly cocked position. The pistons will then wear slowly over time where they make continued contact with the O-ring, something that can create a groove around their circumference, and they can end up wanting to always return to the same resting position because of this. Typically brakes at this level of wear will not center, or if they center they will tend to jump out of alignment as the piston's friction changes and resets which side’s groove they set into.
![Even and clean]()
Disclaimer: Many of our tech tips ARE NOT factory approved service techniques. Riders should evaluate their skills prior to attempting any published tips. Knowledge base is needed to define success or failure after any tip procedure – if you doubt your understanding of any system described in our tech spotlight work with a professional resource. All systems on a bicycle should be considered critical – riders risk injury or possibly death with improper service or application. Be safe and enjoy your riding.
We hope that you found tips in this that will help you better maintain your ride. We will look forward to future instalment of Tech Spotlight here on Pinkbike on the last Tuesday of each month. If you have an idea that you would like to see covered, please e-mail Nate@BikeCo.com to let us know what issues you’ve had that can’t seem to be solved and we will put Joe on the task.
www.bikeco.com
The caliper houses the hydraulic slave cylinder and piston system that clamps the pads down onto the rotor. Modern brakes typically employ either two or four opposing pistons, and a big factor in getting the most performance boils down to symmetry in the piston's power and stroke - this service is aimed at achieving exactly that. Whether you have brakes that have been in hard use for many seasons or a set that's straight out of the box, balancing pistons will increase your brake performance and longevity. New brakes typically only need to be balanced, but brakes that have been in service will likely need to be cleaned and then balanced.
The performance advantage of the steps described below have been proven on the race course, trail riding and commercially through BikeCo.com and other highly capable mechanical resources. As with any type of service, make sure you have the appropriate confidence and skill required to successfully complete the job before you start - you can be seriously injured or even killed if your brakes aren't working properly! Don't attempt this service if you have any doubts about your abilities.
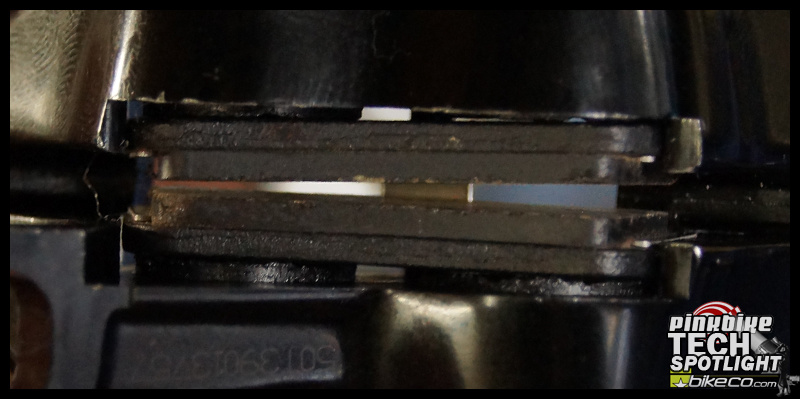
Note how the uneven piston travel in the caliper has the pads sitting at an angle. This can cause power loss and premature pad wear.
Symptoms of unbalanced pistons:
• Long lever throw. This can be from one of the pistons not moving as intended, with the extra throw required to drive the operating piston across the gap left by an ineffective piston.
• Stiff lever throw but low power. Assuming that there is no fluid contamination of the pads or rotor, this condition is typical of a higher friction coefficient needed to drive the pistons. Slow pad return is often a telltale sign of excessive friction. If you apply the brakes and note that one or more of the pistons is slow to return after lever release, you could have contamination that is keeping the piston from returning smoothly.
Important points to remember:
• Mountain bike brake pads are easy to contaminate, and contaminated pads lack power and will be noisy. Contaminants can include any sort of cleaner, lube, grease, and even the oils naturally on your skin. Bottom line, don't let anything touch the pad's braking surface.
• Pistons can be easily damaged, so do not pry directly onto the piston material. You're far better off utilizing an old set of “dummy” brake pads to protect your pistons - slide them into place anytime you need to relocate the pistons.
• Commercial brake cleaner may be used to clean pistons but DO NOT allow brake cleaner to contact pads - mountain bike brakes do not generate enough heat to burn off commercial brake cleaner. After using commercial brake cleaner BikeCo will thoroughly rinse the caliper with an ammonia based window cleaner.
Cocked pistons like those shown above can eventually cause seal issues or even crack while being used.
Cleaning Steps
• Remove your brake pads and put them in a safe place where there is zero chance that they'll be contaminated - it's mind blowing how far some lube or cleaner can travel when over-sprayed. Install your old dummy pads to protect the piston surfaces.
• In order to protect your bladder within your master cylinder, uncap the bleed screw to open the hydraulic system. A Shimano brake bleed cup is a great tool to minimize bubble ingress while still providing an open system. If you utilize the bubble bleed, we suggest opening the system when servicing pistons or replacing pads. This is a good time to review brake fluid condition - if the fluid is roached or you have air in the line you should complete a full service brake bleed.
• It's now time to assess piston movement. This is often the moment of truth for those who have been fighting brake performance issues. Squeeze the lever slowly and only part way through its stroke so as not to drive the pistons completely out of the caliper. This could be a concern if your dummy pads are well worn, and you might need to insert an old rotor between them in order to keep this from happening.
• Is one piston not moving at all? This means that you have a frozen piston that may require you to rebuild the caliper, but there is a trick to try before resorting to that. Start by applying pressure on the functioning piston (you remembered to install your dummy pads, right?) while pumping the brake lever gently. If you're lucky this may provide enough leverage to break the sticky piston free.
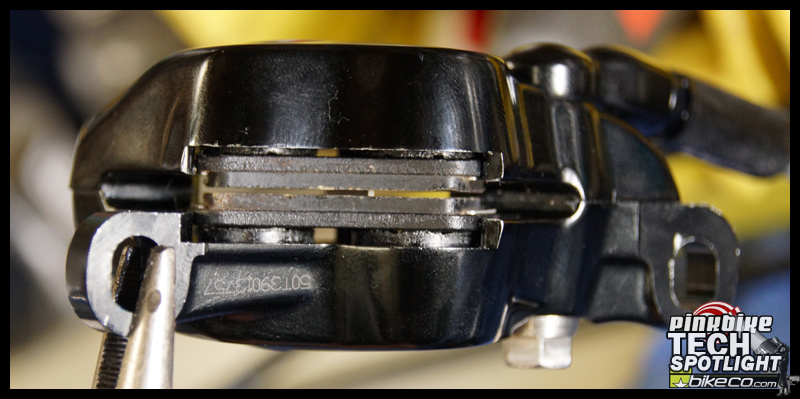
Uneven pistons in a four piston caliper.
• If your pistons are moving but sticky, you will need to assess the level of cleaning they require. Riders who run their brakes into the ground, put extreme heat through the system, or who are generally hard on components, may use commercial brake cleaner. Less aggressive riders may simply use ammonia based window cleaner to get the job done.
• Start by pulling the brake lever in order to expose the pistons. Take a close look at the pistons and inner walls of the caliper - is there burnt debris and filth everywhere? If so, utilize a commercial brake cleaner by spraying it across the pistons and then completely cleaning the same area with window cleaner. However, if your pistons and caliper aren't suffering from any build up you can use a gentler ammonia-based window cleaner. Push the pistons back into their bores only when the area has been cleaned properly, and then check to see if they each travel evenly. Repeat this process until your pistons drive and retract freely. DO NOT lubricate the pistons. Remember, DOT systems are designed for DOT fluid and mineral oil systems designed for mineral oil - mismatching any fluid as a "lubricant" may lead to failure.
Piston Balancing Steps
Both sets of brakes photographed for this article were straight out of the box and had never been used, yet both had piston balance issues that could cause power loss and uneven pad wear, so don't assume that your calipers are working perfectly just because they're brand new. Balanced pistons provide better lever feel, even brake pad wear, and are much easier to mount onto your bike. Those with a touch of OCD will need to remember, however, that absolute symmetry isn't possible in all cases. Ideally, you want the pistons evenly exposed, with near equal stroke and power application. If you’re starting with brakes offset in the caliper but driving with equal stroke and power, the goal is to simply reset the natural location.
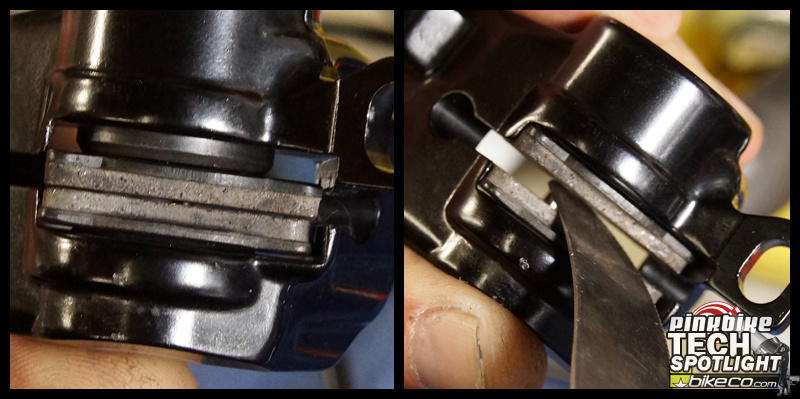
Begin to balance the pistons by driving both back into their bores. A butter knife works well for this job because it's not too stiff but is sturdy enough to get the job done. As always, make sure that your dummy brake pads have been installed - never push on the pads you intend to use.
• Begin by resetting both pistons into their bores - insure that you have the bleed screw cracked and your dummy pads installed. If they drive out evenly when you pull the brake lever, you're golden. If one drives more aggressively, apply slight pressure to it to retain its position while allowing the slower piston to advance towards it until both are even with each other. Take your time and don't pull on the brake lever too hard; remember that going slow will get the job done correctly.
We're applying pressure to the moving piston in order to balance the system.
• If your pistons are not sticky but will not balance, it's a sign of another issue: end of service lifespan. At the very end of a brake's service life the pistons can often develop grooves across the cylinder barrel. These are typically too minute to see or feel but can be measured with machinist tools. What does this mean? Basically, brake pads wear quickest from new to approximately the fifty percent mark, and due to heat cycles and other variables the brake pad material hardens, producing less bite and heat capacity, while allowing the pistons to stay in a slightly cocked position. The pistons will then wear slowly over time where they make continued contact with the O-ring, something that can create a groove around their circumference, and they can end up wanting to always return to the same resting position because of this. Typically brakes at this level of wear will not center, or if they center they will tend to jump out of alignment as the piston's friction changes and resets which side’s groove they set into.
Clean, even, and balanced. These brakes will offer optimum performance when installed.
Disclaimer: Many of our tech tips ARE NOT factory approved service techniques. Riders should evaluate their skills prior to attempting any published tips. Knowledge base is needed to define success or failure after any tip procedure – if you doubt your understanding of any system described in our tech spotlight work with a professional resource. All systems on a bicycle should be considered critical – riders risk injury or possibly death with improper service or application. Be safe and enjoy your riding.
We hope that you found tips in this that will help you better maintain your ride. We will look forward to future instalment of Tech Spotlight here on Pinkbike on the last Tuesday of each month. If you have an idea that you would like to see covered, please e-mail Nate@BikeCo.com to let us know what issues you’ve had that can’t seem to be solved and we will put Joe on the task.
www.bikeco.com
Author Info:

Must Read This Week
Sign Up for the Pinkbike Newsletter - All the Biggest, Most Interesting Stories in your Inbox
PB Newsletter Signup
Thanks for the tips!!
( i can bubble bleed them, never changed oil, or pads so im a first timer
I love the new Shimano braking system because you can literally bleed a brake in 2-3 minutes and never have "weird" results like you may have with other brands.
www.youtube.com/watch?v=o2c6ezHY0A4#t=86
the only piece of your advice I'd take issue with is using DOT or Mineral Oil to "lubricate" the pistons
neither are lubricants but corrosive brake fluids, and both actually cause the piston seals to slightly swell (this is designed into systems and prevent fluid leaks under high pressure)
initially, using DOT or Mineral Oil makes it easy to reseat the pistons as they press back easily into the caliper bay.
However, it then causes more drag on the piston / seal interface. It seems like a quick fix but often make piston imbalance worse. I have seen many mechanics in my workshops make this mistake until we've educated them
the correct lubricant to use is high-temp silicon grease, Avid have their "Pit Stop" variant and Hope use "Hunter" for example. This does require a caliper rebuild to install properly, but ensures a long working life and good piston balance.
i did a bubble bleed in the past only with the cup in the lever, and some lever squeeze
now, i have worn pads, so i will attach the cup to the lever, and push the pistons back, put the bleed block in place, and give the system a fresh fluid, than good to go!
I love shimano's pure easyness too
thanks
We don't suggest lubricating pistons unless you do a full tear down to avoid (which means the system was very dirty or had a more severe issue) if you do a full tear down it is up to you.
MTB brake pads contaminate so easily we do not suggest anything but ammonia based window cleaners - we've seen issues commercially with just about everything else...
Thanks for the comments - there's some good advice in them above!
thanks for your input
normally I'd use Iso Alcohol to clean the rotor and caliper bay. We also have access to commercial "bike specific" disc brake cleaners like this product:
muc-off.com/clean/56-disc-brake-cleaner-5037835913002.html
Do you guys have this product in the US? Any experience with it?
I've used it on customers bikes and my own bikes without any issues as a service item, especially after washing the bike when soapy detergent gets onto the rotors and brake pads.
if a bike comes in, like yesterday a Specialized Crosstrail Disc where the customer used a spray chain lubricant and contaminated the rear brake, I degreased the rotor with Iso Alcohol and replaced the pads after cleaning the caliper bay.
the normal procedure for an uncontaminated bike would be to dose the rotor and pads with the Muc-
Off spray, wipe the rotor clean with a clean, dry rag and then ride the bike up and down the street, applying the brakes, until the brakes stops squeaking.
This seems to return the system to full power. I've done this numerous times on my Devinci, Banshees and Stumpjumper for years and gone mountain biking with no brake issues.
should work fine. you don't need much. wipe the caliper clean with Iso alcohol afterwards. Hope use Hunter silicon grease, Avid have their (rebranded?) Pit Stop silicon grease.
-so open the bleed screw,
-then pull the lever to see pads drive out evenly??
I don't think this will work with bleed screw open
And is it possibile, that uneven pistons go "too much out" on the one side and that causes oil loss?
Thanks for the answers
I just dont like wakistuff like many others that do coment there dobt understand why PB do that...
Everyone has his own taste. Im not a keyboard jokey
"Clean, even, and balanced. These brakes will offer optimum performance when installed." -but the pads are way too close together to fit a rotor in there.......herp derp.
Wouldn't uneven pad wear, or even "Piston unbalance" typically be caused by an improperly centered caliper? Where one piston has to move farther in order for the pad to contact the rotor? Therefore causing the closer pad to contact the rotor sooner, apply more pressure sooner, thus causing that pad to wear faster?
And since every modern brake ships with a pad spacer in it, designed specifically to prevent "Piston imbalance" (or whatever term you invented) in that it is typically the correct thickness to allow a rotor to pass through and the pads to retract enough not to rub - I find it strange that you had these issues.
Just spitballin'
The slot opening for the rotor will typically balance itself when you apply the brakes a few times (it's very hard to say add a mm and keep it - brakes are designed to accommodate pad wear)
Pads are very porous, they will suck most contaminants very deep. You can clean a rotor to a certain degree but as a base rule contaminated pads should be thrown away immediately to save yourself time, frustration and eventually money. If you used contaminated pads for longer time throw the rotors away as well. It will be cheaper than contaminating new pads with shit that sits in the rotors and doing it all over again. Bicycle pads and rotors are not motorcycle or car brakes - they are many times smaller thus the effects of contamination have more impact on their performance.
Also WAKI, I am curious, what in metal pads that makes them toxic?
About the toxicity of brake pads - I got this advice from a bloke who is a car mechanic and occasionaly rides bikes. He says that these days brake pads don't contain as much crap but they still work with them with mask on their face. He says that he just wouldn't risk. My bike mechanic does not recommend burning pads either. They are not that expensive to replace.
Squealing brake noise typically from overheat. Look for black marks on rotors. We suggest flooding with ammonia based window cleaner (spray entire rotor), then resurface with wet/dry sandpaper approx 200 grit. Do this a couple times, then go ride the bike with the brakes applied to burn it off. Typically this gets you going.
Honking brake noise (more like a goose) is typically pad contamination. I have seen many was people try to correct this over the years - some with much more risk than others... If I contaminate pads (and occasionally it happens to everyone) I replace them. Yes I work at a shop, yes I suggested you buy something but for me - the cost of a set of brake pads typically isn't worth the amount of time it takes to try to correct them or the extreme irritation if they didn't get corrected after that much time!