Tech Tuesday - Flat Repair Without A New Tube Or Patch Kit
Got a flat tire and no tubes or patches? No matter how prepared you think you are or how many spare tubes and patches you pack in your bag, there comes a time when you end up facing a long walk out of the bush. It could happen on the quick after work spin where you forgot to throw another tube in your bag, or maybe during that epic death march that saw you and your friends make your way through every spare tube in the group - but all hope is not lost. By removing the flat tube, cutting it in half at the puncture and then tying it in a tight knot you may just be able to take a pass on the walk of shame. Keep in mind that this trail side repair is strictly designed to get you home and no further. Sure, it may hold air for days, but pedal carefully and be sure to replace the knotted tube with a new one once you get home.
What you'll need:
• While this emergency repair doesn't require a new tube or patch kit, you'll still need a pump to get back up and riding.
![n a]()
![n a]()
![n a]()
![n a]()
![n a]()
![n a]()
Have you used this technique to get out of the bush? Have your own tips to add? Put them down below!
Past Tech Tuesdays:
Technical Tuesday #1 - How to change a tube.
Technical Tuesday #2 - How to set up your SRAM rear derailleur
Technical Tuesday #3 - How to remove and install pedals
Technical Tuesday #4 - How To Bleed Your Avid Elixir Brakes
Technical Tuesday #5 - How To Check And Adjust Your Headset
Technical Tuesday #6 - How To Fix A Broken Chain
Technical Tuesday #7 - Tubeless Conversion
Technical Tuesday #8 - Chain Wear
Technical Tuesday #9 - SRAM Shift Cable Replacement
Technical Tuesday #10 - Removing And Installing a Headset
Technical Tuesday #11 - Chain Lube Explained
Technical Tuesday #12 - RockShox Totem and Lyric Mission Control Damper Mod
Technical Tuesday #13 - Shimano XT Crank and Bottom Bracket Installation
Technical Tuesday #14 - Straightening Your Derailleur Hanger
Technical Tuesday #15 - Setting Up Your Front Derailleur
Technical Tuesday #16 - Setting Up Your Cockpit
Technical Tuesday #17 - Suspension Basics
Technical Tuesday #18 - Adjusting The Fox DHX 5.0
Technical Tuesday #19 - Adjusting The RockShox BoXXer World Cup
Technical Tuesday #20 - Servicing Your Fox Float Shock
Technical Tuesday #21 - Wheel Truing Basics
Technical Tuesday #22 - Shimano Brake Pad Replacement
Technical Tuesday #23 - Shimano brake bleed
Technical Tuesday #24 - Fox Lower Leg Removal And Service
Technical Tuesday #25 - RockShox Motion Control Service
Technical Tuesday #26 - Avid BB7 Cable Disk Brake Setup
Technical Tuesday #27 - Manitou Dorado Fork Rebuild
Technical Tuesday #28 - Manitou Circus Fork Rebuild
Technical Tuesday #29 - MRP G2 SL Chain Guide Install
Technical Tuesday #30 - Cane Creek Angleset Installation
Technical Tuesday #31 - RockShox Maxle Lite DH
Technical Tuesday #32 - Find Your Tire Pressure Sweet Spot
Technical Tuesday #33 - Three Minute Bike Preflight Check
Technical Tuesday #34 - MRP XCG Install
Technical Tuesday #35 - Stem Choice and Cockpit Setup
Technical Tuesday #36 - Handlebars - How Wide Affects Your Ride
Technical Tuesday #37 - Repairing A Torn Tire
Technical Tuesday #38 - Coil spring swap
Technical Tuesday #39 - Trailside help: Broken Shift Cable
Technical Tuesday #40 - Installing a Fox Float Air-Volume Spacer
Technical Tuesday #41 - Replace the Seals on Your 2011 RockShox Boxxer World Cup Fork
Visit Parktool.com to see their entire lineup of tools and lubes.
What you'll need:
• While this emergency repair doesn't require a new tube or patch kit, you'll still need a pump to get back up and riding.

Start your self rescue mission by removing the tire and tube, being sure to figure out exactly what it was that caused the flat in the first place - this trail side fix will only work once per tube so you want to be sure that you won't flat again. Using your pump to inflate the tube sightly will make finding the puncture much easier. It's time to perform a bit of surgery once you've found it...
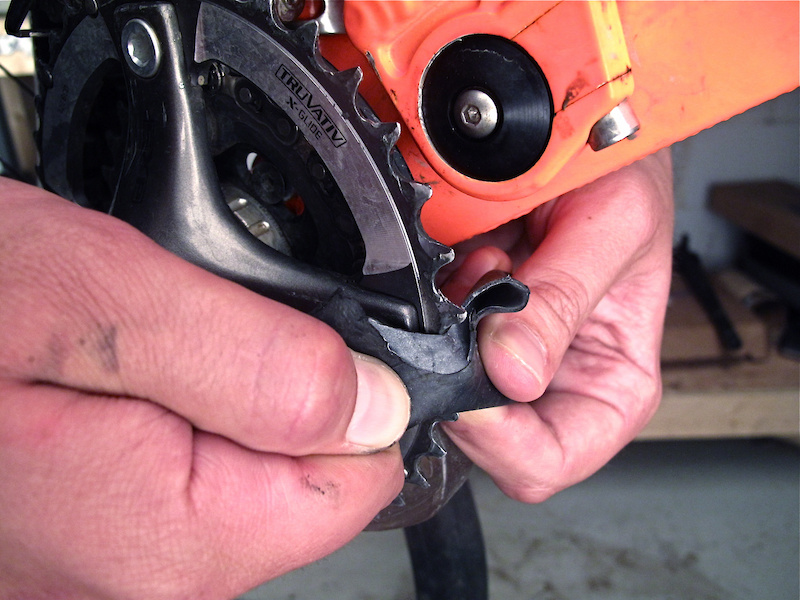
If you carry a folding knife or Leatherman in your bag you can use that to cut the tube across its diameter exactly where the puncture is located. If not, you'll need to use the teeth on your chain ring to do the job. If your bike uses a single ring and guide, lift the chain up and off of the ring. Take your time and be careful not to cut yourself as you do it. The straighter the cut, the more likely it will hold air when the time comes to test it out.

This is what it should look like if you've done it right. You'll now need to tie the two ends together in a very tight knot that will hopefully be airtight...
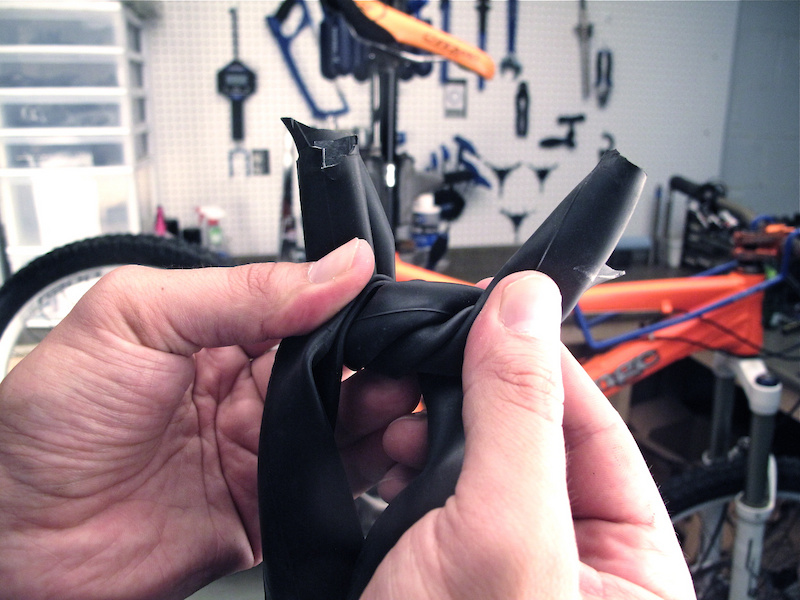
It is important to have enough slack to easily tie the two ends together in a tight knot, but at the same time you don't want to use so much tube length as to make reinstalling the now too-small tube back on the wheel difficult. Again, the tighter the knot is, the better chance you'll have at getting out of the bush.

Pump some air into the tube once you've finished tying your knot, putting enough in to allow you to hear if air is leaking at the new joint by holding it up to your ear. There is a good chance that you'll have to undo your first few tries to get a tighter knot before it becomes air tight, but when done right it shouldn't leak at all.
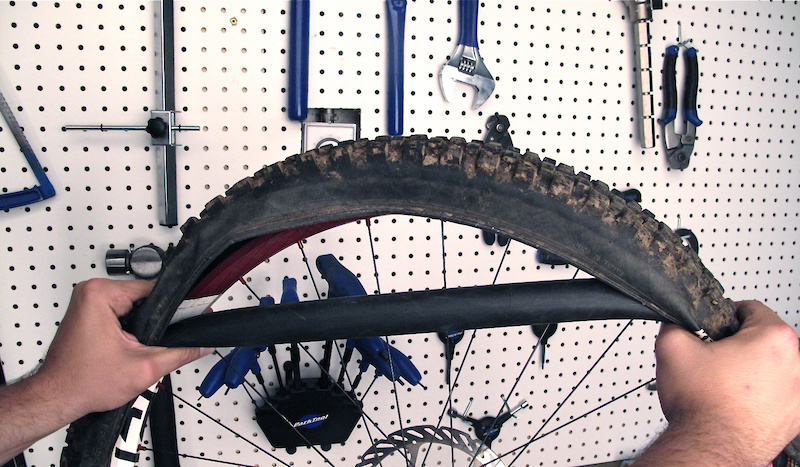
The ''repaired'' tube will now have a much smaller diameter, making it a bit trickier to install than when you first put it in. Put one side of the tire onto the rim and then work the tube up and onto the rim. The tube should stretch enough that once it is onto the rim it will stay there on its own. Now install the other bead and pump up the tire to a bit less than your usual pressure. Remember that this repair is only to get you out of the bush - go around any jumps or drops that you would usually hit and ride well under your limits, stopping frequently to check the tire's pressure. This is especially true if you've repaired your front tire.
Past Tech Tuesdays:
Technical Tuesday #1 - How to change a tube.
Technical Tuesday #2 - How to set up your SRAM rear derailleur
Technical Tuesday #3 - How to remove and install pedals
Technical Tuesday #4 - How To Bleed Your Avid Elixir Brakes
Technical Tuesday #5 - How To Check And Adjust Your Headset
Technical Tuesday #6 - How To Fix A Broken Chain
Technical Tuesday #7 - Tubeless Conversion
Technical Tuesday #8 - Chain Wear
Technical Tuesday #9 - SRAM Shift Cable Replacement
Technical Tuesday #10 - Removing And Installing a Headset
Technical Tuesday #11 - Chain Lube Explained
Technical Tuesday #12 - RockShox Totem and Lyric Mission Control Damper Mod
Technical Tuesday #13 - Shimano XT Crank and Bottom Bracket Installation
Technical Tuesday #14 - Straightening Your Derailleur Hanger
Technical Tuesday #15 - Setting Up Your Front Derailleur
Technical Tuesday #16 - Setting Up Your Cockpit
Technical Tuesday #17 - Suspension Basics
Technical Tuesday #18 - Adjusting The Fox DHX 5.0
Technical Tuesday #19 - Adjusting The RockShox BoXXer World Cup
Technical Tuesday #20 - Servicing Your Fox Float Shock
Technical Tuesday #21 - Wheel Truing Basics
Technical Tuesday #22 - Shimano Brake Pad Replacement
Technical Tuesday #23 - Shimano brake bleed
Technical Tuesday #24 - Fox Lower Leg Removal And Service
Technical Tuesday #25 - RockShox Motion Control Service
Technical Tuesday #26 - Avid BB7 Cable Disk Brake Setup
Technical Tuesday #27 - Manitou Dorado Fork Rebuild
Technical Tuesday #28 - Manitou Circus Fork Rebuild
Technical Tuesday #29 - MRP G2 SL Chain Guide Install
Technical Tuesday #30 - Cane Creek Angleset Installation
Technical Tuesday #31 - RockShox Maxle Lite DH
Technical Tuesday #32 - Find Your Tire Pressure Sweet Spot
Technical Tuesday #33 - Three Minute Bike Preflight Check
Technical Tuesday #34 - MRP XCG Install
Technical Tuesday #35 - Stem Choice and Cockpit Setup
Technical Tuesday #36 - Handlebars - How Wide Affects Your Ride
Technical Tuesday #37 - Repairing A Torn Tire
Technical Tuesday #38 - Coil spring swap
Technical Tuesday #39 - Trailside help: Broken Shift Cable
Technical Tuesday #40 - Installing a Fox Float Air-Volume Spacer
Technical Tuesday #41 - Replace the Seals on Your 2011 RockShox Boxxer World Cup Fork
Visit Parktool.com to see their entire lineup of tools and lubes.
Author Info:
Must Read This Week
Sign Up for the Pinkbike Newsletter - All the Biggest, Most Interesting Stories in your Inbox
PB Newsletter Signup
we were there for the race a few weeks ago and those rocks are NASTY! i had just went tubeless and hit my rims several times. would have been walking down if i had tubes for sure!
Rim It Baby...
Duct tape or plastic notes (like Aus money) also work
Worse comes to worse, stuff the tyre with grass and roll slowly home
My normal plan of attack would be pump the tube up as much as possible, ride as far as possible, then repeat. But the air was coming out as quick as it was going in. Knowing about this would have saved me a 2 hour walk =(
Also, if you're dumb enough to go out on a ride without a tube or patches and far enough away from home not to walk it, or a contingency plan to cover such an eventuality, frankly you deserve to get a flat. $0.02
I've used this method a few times in the past with good results. Even the flat tube that I used to shoot the photos above is still holding air.. that was 4 days ago now!
And it isn't a matter of being "dumb enough" to go on a ride w/o a tube, but rather using all of your tubes or patches up during a ride.
We haven't heard this one yet: "This article is useless to me because I never get flats. Oh and I ride every day on thorn bushes and huck 20 footers with 15psi."
I love the Tech Tuesdays articles, keep 'em coming. This one is an ace to keep up your sleeve...
The first mile or so will be eeerrrr bumpy, but once all the folage and veg has been beatten to a pumlp becomes quite good. Enought to ride along the road to safty.
Oh and last time I asked a tree for a tube, I got my hopes up, but then the bear only had road tubes left :/
(damn it! I meant to hit reply)
Here's a novel solution, courtesy of my pal Vish: He flatted out in the Gatineaus one time, and his riding partner forgot the patch kit he promised to bring. He repaired the flat with a cherry Fruit Rollup.
B'leeeeee-dat.
Hey Mr. Negative Pants, it isn't just about fixing a flat. The majority of riders that I know weren't aware of this trail side repair, but all know how to swap out tube. I always carry multiple tubes and a patch kit, but have actually run out during a few long and eventful rides and this job has got me out of the bush a few times in the last 15 years. If it has helped me, it will help others. I'll give you a bit of cred though and assume that you were just having a bad day when you said that this TT is "insulting"... how can you find a helpful article that we took the time to put together for you insulting? I have no idea.
And 98% of the riders I've told this to had never heard of it, and thought it was ingenious. It works amazingly well if you take the 2 mins to do it properly.
(Mr negative pants,funny)
- Uhm, excuse me mister tree, would you get me a dh tube for my bike.
- Just wait here, i need to check with my staff. - Hey, bear, do we have any tubes left?
- Nah, bro, we're sold out...
On topic: Last weekend my buddy got a flat and since we didn't have anything to do about it we just filled the tire with pine tree branches, it held long enough to get out of the bush without the need to push the bike down and walk beside it. But if you have a pump that sounds like a real trick.
I don't think that your reading comprehension is quite up to par.. The article is about what to do if you get a flat and have already used your spare tube(s) or patches and are out in the bush.