Tech tuesday - RockShox BoXXer TLC
Easy TLC
Is your BoXXer feeling a touch sticky? Doing a complete rebuild of your BoXXer, while not difficult with with the proper tools and good instructions, can be intimidating for a lot of riders. Thankfully, the BoXXer's internal layout that completely separates damping and lube oil allows riders to easily perform minor maintenance like dropping the lowers to give them a good cleaning, or change seals, without having to jump right into a full on damper rebuild. While we'll show you how to replace the BoXXer's damping oil in an upcoming Tech Tuesday, today we are going to cover the basics: fork lowers removal, cleaning and greasing, and reassembly. This can also be tied into seal replacement as well, although it is often the case that the fork seals are just fine but some new lube oil and grease within the lowers can make all the difference in the world.
Some helpful pointers
• We've used a BoXXer World Cup in the photos below, but the same basic steps can be applied to the current R2C2 and R2 models, as well as the older Team and Race versions. Note that other BoXXer models may use a different adjuster knob assembly at the bottom of the damping side leg, requiring a slightly different removal method.
• You'll be removing the high and low speed rebound knob assembly before pulling off the lowers - be careful not to lose the washer, c-clip, or small 2mm hex bolt.
• More grease and lube oil on top of what is recommended will not keep your fork running smoother for longer. In fact, the extra lube will likely be forced out through the fork seals and cause a large, dust attracting mess.
• As with any repair, if you don't have the right tools, or don't feel comfortable doing the job, you are much better off taking the fork to your local shop instead.
• We are not pictured wearing Nitrile gloves in the photos below, but it is certainly a good idea to wear some. This is especially true if you work in a shop and will be getting your hands oily on a regular basis. Eye protection is also recommended, especially when spraying any cleaning solvents.
• As always, follow RockShox's torque values - Maxle: 50in/lbs, crown bolts: 65in/lbs, foot bolts (damper and spring side): 65in/lbs
![Tech Tues]()
![Tech Tues]()
![Tech Tues]()
![Tech Tuesday]()
![Tech Tues]()
![Tech Tues]()
![Tech Tuesday]()
![Tech Tues]()
![Tech Tuesday]()
![Tech Tues]()
![Tech Tues]()
![Tech Tuesday]()
![Tech Tuesday]()
![Tech Tuesday]()
![Tech Tuesday]()
![Tech Tues]()
![Tech Tuesday]()
![Tech Tuesday]()
![Tech Tuesday]()
Do you have something to add to Mike's quick BoXXer TLC guide? Put it down below!
Past Tech Tuesdays:
Visit Parktool.com to see their entire lineup of tools and lubes
Is your BoXXer feeling a touch sticky? Doing a complete rebuild of your BoXXer, while not difficult with with the proper tools and good instructions, can be intimidating for a lot of riders. Thankfully, the BoXXer's internal layout that completely separates damping and lube oil allows riders to easily perform minor maintenance like dropping the lowers to give them a good cleaning, or change seals, without having to jump right into a full on damper rebuild. While we'll show you how to replace the BoXXer's damping oil in an upcoming Tech Tuesday, today we are going to cover the basics: fork lowers removal, cleaning and greasing, and reassembly. This can also be tied into seal replacement as well, although it is often the case that the fork seals are just fine but some new lube oil and grease within the lowers can make all the difference in the world.
Some helpful pointers
• We've used a BoXXer World Cup in the photos below, but the same basic steps can be applied to the current R2C2 and R2 models, as well as the older Team and Race versions. Note that other BoXXer models may use a different adjuster knob assembly at the bottom of the damping side leg, requiring a slightly different removal method.
• You'll be removing the high and low speed rebound knob assembly before pulling off the lowers - be careful not to lose the washer, c-clip, or small 2mm hex bolt.
• More grease and lube oil on top of what is recommended will not keep your fork running smoother for longer. In fact, the extra lube will likely be forced out through the fork seals and cause a large, dust attracting mess.
• As with any repair, if you don't have the right tools, or don't feel comfortable doing the job, you are much better off taking the fork to your local shop instead.
• We are not pictured wearing Nitrile gloves in the photos below, but it is certainly a good idea to wear some. This is especially true if you work in a shop and will be getting your hands oily on a regular basis. Eye protection is also recommended, especially when spraying any cleaning solvents.
• As always, follow RockShox's torque values - Maxle: 50in/lbs, crown bolts: 65in/lbs, foot bolts (damper and spring side): 65in/lbs
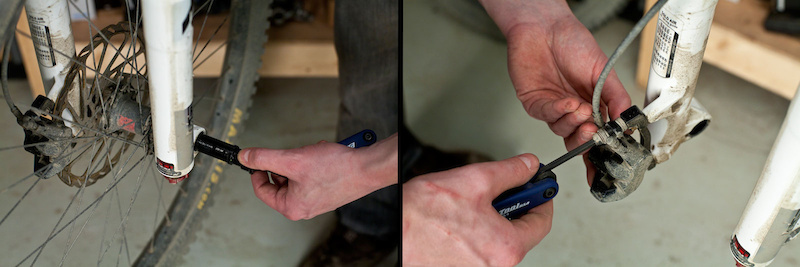
Step 1 - Remove the Maxle by turning the non-drive side 6mm hex until it no longer clicks, then use the same 6mm hex key on the drive side to turn it out of the fork and remove the front wheel. Give the Maxle a quick wipe and put it somewhere where it won't pick up any dirt. The brake caliper is taken off easier once the front wheel is out of the way, but be sure to keep track of any washers that may be present.
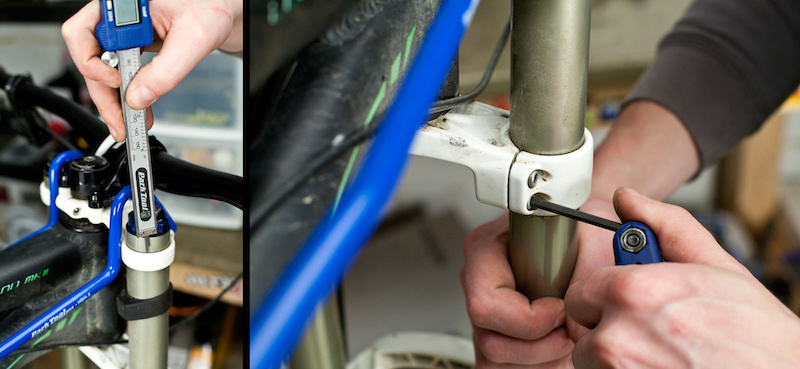
Step 2 - Take a quick measurement with a ruler or tape of how high the stanchion tubes sit above the top crown. The goal is to reinstall your fork to the exact same hight after you've serviced it. Write down the measurement, and then loosen all four lower crown bolts, as well as both upper crown bolts, with a 4mm hex key.
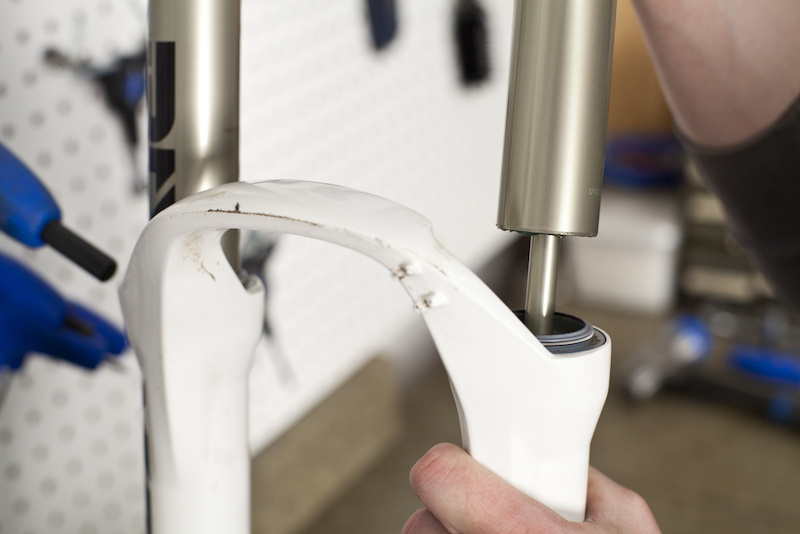
Step 3 - Use one hand to pry an edge of the fork bumpers away from the stanchion tube while giving them a quick squirt of isopropyl alcohol with the other. This will free them up enough to slide them up and off of the top of the stanchion tubes. You can now carefully slide the fork out of the crowns and off of the bike.
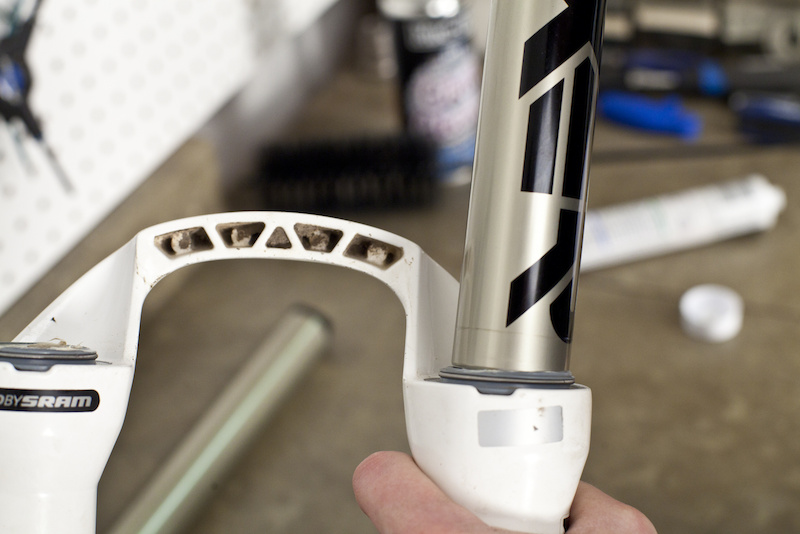
Step 4 - Give the fork a good cleaning once you have it off of the bike and inspect the lowers for any damage. Because you are not servicing either the damper or spring side you do not have to release the fork's air pressure (this only applies to the World Cup model. At this point RockShox recommends gently clamping the upper section of the one stanchion tube in a bike repair stand, but we far prefer to do the job on a workbench instead.
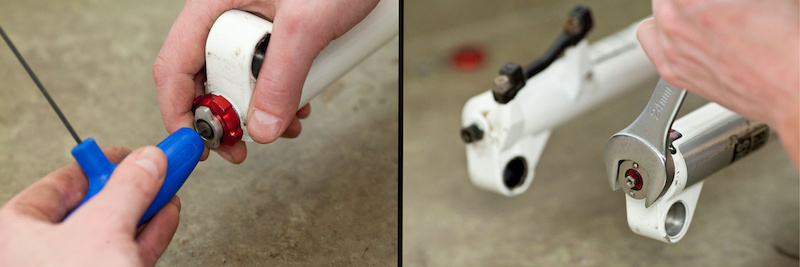
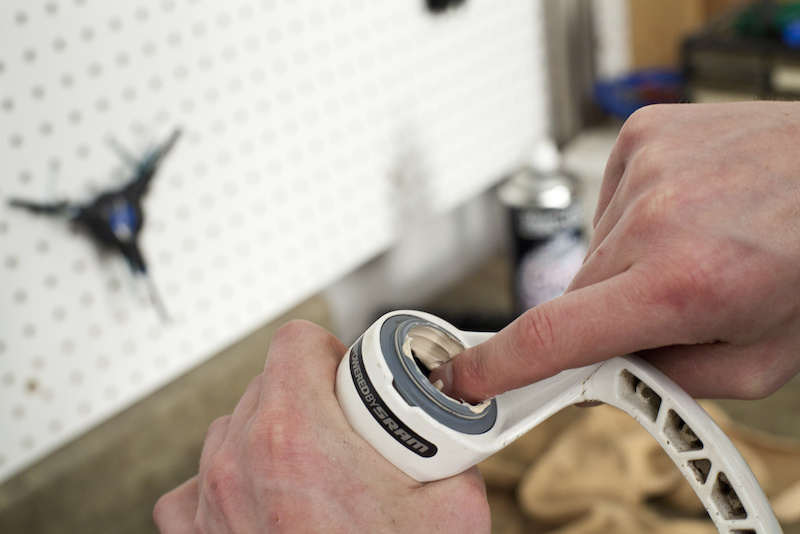
Step 5 - It is now time to remove the high and low speed rebound adjuster knobs to allow access to the damper side foot bolt. Our fork requires a 2mm hex key to loosen the bolt holding the outer knob in place, but other model year forks may use a c-clip instead. If your's requires a 2mm hex key, be careful to ensure that it is fully engaged to prevent rounding out the aluminum bolt as you loosen it. If your fork has a c-clip, use a pick and small sized flat blade screwdriver to push it out. The c-clip may pop free suddenly and go flying, so go slow. Pull the outer knob off, making sure to also note the thin black washer under it, and place it in a safe spot.
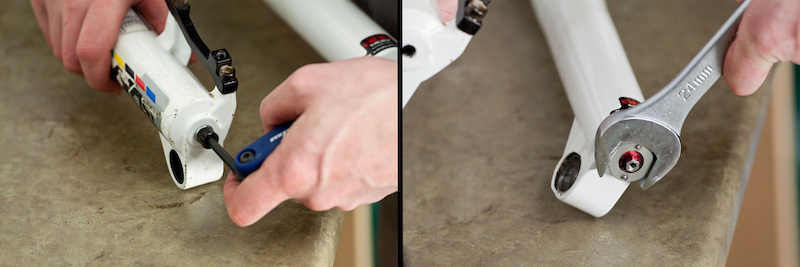
Use a 24mm open ended wrench to turn the large aluminum foot bolt counter clockwise until it is free, then thread it back in three to four turns after you've removed the crush washer and retainer. Proper thread engagement is key because you will be striking the bolt to free the damper shaft's press fit into the bottom of the lower leg.
Use a 24mm open ended wrench to turn the large aluminum foot bolt counter clockwise until it is free, then thread it back in three to four turns after you've removed the crush washer and retainer. Proper thread engagement is key because you will be striking the bolt to free the damper shaft's press fit into the bottom of the lower leg.
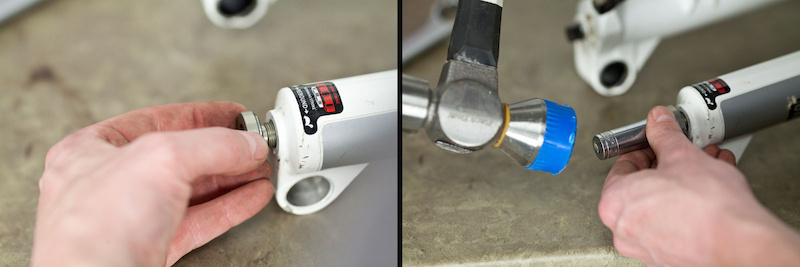
Step 6 - With the damper side foot bolt threaded in three to four turns, place the open end of a 12mm socket against it and strike the socket with a plastic mallet. It may take a few hits until you see the foot nut bottom on the outside of the lower casting, signalling that the damper shaft is likely free. You can now remove the foot bolt completely.
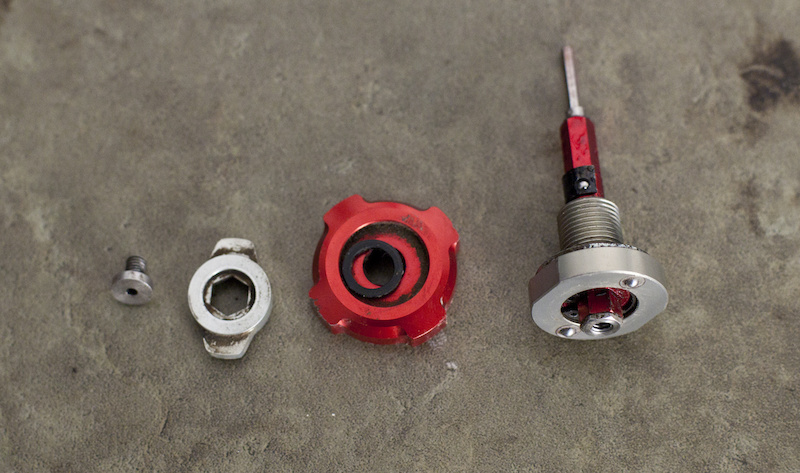
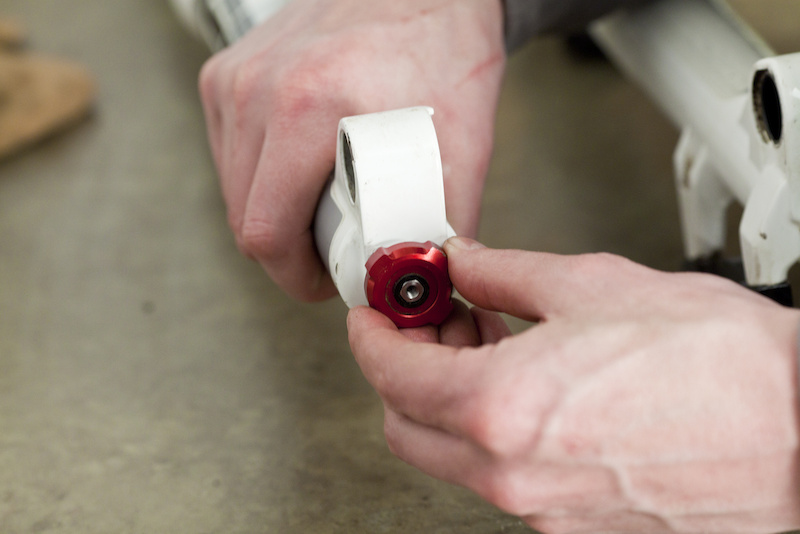
Step 7 - Take a minute to properly clean the adjusters and hardware of any dirt and grime. Note that your hardware may look slightly different depending on the model year of the fork.
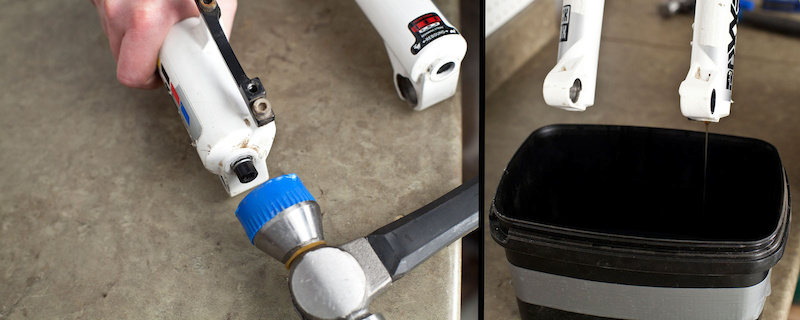
Step 8 - The next step is to loosen the spring shaft foot bolt. Use a 5mm hex key to turn it counterclockwise three to four turns, then strike the bolt with the same plastic mallet to knock the shaft free from the lower leg. Completely remove the bolt and position the fork vertically over a drain pan (an old Tupperware container is perfect) to let the old lubrication oil drain out of the foot nut holes in the lower leg assembly. Cycling the stanchion tubes up and down a few inches will encourage it to drain out as well.
Step 9 - With the fork still upright and over the drain pan, pull both stanchion tubes up and out of the lower legs and set them down on a clean section of the work bench. At this point most of the oil should have drain out of the fork legs, but place them on top of a rag to catch any drips.
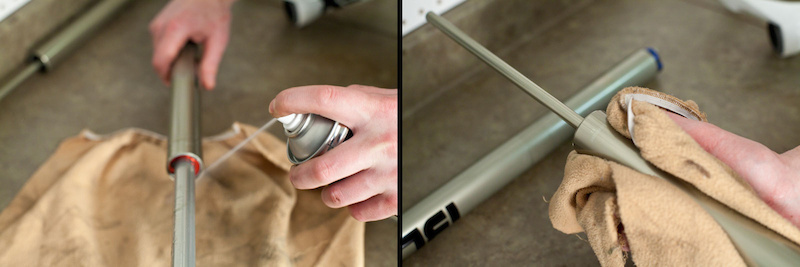
Step 10 - Give the stanchions a good cleaning with a lint free rag and a few sprays of isopropyl alcohol. Inspect them thoroughly, checking for any dings or scratches that may damage the fork seals or bushings. You can also cycle the damper rod into the stanchion tube to check for any issues (we'll cover damper rebuild in an upcoming Tech Tuesday). Now is also the time to take a close look at the crush washers that are under each foot bolt. It is a good idea to replace them each time that you remove the bolts, but that rarely happens out in the real world. If they are cracked in half, or completely crushed, you should install new ones as they also help to seal the lubrication oil into the lower legs.
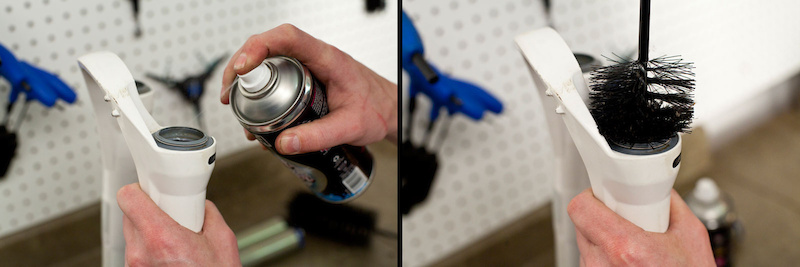
Step 11 - The most time consuming, but also the most important, part of the job is up next: cleaning the inside of the lower legs. We use a brush that has been designed specifically for the job (it's just a soft, tubular shaped brush on a long handle), but an old rag on the end of a plastic or wood rod also works just fine. We recommend never using a long screwdriver to force the rag down into the fork, as it can easily scar one of the bushings.
Spray a good amount of isopropyl alcohol down into one side of the lowers, followed by a scrubbing with your brush or rag. Repeat a few times on each side of the fork, and then give the insides a visual inspection. The bushings should be free of any grime, and there shouldn't be any old gunk pooled at the bottom of the casting - it will only cycle around inside the fork after your rebuild, negating the new grease and lube oil. Make sure that the rubber disc bottom out bumpers are still seated at the bottom of each leg.
Spray a good amount of isopropyl alcohol down into one side of the lowers, followed by a scrubbing with your brush or rag. Repeat a few times on each side of the fork, and then give the insides a visual inspection. The bushings should be free of any grime, and there shouldn't be any old gunk pooled at the bottom of the casting - it will only cycle around inside the fork after your rebuild, negating the new grease and lube oil. Make sure that the rubber disc bottom out bumpers are still seated at the bottom of each leg.
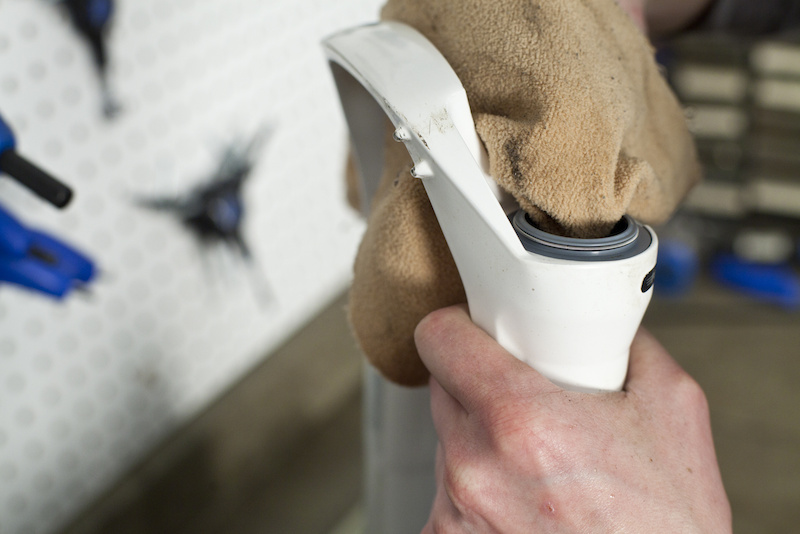
Step 12 - Your cleaning isn't finished yet! Use a clean rag wrapped over a finger to wipe both the oil and dust seals free of any gunk. Now is also the time to inspect the seals for damage - look for tears in the seal lips, or worn sections that would allow dirt in and oil out. Remember that the better you clean, the smoother your freshly rebuilt fork will run.
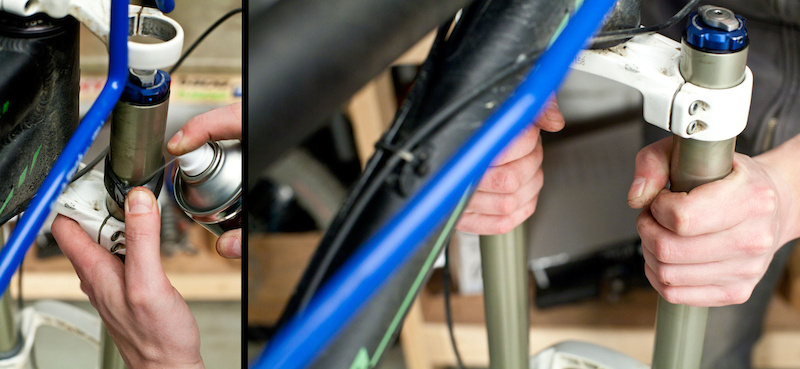
Step 13 - Once you are satisfied with your sparkly clean fork it's time to give the oil and dust seals a coating of grease. Applying massive globs of grease isn't going to help anything - it will just get displaced down into the bottom of the fork lowers. Instead, apply a thin coating to both the inner oil seal (usually black coloured within BoXXer forks) and the inside lip of the dust seal. A dab of grease spread around the upper bushing will help as well. Most grease with a Teflon element to it is fine to use, but stay away from Lithium based option as they are said to be corrosive to the fork's seals.
Step 14 - The next step is to reinstall the stanchion tubes into the fork lowers. Remember that the damping side leg is on the riders right, while the spring side leg is on the left. The very bottom of the stanchion tubes feature a slight taper to them that helps you to slide them past the dust seal without causing any damage, although you still needs to be very careful at this point. It can help to start the insertion at a slight angle, setting one portion of the stanchion tube past the seal only a few mm before the rest. Keep an eye on the entire circumference of the seal as you insert the stanchion, making sure that the bottom of the tube doesn't pull the seal lip in and tear it. Slide both tubes in until the damper and spring rods bottom on the casting, then pull them back out a few inches to allow the lube oil to be put in. Inspect the seals once both stanchion tubes are in.

Step 15 - With both stanchions in, tip the bottom of the fork up so it sits at 45 degrees. Use a syringe to push 10ml of 15wt fork oil in through the shaft holes (where the foot nuts tighten into the damper and spring shafts) in the bottom of the fork casting. Although different weight fork fluid will work just fine, you don't want to use much more than the recommended 10ml of fluid because it will only make a mess as it is forced past the fork seals. If you don't have a measured syringe you can think of 10ml as being two teaspoons worth of fluid.
Step 16 - With the bottom of the fork still at an up angle, compress the stanchion tubes enough so that both the damper and spring rods bottom within the fork lowers. Thread the spring side foot bolt in place after putting a dab of grease on bolt threads (this will allow you to unthread it easier down the road), tightening it to 65in/lbs. Bottom the damper side stanchion, holding it down as you thread the greased damper side foot bolt assembly clockwise, tightening it to 65in/lbs with a 24mm open ended wrench. Do not over-tighten the foot damper side foot bolt; it is aluminum and can be damaged if overdone.
Step 17 - Reinstall the ending stroke rebound knob, washer, and beginning stroke rebound knob onto the rebound adjuster shaft. You may have to push down on the rebound assembly to access the retaining clip groove, or to get the outer knob to fully engage the hex fitting. If your adjusters are held in place with a 2mm hex bolt, thread it back in place carefully.

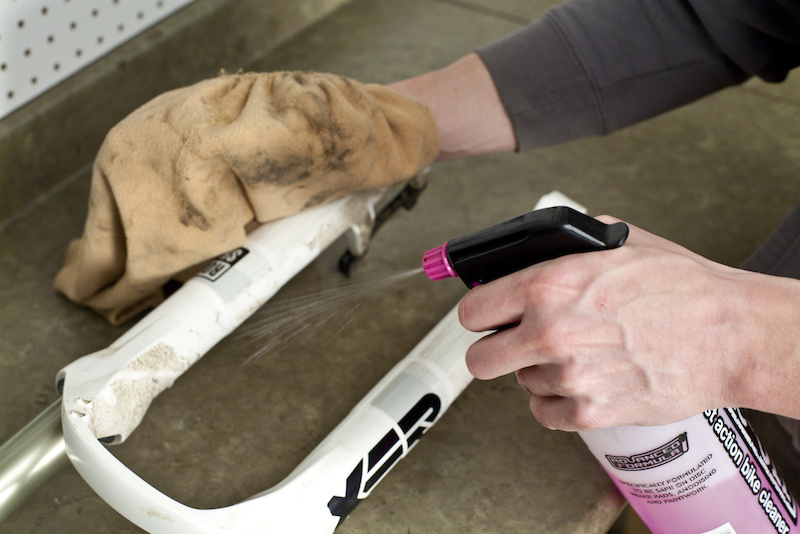
Step 18 - Thoroughly clean the outside of the fork, paying special attention the assembly grease buildup around the seals - any extra grease will only attract grit and cause a mess. Compress both stanchion tubes a few times, re-wiping the seal area each time until no grease residue remains after you compress the stanchions.
Step 19 - Give the inside clamping surface of the crowns a wipe and a thin coating of grease before reinstalling the fork tubes, then you can slide them up into place to the correct height (you took the measurement at the beginning, right?). Reinstall your brake caliper, front wheel, and double check all bolts before hitting the trails.
Past Tech Tuesdays:
Visit Parktool.com to see their entire lineup of tools and lubes
Author Info:

Must Read This Week
Sign Up for the Pinkbike Newsletter - All the Biggest, Most Interesting Stories in your Inbox
PB Newsletter Signup
ecx.images-amazon.com/images/I/31eG3Db8CHL._SL500_AA300_.jpg
and also i have the right to my opinion of boxxers and ive ridden 4 or 5 sets and they all feel horrible compared to 40's and 888s, i mean yeah they they're probably good for racing cause you get all your power down cause of theyre stiffness/solidness .. tbh im over reacting but im comparing them to even older fox and marzocchi which just feel nicer so theyre not going to be anymatch to a standard 888
Check this Rock Shox video around the 45s mark:
www.youtube.com/watch?v=p9Xd4BQ2ghE
www.sram.com/sites/default/files/techdocs/2011-rockshox-fork-oil-chart.pdf
www.sram.com/sites/default/files/techdocs/gen.0000000003511_front_fork_oil_chart_2012_0.pdf
Can you please update this Pink Bike.
Controversy about the WC lowers being the same as Team
This service explanation needs to be edited to coincide with the one I attached, this is CRAP that Pink bike would post up misleading information and potentially destroy some poor guys fork!!!!!!
www.pinkbike.com/forum/listcomments/?threadid=95568
cdn.sram.com/cdn/farfuture/KGG14brdV8BvAwk2BhvGc0QigO4uQxFFkoBwClaFYg8/mtime:1372788172/sites/default/files/techdocs/2011-boxxer-r2c2-technical-manual.pdf
this is the one for the R2C2
Has anyone got the problem with the Low comp wheel not spinning? Thats just one of my forks issues.
I finally (?) lost the stupidly small retaining clip in my work shop . LOL.
Marzocchi ftw again.
Grateful in advance
I recall doing this service to my boxxer team and seemingly much more than the total of 30 mls came out?
I now have a 2012 boxxer race?
www.bike-components.de/bedienungsanleitungen/2011/rockshox/forks/rockshocks_technical-manual2007.pdf
www.youtube.com/watch?v=p9Xd4BQ2ghE
... you don't expect me to read all of this do you??
The distributors have none here in the UK.
If there aren't any around, do you recon it would be possible to have one custom machined?
i can't find a reason to why we should add oil there
www.bike-components.de/bedienungsanleitungen/2011/rockshox/forks/rockshocks_technical-manual2007.pdf
these surfaces are typically degreased using ISO alcohol which removes any traces of bike grease lubricant, dirt and greasy fingerprints
and then clamped in place "dry", with all bolts fitted using blue loctite and a calibrated torque wrench
using grease on safety critical clamps simply is bad practise as it provides a false torque reading when tightening (assuming you are even using a torque wrench..) and reduces friction between clamping surfaces, which is what gives the required clamping friction at the torque rating given by the manufacturer
the only fork element I would use any substance on (shimano anti-seize) is the fork axle (20mm or QR15mm) as this stops the axle becoming seized into the fork dropouts or hub axle during regular use, because it has no lubricant properties it does not affect torque settings
in fact, in situations where slightly poor tolerances allow a stem to rotate on a steerer tube despite given following torque setting, the opposite situation to using grease is true, we would use Finish Line Fibre Grip (carbon fibre installation paste which has abrasive particles) which actually allows us to increase clamping friction for the same given torque setting
some useful hints for you, from a professional bike workshop manager
I don't think I'd recommend that to anyone. I'll be skipping that step