Tech Tuesday - Overhaul a BB30 Bottom Bracket
Today's Tech Tuesday is brought to you by Samuel Hardie, a PB member who wanted to know how to change the bearings in a BB30 bottom bracket, and also, the folks at Park Tool, who sent me bottom bracket tools for BB30 and for Shimano's PressFit BB system. Most modern press-in BB bearing systems use a cup or a housing that surrounds the actual bearing, which helps 'cushion' the ultra tight tolerances that frame makers would have to adhere to to press the bearings directly into the frame's BB shell. The cup also makes it easier to remove and replace the bearings, because it is a larger, easier-to-handle piece. Either way, removing and replacing the bearings in threadless bottom bracket shells is a simple process when armed with the proper tools.
![what you ll need II]()
How To and How Not To Service a Press Fit BB
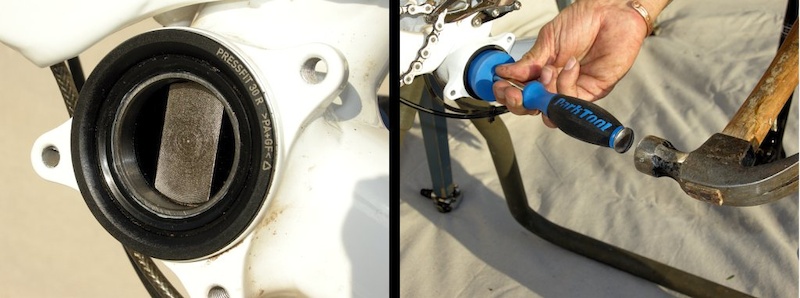
There are a couple of methods to remove and replace pressed-in bottom bracket bearings: The first is the crude, but simple BMX method (also called, the Dad Method), that entails pounding out the old bearings with a framing hammer and a BFS (rather large screwdriver) and then pounding the new bearings back in place with a block of wood and a positive, winning attitude. Hey, it works in a pinch, but the probability that you will damage a bearing by pitting the races as you pound on the bearing is almost certain. We recommend the second method - using the Park BBT-30.3 tool and a simple-to-make press using a threaded rod to remove and install press-fit bottom bracket bearings. (Park Tool offers a ready-made press for this task.) The basic technique is a much-evolved version of the Dad Method that it is gentle on the bearings and far more precise when it comes to keeping all the bits aligned during the process.
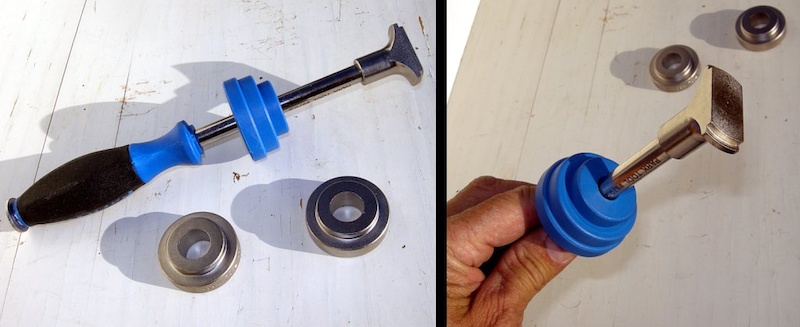
Before We Get Started, Meet the Key Players
![The removal tool has a stepped plastic guide that ensures the business end is aligned perpendicular to the bearing. The metal rounds are used to keep the bearings in alignment as they are being pressed into the frame.]()
![Assemble the press by tightening the washers between two nuts about five inches inboard. This forms a crude handle. Use a wrench on the opposite nut to press the bearings in.]()
How to Remove and Replace BB30 Bottom Bracket Bearings
![Remove the crankset n this case a 10mm Allen key is all that is necessary because Truvativ cranks are self-releasing . Note how all the bits go together and set the assembly aside.]()
![Angle the removal tool into the bearing and then slide the guide into its ID. Feel around until you get the business end locked into the bearing on the opposite side.]()
![Before you start hammering check the tool to be certain that the business end is aligned with the inner race of the bearing. It should not take much force to tap out the cups with the hammer.]()
![After the first bearing is pressed out the larger flange on the stepped tool guide fits in to the empty BB shell.]()
![Clean everything and then put a thin film of grease on the cups where the bearings will press in to prevent creaking.]()
![Slide one bearing assembly onto the threaded shaft and slide everything into place on the bottom bracket shell.]()
![Tighten the press slowly while checking that the bearings are not canted as they enter the shell. here should be no gaps around the circumference of the cup.]()
![Put a thin film of grease on the crank axle and spline but don t overdo it. Reassemble the bits in the reverse order and torque the crank bolt to the maker s specification. The cranks should spin freely.]()
Want the Short Version? Watch the Park Tool Video
Past Tech Tuesdays:

How To and How Not To Service a Press Fit BB
There are a couple of methods to remove and replace pressed-in bottom bracket bearings: The first is the crude, but simple BMX method (also called, the Dad Method), that entails pounding out the old bearings with a framing hammer and a BFS (rather large screwdriver) and then pounding the new bearings back in place with a block of wood and a positive, winning attitude. Hey, it works in a pinch, but the probability that you will damage a bearing by pitting the races as you pound on the bearing is almost certain. We recommend the second method - using the Park BBT-30.3 tool and a simple-to-make press using a threaded rod to remove and install press-fit bottom bracket bearings. (Park Tool offers a ready-made press for this task.) The basic technique is a much-evolved version of the Dad Method that it is gentle on the bearings and far more precise when it comes to keeping all the bits aligned during the process.
Before We Get Started, Meet the Key Players
The Park BBT-30.3 removal tool has a stepped plastic guide that ensures the business end is aligned perpendicular to the bearing. The metal rounds are used to keep the bearings in alignment as they are being pressed into the frame.
Assemble the press by tightening the washers between two nuts about five inches inboard. This forms a crude handle. Use a wrench on the opposite nut to press the bearings in.
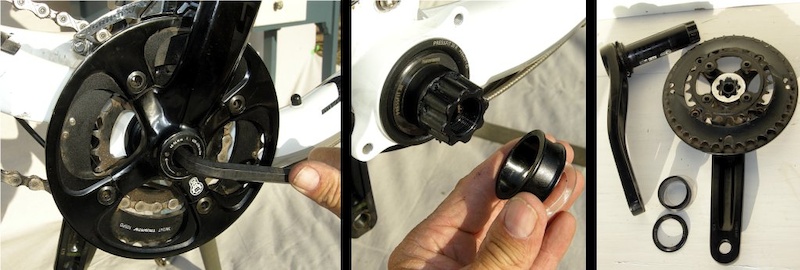
Step 1 - Remove the crankset. In this case, a 10mm Allen key is all that is necessary because Truvativ cranks are self-releasing. Note how all the bits go together and then set the assembly aside.
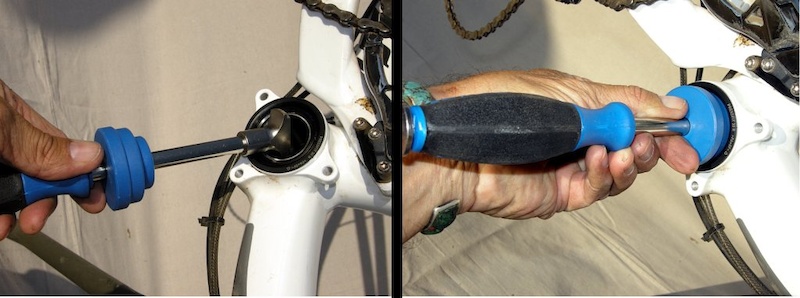
Step 2 - Angle the removal tool into the bearing and then slide the guide in place. Feel around until you get the business end locked into the opposite bearing's ID.
Step 3 - Before you start hammering, check the tool to be certain that the business end is aligned with the inner race of the bearing. It should not take much force to tap out the cups with the hammer.

Step 4 - After the first bearing is pressed out, the larger flange on the stepped tool guide fits in to the empty BB shell.
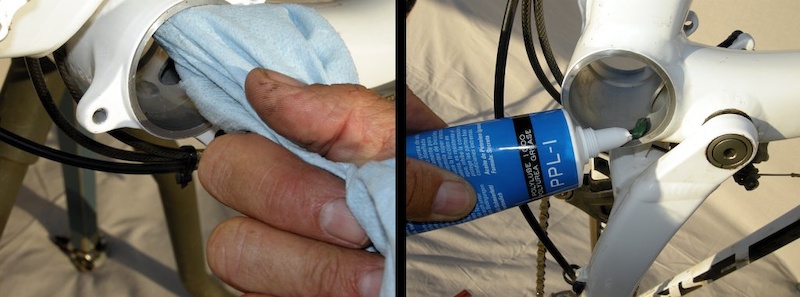
Step 5- Clean everything and then put a thin film of grease on the cups where the bearings will press in to prevent creaking.
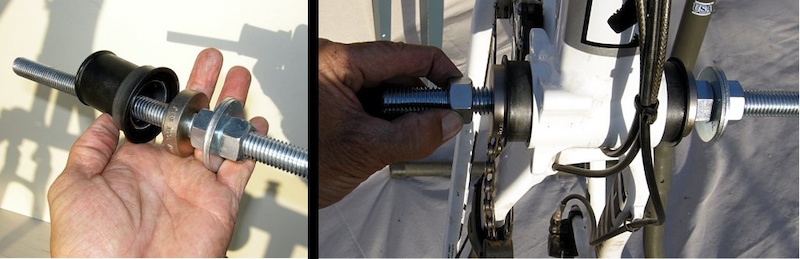
Step 6 - Slide one bearing assembly onto the threaded shaft and assemble the opposite bearing into place on the bottom bracket shell. Snug up the press finger tight and check that the cups are not canted in the frame before you start cranking with the wrench.
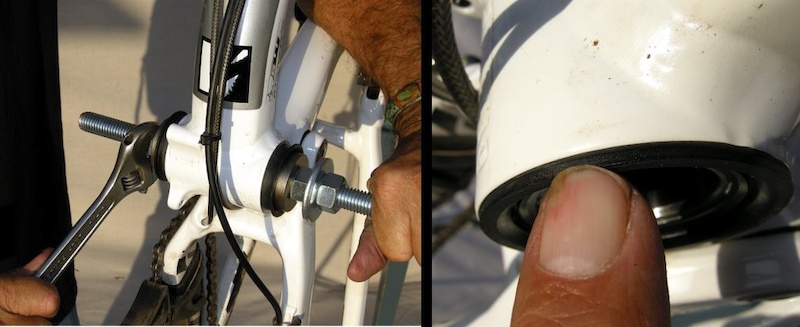
Step 7 - Tighten the press slowly while checking that the bearings are perfectly aligned as they enter the shell. There should be no gaps around the circumference of the cup when you are done. (some BB shells have internal snap rings that the bearing assembly presses up against. In this case, you'll want a snug fit against the snap ring - don't overdo it.)
Step 8 - Put a thin film of grease on the crank axle and spline. Reassemble the bits in the reverse order and torque the crank bolt to the maker's specification. The cranks should spin freely. If not, check the left-side for an end-play adjustment (Truvativ and Shimano have them) and readjust the bearing preload. Otherwise, check for a misaligned bearing or cup and reset that bearing if necessary.
Want the Short Version? Watch the Park Tool Video
Past Tech Tuesdays:
Author Info:

Must Read This Week
Sign Up for the Pinkbike Newsletter - All the Biggest, Most Interesting Stories in your Inbox
PB Newsletter Signup
this ain't nothing new.
IMO, l think it's better --- (less chance of messing up your frame). my big big big wish. l wish they frikin all stick to one dang system or size.
there's a few dozen seatpost sizes on the market, at least a couple dozen front D specs and now all the new options for headsets... geez.
standard, integrated, semi-integrated, zero stack, no stack, tapered + all the different diameters
the comment:
"Step 5- Clean everything and then put a thin film of grease on the cups where the bearings will press in to prevent creaking."
this contradicts the information I was given directly by SRAM Technical support - the PF30 system with Delrin cups should be fitted "dry" to the BB shell as the Delrin (nylon) does not require any lubrication or anti-seize and in fact they said it could be detrimental to the long-time durability of the polymer material
however, your advice is true for Cannondale's "BB30" which has bearings sitting directly inside the BB shell, where the technical advice is to use a layer of anti-seize to isolate the bearing surface from the shell
in the BMX world the Spanish and Mid size push-fit BB systems have proven to be very effective, so as long as shell tolerances are correct, problems should not occur.
Anyway my question is is there an actual mid, or Spanish type bb removal tool?
I was asking if there was a tool that applies even pressure without damaging the bearings, like you get splay tools to remove headset cups, and like the tool in the above article. But i dont get how it would actually fit, because of the tube spacer. Although i cant see how they could have designed such a good system with no thought in replacing the bearings.
Also screwdriver method you are in danger of scoring the bb shell walls, and also ruining the bearings, try using a socket extender, the rounded end makes it a much safer tool for the job
I mean i know getting the bearings out unharmed isnt too much of an issue, but it would be great to have puller or something just to save that extra hassle when painting frames ect, also to give the bearings a proper service, rather than get them out and when doing that making them shot and destined for the bin
valid point you make
but there is no specific tools for BMX press-fit BB removal - as chris-adam-media mentioned the assumption is that BB removal will only be performed once the bearings are shot and you are doing bearing replacement
you can often use finger pressure (or a screwdriver) to dislodge the centre spacer enough to expose a lip of the bearing, and the normal practise is to use an old extension bar or even large flat blade screwdriver with mallet and punch the bearing out of the BB shell
you then remove the centre spacer by hand, and this allows you easy access to the other bearing to again, punch it clean out
because bmx frames using press-fit BB, are made from 4130 cromoly steel, you will have no issues with punching bearings out of the press-fit shell, it won't do any damage to the BB's internal diameter
I would certainly have issues performing that procedure on an aluminium-alloy frames as it could cause premature wear to the BB bearing seats, with aluminium alloy frames the proper tooling is a good practise. most alloy BMX race frames tend to use the ISO Euro threaded shell, often with external bearing cranksets
if there are tolerance issues with bmx press-fit, Loctite gap-fill compound will work very effectively, as it does on suspension frames (MTB) with bearing seating issues
Also I think even you would be surprised at the damage an aluminum screwdriver,and a hammer can do to a steel frame... I was servicing a friends bike for him, full bearing replacement, ect, basically he tried doing it himself and got stuck at the bb, once that thing was out the frame was a mess... It was just a matter of hammering the new set in and hoping for the best.
Also i am not a huge fan of loctite, i absolutely love ptfe tape though ha Best stuff ever.
Just another quick question, any idea why tube spacers and bb shells are now longer/wider? Seems a bit silly to expect people to have to slap a spacer on there too, as i know a lot of people who havent done this and just eaten the bb. I would have thought with the longer size being more common now they would supply them in bb kits as opposed to the shorter one?
I was wondering about this, because right in the pics you can clearly see "PRESSFIT 30 R" on the bottom bracket.
It would be nice if there was comprehensive information about all the bottom bracket standards, e.g., BB90, also...
everything you need to know
had replaced the PF30 Bottom Bracket 5 times under warranty, and had the SRAM BB30 crankset inspected under warranty, and had to go the route of swapping pedals, back wheel, chain ring bolts, skewer, etc. to eliminate all possibilities
every time the crank was turned the bike would click and creak. Eventually I had enough and after some further investigation we discovered the non-driveside PF30 side of the BB shell would 'overload' the PF30 cup and cause a brand new bearing to become graunchy and click. Remove the same cup and the bearing felt brand new
the manufacturer (Specialized) was very good in upgrading me to their carbon fibre frame free of charge with only a 3 day turn around, after I stripped the bike, shipped back to them and they found the non-driveside cup was 0.2mm out of tolerance
so any expectation that the delrin (nylon) cups will take up poor manufacturing tolerances is a myth, good tolerances are critical for BB30 and PF30 systems
Quite simply, there are no real benifits to BB30, only negatives. Doesn't last, poor seals, creaky, and you shouldn't have to use loc-tite on a BB! Even sissy ass VeloNews has been very critical of BB30 and PF30(even worse), how can a mountain biker like RC pretend this is a good system?
The key here is to never but a frame with anything but a euro BB. I feel confident that all these new BB standards will go away eventually and the euro BB will come back, since it is the only proven, reliable system.
its certainly worth a healthy debate
whether we like it or not, the BB30, PF30 and additional push-fit systems are here to stay with many big manufacturers getting behind it on their mid-to-high end bikes
I completely understand the theory behind the systems, and from a performance point of view the increase in frame and crank stiffness is actually very noticeable with PF30
however, the proof is in the "real world" experiences of riders and workshop mechanics who have to live with these systems, and deal with them on a day to day basis
I have used push-fit on BMX for a number of years with 0% issues, and as I mentioned in my post above, my first PF30 experience was not positive due to poor manufacturing tolerances of the frame's PF30 BB shell (rather than bearing or crankset components), but I will give the system another chance and report back in a few months
I know exactly what you mean. I've used up much time on this new garbage, and it is pretty much never as easy as working on a regular BB, and they are so much more prone to have problems. Then you have to use loc-tite, but sometimes that doesn't work out and you have to take it out again and its a big loc tite mess. Honestly, shit like this makes me want to quit the industry and look for other types of work. The bike industry keeps crapping all over itself but if you read the marketing in the magazines its all peaches and cream, or at least that's what they pretend.
Also as a few people said i dont think carbon holds a thread very well, so this saves all that hassle of tapping carbon, threads to make a euro bb fit. Honestly i dont see the hate for press fit bb's other than people that are too scared to have to hammer something into their frame
Just from my own experience and it worked fine for my headset cups.
I am showing this to my new guy, I already knew due to being a cannondale dealer. And, also Kona is using the BB30 as well now.
James: Thank you for clearing this up.
damn confusing.....too many standards....
Cheers