How to Build a Kicker?
For dirt jumping you need more than good will and a bike. What you also need is mentioned dirt jumps. The same way how different bikes behave differently, different jumps will do the same based on geometry, materials and finish. Some bikes feel better, some worse. It's the same way with jumps - we can perceive them in many ways. So what's the best jump geometry? Can one kicker service all jump sizes? Dirt It More has tested many solutions and we will gladly share them with you!
![photo]()
Throughout the last few years we've build tens of different jumps, permanents as well as temporary builds for specific events. We started with 2m tables and ended with building over 9m doubles. In that time we came to many conclusions that now make our projects much easier and help us avoid problems.
One of the more popular ideas is a wooden kicker. Our first build like that took place in 2006. I still regret not taking photos of it because the project was amazing. We have built 2 halves of the jump from torn down furniture and the profile was drawn using a huge compass made from rope and a marker. Nowadays we use the same rules and software for making our jumps that I also use for designing Dartmoor parts.
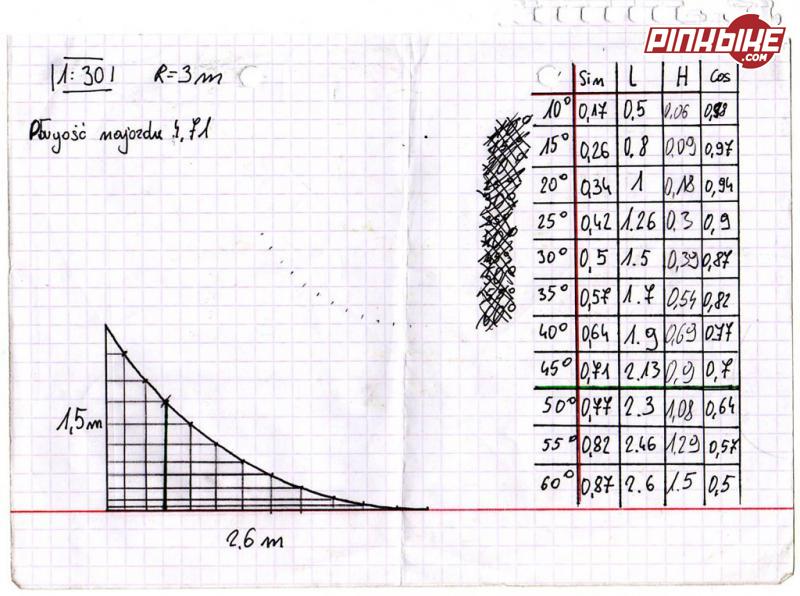
We may not have the pictures of our first kicker but we've managed to dig up our first good kicker sketches.
![photo]()
Why a kicker and not a jump made from dirt?
Biggest Advantages:
Longevity, doesn't need renovation i.e. after rain.
Always stays hard, without any holes or ruts
Perfect geometry according to the plan
It can be transported
Problems:
More Expensive
You need to be good with tools
Requires patience
Don't panic though, with our tutorial you will be able to make a really cool kicker at your first try.
![photo]()
Good preparation is a must, before you start check if you have all the needed tools:
- A saw with adjustable cut height and maximal cut not shallower than 60mm
- Driller/Electric Screwdriver with PH2 and PZ3 tips, it's better if they are good quality.
http://swiatnarzedzi.com.pl/all/stanley/bity/konc_ph-pz-1.jpg
- At least 2 carpenter vices
- A marker or a constructors pencil
- Measuring tape.
- A ruler, best an angular one. Can be a level with a scale, at least 100cm
- A kicker plan.
![photo]()
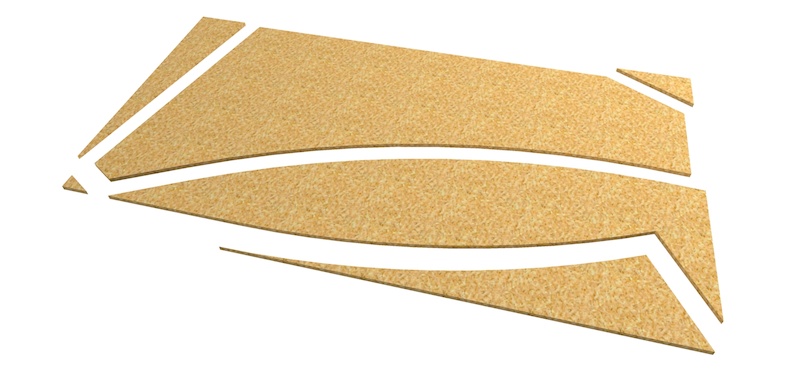
After you gather all the tools the next step is to prepare the materials. In our tutorial you will learn how to build a profile from 2 plates. It's the easiest technique for adjusting geometry and controlling the final effect.
You will need:
- 2 plates for the sides. Plywood at least 15mm or OSB plate at least 18mm.
- 2 plates for the lip. Best use 10mm plywood or in worst case OSB plate 12mm.
- Around 18 kicker ribs at least 5x10cm wide and 125cm long - (2 x the thickness of plywood in cm)
Structural beams (5x10cm cross section):
- Main beams in case of a big kicker 2x205cm, 2x390cm
- Diagonal beam on the rear of the kicker around 2m
- A beam connecting the bottom of the kicker 2x125cm long (base of the side beams + plywood/plates thickness)
- Large screws around 16cm for the PZ3 socket - around 10 pieces.
- Small screws around 5cm for the PH2 socket - around 150 pieces.
You are probably very confused by now so first maybe see a film of how we build a kicker for Warsaw's Burn Dirtpark.org so you can relate it to different build stages.
When you have all the tools you can start the work.
1. The first thing you have to do is transport the project to the side plate. Transfer dimensions one by one. Do not hurry and try to be as accurate as possible with correct dimensions.
2. After drawing the shape start cutting. Experience has though us to use a handheld circular saw. Despite cutting around a profile after lowering the blade 3mm lower than the thickness of the plate cutting with the radius shouldn't be a problem.
![photo]()
3. Cut out elements we put together the same way as in the movie. Then you screw them to construction beams using screws. Screw them ever 20cm. Carpenters vices will help here.
4. Two finished sides should be connected together using previously prepared ribs. We screw each of them using 2 small screws as the large ones may damage the beam. It's much easier to do on an even surface. Start from the top, making regular 20-25cm spaces between them. The spacing should be the same on both sides, different spacing = crooked kicker.
5. Screwing the lip plate is a difficult part because you need to attack it so it's straight and doesn't stick out nowhere. We connect the plate with the top beam using vices and pushing it into the ribs we connect it to each of them using 3 screws. Start from the top and work down from there. Try to screw the lower plate in a way that will not create a rift. It's good to screw it so that there is a 3mm overlap (as in the film) and then pressing it into place.
6. If we worked carefully the kicker should stand straight. Now we can screw the rear angled beam. Screw it using 2 large screws.
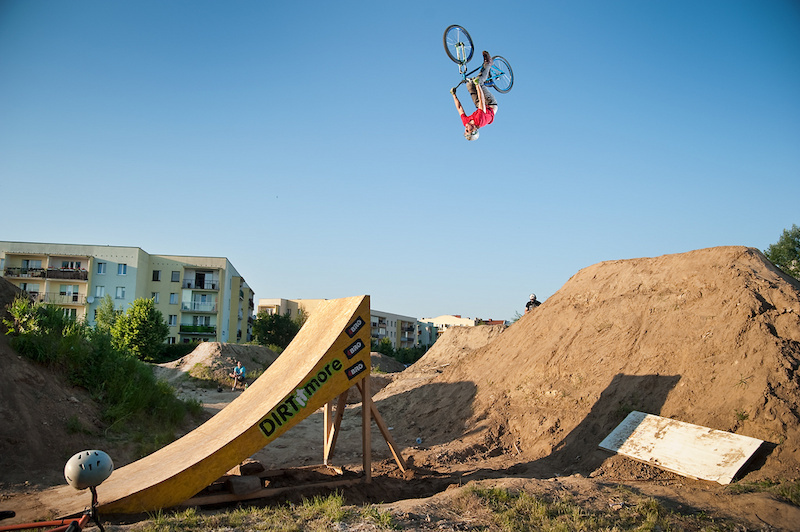
BRAVO!!! Your first kicker is finished and it looks good. Now place it next to a landing and start doing flips.
Now you need a landing. Building it remember that your safety and trick difficulty will depend on how you make it. Remember that it should be wide and have an at least 20cm ledge. Landing height and landing are very important. Try to make it at least 10% higher than the kicker. It's easier to jump that way. The landing angle should be around 30 degrees (steeper for steeper kickers and the other way around)
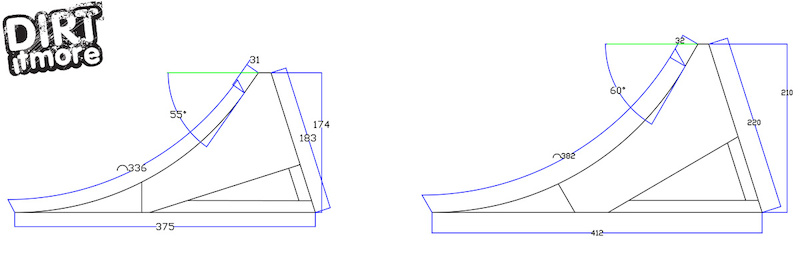
At the moment we offer you 3 jumps geometry numbers:
1. Small for beginners, for jump to 3m long.
2. Medium, steep angle, perfect for 3-5 meters dirts and for step-up.
3. Big, smooth angle for 5-7 meters jumps
![photo]()
Send us finished kicker photos. We will gladly publish them and reward young constructors.
Download the file:
Kicker plan - Big
Kicker plan - Medium
Kicker plan - Small
If you want to read more about Dirt It More projects visit our Polish Blog, English Blog and Our Facebook
Throughout the last few years we've build tens of different jumps, permanents as well as temporary builds for specific events. We started with 2m tables and ended with building over 9m doubles. In that time we came to many conclusions that now make our projects much easier and help us avoid problems.
One of the more popular ideas is a wooden kicker. Our first build like that took place in 2006. I still regret not taking photos of it because the project was amazing. We have built 2 halves of the jump from torn down furniture and the profile was drawn using a huge compass made from rope and a marker. Nowadays we use the same rules and software for making our jumps that I also use for designing Dartmoor parts.
We may not have the pictures of our first kicker but we've managed to dig up our first good kicker sketches.
Why a kicker and not a jump made from dirt?
Biggest Advantages:
Longevity, doesn't need renovation i.e. after rain.
Always stays hard, without any holes or ruts
Perfect geometry according to the plan
It can be transported
Problems:
More Expensive
You need to be good with tools
Requires patience
Don't panic though, with our tutorial you will be able to make a really cool kicker at your first try.
Good preparation is a must, before you start check if you have all the needed tools:
- A saw with adjustable cut height and maximal cut not shallower than 60mm
- Driller/Electric Screwdriver with PH2 and PZ3 tips, it's better if they are good quality.
http://swiatnarzedzi.com.pl/all/stanley/bity/konc_ph-pz-1.jpg
- At least 2 carpenter vices
- A marker or a constructors pencil
- Measuring tape.
- A ruler, best an angular one. Can be a level with a scale, at least 100cm
- A kicker plan.
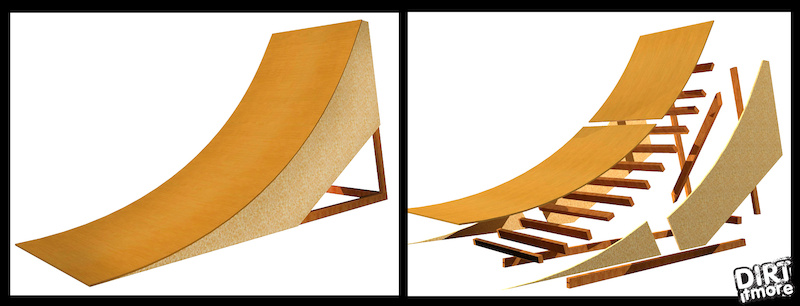
After you gather all the tools the next step is to prepare the materials. In our tutorial you will learn how to build a profile from 2 plates. It's the easiest technique for adjusting geometry and controlling the final effect.
You will need:
- 2 plates for the sides. Plywood at least 15mm or OSB plate at least 18mm.
- 2 plates for the lip. Best use 10mm plywood or in worst case OSB plate 12mm.
- Around 18 kicker ribs at least 5x10cm wide and 125cm long - (2 x the thickness of plywood in cm)
Structural beams (5x10cm cross section):
- Main beams in case of a big kicker 2x205cm, 2x390cm
- Diagonal beam on the rear of the kicker around 2m
- A beam connecting the bottom of the kicker 2x125cm long (base of the side beams + plywood/plates thickness)
- Large screws around 16cm for the PZ3 socket - around 10 pieces.
- Small screws around 5cm for the PH2 socket - around 150 pieces.
You are probably very confused by now so first maybe see a film of how we build a kicker for Warsaw's Burn Dirtpark.org so you can relate it to different build stages.

When you have all the tools you can start the work.
1. The first thing you have to do is transport the project to the side plate. Transfer dimensions one by one. Do not hurry and try to be as accurate as possible with correct dimensions.
2. After drawing the shape start cutting. Experience has though us to use a handheld circular saw. Despite cutting around a profile after lowering the blade 3mm lower than the thickness of the plate cutting with the radius shouldn't be a problem.
3. Cut out elements we put together the same way as in the movie. Then you screw them to construction beams using screws. Screw them ever 20cm. Carpenters vices will help here.
4. Two finished sides should be connected together using previously prepared ribs. We screw each of them using 2 small screws as the large ones may damage the beam. It's much easier to do on an even surface. Start from the top, making regular 20-25cm spaces between them. The spacing should be the same on both sides, different spacing = crooked kicker.
5. Screwing the lip plate is a difficult part because you need to attack it so it's straight and doesn't stick out nowhere. We connect the plate with the top beam using vices and pushing it into the ribs we connect it to each of them using 3 screws. Start from the top and work down from there. Try to screw the lower plate in a way that will not create a rift. It's good to screw it so that there is a 3mm overlap (as in the film) and then pressing it into place.
6. If we worked carefully the kicker should stand straight. Now we can screw the rear angled beam. Screw it using 2 large screws.
BRAVO!!! Your first kicker is finished and it looks good. Now place it next to a landing and start doing flips.
Now you need a landing. Building it remember that your safety and trick difficulty will depend on how you make it. Remember that it should be wide and have an at least 20cm ledge. Landing height and landing are very important. Try to make it at least 10% higher than the kicker. It's easier to jump that way. The landing angle should be around 30 degrees (steeper for steeper kickers and the other way around)
At the moment we offer you 3 jumps geometry numbers:
1. Small for beginners, for jump to 3m long.
2. Medium, steep angle, perfect for 3-5 meters dirts and for step-up.
3. Big, smooth angle for 5-7 meters jumps
Send us finished kicker photos. We will gladly publish them and reward young constructors.
Download the file:
Kicker plan - Big
Kicker plan - Medium
Kicker plan - Small
If you want to read more about Dirt It More projects visit our Polish Blog, English Blog and Our Facebook
Author Info:

Must Read This Week
Sign Up for the Pinkbike Newsletter - All the Biggest, Most Interesting Stories in your Inbox
PB Newsletter Signup
blueprints:
dirtitmore.com/blog/wp-content/uploads/2012/02/szkic-kiker-duzy-OSB.pdf
dirtitmore.com/blog/wp-content/uploads/2012/02/szkic-kiker-ma%C5%82y-OSB.pdf
www.pinkbike.com/photo/13854246
www.pinkbike.com/photo/13854241